How to enter items in the My Warehouse program. My warehouse. Working with item attributes
Warehouse allows you to create a range of goods required for work and manage the warehouse (receipts of goods to the warehouse or warehouses).
You can create any number of sections and subsections where you can place final products (spare parts, for example).
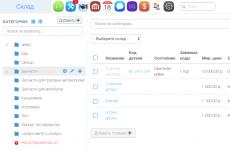
In the Item Catalog section in the Warehouse, you will see all the goods added to the item, the minimum price, cost, balance in the warehouse (in stock) and the number of goods in reserve (i.e., reserved for active work orders).
Product range
You can add sections, subsections and products, delete them and move them. Important: the system will not allow you to delete a category (section) if there are products in stock in this section.

Minimum price and cost of goods
The minimum price and cost of goods fields in the My Warehouse section are needed to calculate salaries for craftsmen (if they have a percentage of the sale of spare parts and materials for repairs).
When adding a new product to the product range, you set its cost and minimum price. The minimum price is the minimum price of a product for sale (sale) to a client within the framework of a work order. The system will not allow the master to sell the product or spare part below this set price under any circumstances (neither taking into account the client's discount, nor taking into account manual pricing).
In the screenshot below, we created the Bearing position with a cost of 80 rubles. (the price at which we purchased the goods to our warehouse) and the minimum selling price of 200 rubles. This means that the master can sell this product to a client at a price of 200 rubles. and higher (at your discretion).
How is the percentage of sales for salaries for craftsmen calculated?
Let’s say we have set up 50% of the profit from sales of any materials to motivate employees. The master will receive a percentage only from the difference between the cost of the goods and the final selling price. Let's compare two examples:
Master Sergei sold 1 bearing for 200 rubles. (the minimum possible price we set). In this case, he will receive (200-80)*0.5=60 rubles.
But master Ivan sold the same bearing for 600 rubles. (because Ivan is a brilliant salesman and knows how to persuade). In this case, Ivan already receives (600-80)*0.5=260 rubles.
Thus, the percentage of sales is calculated only from the profit from the sale. And the master is interested in selling the spare part at a higher price (especially if the client is aggressive and unfriendly), then his profit from the sale will be higher.

The percentage earned from the sale of goods will be taken into account in the employee's billing. You can always go to the section Employees - Billing - Employee's name to view all his accruals (for work or sales, with the specified order number).

Goods are loaded into the system using the Receipt to Warehouse button located in the right menu.

You can add the item name, purchase price and quantity of goods.
The name can be entered manually (the system will offer you options for existing products as soon as you start entering the name) or selected from the existing catalog by clicking on the folder icon to the right of the name. After adding the received parts, click on the “Add without invoice” button. The goods will be successfully registered at the specified warehouse.

Mass markup of goods upon arrival at the warehouse
When arriving at the warehouse, you can automatically set a mass markup for all products. The markup on the cost of selling all parts is calculated using the following formula:
"Purchase price" + [Value] (Percentage or amount) = Selling cost.
Types of addition to the purchase price:
- percentage (for example, 45% can be added to the purchase cost)
- amount (for example, you can add 1000 rubles to the purchase price)

Important: do not forget to select the supplier and warehouse where the goods were received at the top of the screen. The system will not allow you to add products to the system if you have not specified a supplier or warehouse. You can select them from the existing list or add new ones.


It is also possible to import warehouse categories and items from Excel into Auto iDirector (via a CSV file).
There is an import option “only new”: in this case, the import creates only new categories and items of the product catalog in the warehouse, old products are not modified.
The import function is available only to a user with "General Director" rights.
To import, go to the section WAREHOUSE - RECEIPT TO WAREHOUSE - IMPORT FROM EXCEL.

In the section that opens, indicate the category of imported goods, warehouse for receipt, supplier, comments (if any) and upload the file from your computer.

Warehouses
You can create, edit and delete your warehouses.
List of operations
In the "List of Operations" section you can see all operations related to the movement of goods from the warehouse and to the warehouse. The system will show you how many goods arrived at the warehouse and were written off, the total cost, the document (i.e., under which purchase order the spare parts were written off) and the supplier.

How to write off or move all items from the warehouse?
There are situations when you need to write off all positions from a warehouse (if you liquidate it and delete it from CRM Auto iDirector, for example) or move it to another warehouse. To do this, in the “Warehouse” - “Movement of goods” section there is a button “Select everything from the warehouse”. When you click on it, all available items in the warehouse will be automatically written off or added to another warehouse (this option is selected in the "Replenishment warehouse" list).

", based on the universal platform "1C:Enterprise 8", provides the ability to work with both different units of measurement and packaging. This is a very important option, since products are often marketed in packaging containing a certain number of units of goods, and they need to be sold individually.
To do this, the program implements the ability to register goods immediately in packages: the software can independently convert everything into the required units of measurement. To take advantage of this convenient feature, you will first need to activate it in the settings, while simultaneously adding information about the types of packaging used to the database.
Algorithm of actions
In the “Administration” section, select the item settings item.
A window will open - activate the “Item Packaging” item in it. After activating it, the field we need will appear in the item settings.
Important!
Before entering information about the packaging, you need to check the presence of all the units of measurement necessary for the work in the directory. Products can be sold by weight, by the piece, by the meter, in sets and in other ways. Therefore, the packaging itself becomes a kind of unit of measurement, which means that it must also be present in the corresponding directory (all directories in “Retail” are located in the regulatory and reference information section).
Go to this section and select the reference book of units of measurement (group “Nomenclature”). It contains the most necessary types of units of measurement:
- meters
- kilograms
- Cubic Meters
- pieces
You can add an additional view there in 2 ways:
- creating a new unit yourself
- use of OKEI (All-Russian Classifier of Units of Measurement)
The latter is preferable to avoid confusion. In addition, OKEI is pre-installed in the system.
Working with the classifier
It is quite extensive, and not all positions in it are related to trading. To quickly find the required unit, we begin to enter its name from the keyboard. The software will immediately suggest a suitable option. In this case, the input field will be absent at first, but will appear immediately as soon as we start typing the word. When a suitable unit appears, mark it and click “OK”.
We also open the card of the new item and see what details it has. "1C: Retail" supports 2 types of item sets:
- individual- is activated when each of its positions uses its own type of packaging;
- general- involves the use of one type of packaging for a group of goods.
If different categories of goods in similar packaging are received for sale, it is necessary that when they arrive, the program itself can calculate how many units of goods have arrived at the warehouse.
Further actions
Although the change unit “Packaging” has been added to the database, the software cannot yet apply it, since it is not known how many and what specific units of the item are present in each of the packages. In order for the configuration to be able to account for goods accordingly, we need to indicate which packaging and for which products we will use. For this purpose, you will have to create the required sets of packaging.
First, open the directory of the same name. Now we need to start creating a new set: we will indicate its name, the unit of measurement in which the nomenclature will be taken into account, for which the packaging of the new set will be used. Let, for example, these be things. We fill in these fields, go to setting up packages and adding a new one.
In the package creation window that appears, you need to specify its type and the number of product units included in it. “Name” will be filled in automatically, based on the configured settings. Just below there are 2 more fields, where the weight of the package with the goods (gross) and volume (in cubic meters) are indicated.
Next, we add to the set the packaging with the number of units of goods in the same way. Now the created set of packages can already be assigned to an item during its creation or immediately at the item type level. We create the required item with individual characteristics, for which the set we created will be used by default.
First, let's create a new type, then on the default values tab, select a set of packages for our item. Next, the program will automatically substitute pieces as a unit of measurement (in our example), since the set we have chosen must be completed individually.
Now we simply indicate the VAT rate for the product and select a product group for automatic distribution of the product. These settings, in principle, can be set later, when creating item items, however, if you specify them at this stage, the item card will be filled in automatically in the future.
After saving a created or modified item type, its settings will be automatically protected from editing, but the updated parameters of the packaging set belonging to the item will still be applied to it, which is very convenient. That is, if we subsequently have goods in different quantities in packages, we only need to add one more package to the set. In order to accept products in such packaging in the future, you will not need to change the item settings.
Directory "Nomenclature" V 1C Accounting Enterprise 8 has a much wider application than the same reference book in Accounting version 7.7.
Let's look at it in detail using an example 1C Accounting 8 edition 3.0.
In the "eight" this directory is used to store information about all inventory items and services enterprises. Unlike version 7.7, in which each type of inventory had its own directory, here all information is stored in a common directory in different groups.
This directory stores information about materials, products, semi-finished products, containers, equipment, goods, services, workwear and special equipment.
Find reference book "Nomenclature" You can go to the accounting section “Nomenclature and Warehouse” by clicking on the “Nomenclature” hyperlink. The directory list form will open.
The directory has a multi-level hierarchical structure. By default, it already contains groups for the types of inventory items for which it is intended to store information, but the user can also create their own groups.
When you create a group, you can go straight to for that group.

Let's take a closer look at the directory details when entering a new element.
The required details are the short name of the item and the unit of measurement of the item. Moreover, when you enter a new directory item, the item item is filled in automatically. The remaining details can be left blank, but this will affect the automatic completion of documents when selecting this directory element.

The “Group” attribute contains the directory group to which this element belongs. By default, directory groups " Nomenclature" are types of inventory items. By default, settings are made in the system for item groups specified in advance inventory accounts, so if you enter a directory element outside the existing groups or in the wrong group, you should be prepared to incorrectly fill out the accounting accounts in the receipt and sales documents when using this directory element.
In the “Full name” attribute, you can specify the name of the item as it will be printed in documents. By default, the full name duplicates the short name after it is entered.
The “Service” flag is checked if this item of the nomenclature relates to services (that the organization provides or that third parties provide to our organization). To reflect the receipt or sale of services in the program, special tabular parts are provided in the documents, and the system will not allow the receipt of services to be reflected in the “Goods” tabular part.
In the “Manufacturer” attribute, if necessary, you can indicate the manufacturer of the product (material, equipment) by entering it in the “Counterparties” directory and selecting it in the attribute.
The “Article” attribute indicates the article number of the product. It can be used in printed document forms if configured appropriately.
The unit of measurement of the nomenclature is selected from the reference book “Classifier of units of measurement”. The default value is automatically set to "piece". It can be changed if necessary.
The “VAT” detail is filled in with the default VAT rate and this value is inserted into receipt and sales documents.
The “Nomenclature group” attribute is filled in with the value from the “Nomenclature groups” reference book and is used when accounting for the costs of production and sale of items, as well as when determining revenue from the sale of products, goods, and services. Nomenclature group should not be confused with the “Nomenclature” directory group - this is the most important section of analytics in 1C Accounting, and there will be a separate article about this. The value of this attribute is substituted into the implementation documents.
The next group of details is filled in only for imported goods and is used for substitution in receipt documents and invoices.
- The “Importer” detail is selected from the “Counterparties” directory.
- The “Country of Origin” attribute is selected from the “Countries of the World” classifier
- The “GTD” detail is filled in with the number of the cargo customs declaration from the corresponding directory.
The details “Cost Item” and “Specification” are used to automatically include in documents the transfer of materials and semi-finished products into production. The cost item is selected from the “Cost Items” directory; the specification is the main specification of the item from the “Specifications” directory.
On the left in the form of the “Nomenclature” directory element there is a navigation panel for this element.

The panel elements relate to different types of inventory items and therefore are not all used at the same time.
For example, the item “Counter output” opens the information register “Counter output of products, services”, which is intended for setting up rules for calculating the cost of counter output of products and services and writing them off for own needs.

The “Use Purposes” item opens the “Use Purposes” directory. It is designed to store information about

The “Rules for determining accounting accounts” item opens a list of rules configured in, to which this item of nomenclature falls.

You can enter a new rule for determining accounting accounts for this element by selecting the item “ Item accounting accounts».

The “Information on alcoholic products” item opens the “Information on alcoholic products” register, which is filled out only for items that are alcoholic products and serves to fill out a declaration on the volume of retail sales of alcoholic and alcohol-containing products.

The “Specifications” item opens a list of specifications for a given item and is used for the type of inventory items – products, self-made semi-finished products, services.

In the item “Item prices” you can specify all types of current prices for a given directory element. By clicking on the “Write prices” button, a “Setting item prices” document is created for each type of price for the date specified in the “Get/set prices for date” attribute. By clicking on a cell with a link to a document, you can activate the row and use the document view button.

When entering documents daily, an accountant can significantly facilitate the process of entering invoices if he uses product selection mechanism from the reference book, which is written about in detail.
Video tutorial:
This is undoubtedly the best software for keeping inventory records. The advantages of the program include a simple user interface and ease of learning. The program allows you to keep full records of goods and money from a kiosk to a large wholesale warehouse. For users who value mobility, there is a version created using portable application technology (portable edition). The program in this version can be installed either on the computer’s hard drive or on removable media (USB-flash, etc.) and can be freely moved from computer to computer.
This is a simple, reliable and flexible program for automating trade, warehouse and production. Easy to deploy, the program requires a minimum of effort to implement and has an affordable price. A free trial version is available.
The program is designed for maintaining operational warehouse accounting. The program allows you to track the balances of goods and materials in the warehouse and receive reports on balances as of any date. Commodity accounting is based on maintaining warehouse accounting cards.
The program "IP: Trade Warehouse" is part of the Info-Enterprise program system. "IP: Trade Warehouse" allows you to easily and conveniently automate warehouse accounting at a trading enterprise. Among the users of our program are wholesale and retail trade enterprises, chain stores, and wholesale warehouses. Despite its trade orientation, "IP: Trade Warehouse" allows you to keep records of materials, finished products, small business products, i.e. The program can be used wherever warehouse accounting is necessary.
As with other FOLIO programs, no special knowledge is required to operate, other than familiarity with MS Windows.
Warehouse accounting "Warehouse+" is a very simple and convenient program that has the most necessary capabilities. Formation of incoming and outgoing documents. Printing of invoice, invoice, invoice and receipt order. Calculation of three sales prices with given coefficients relative to the purchase price, followed by the ability to select one of these prices to form sales prices for a specific buyer.
"1C: Accounting 8" is a universal mass-use program for automating accounting and tax accounting, including the preparation of mandatory (regulated) reporting. This is a ready-made solution for accounting in organizations engaged in any type of commercial activity: wholesale and retail trade, commission trade (including subcommission), provision of services, production, etc. In addition, with the help of "1C: Accounting 8" individual entrepreneurs who apply a simplified taxation system or a general taxation regime can keep records.
The "Azhur-SKLAD" program is designed to automate the cycle of accounting for warehouse operations. The system includes a full cycle of accounting for all types of warehouse transactions of receipt, accounting of expenditure transactions and preparation of analytical reporting.
This is a trade and warehouse program for comprehensive control over the activities of wholesale, retail, wholesale-retail and other trading enterprises - from a kiosk to a supermarket. The program allows you to carry out and formalize all types of trade and warehouse operations, account for funds and control mutual settlements with clients, maintain all the necessary documentation and analyze the work of the entire enterprise.
"Microinvest Warehouse Pro" is an industry solution that is an automation system for “network” retail structures (self-service stores and/or counter sales), warehouse facilities and restaurants. "Microinvest Warehouse Pro" meets all the requirements for the movement of commodity resources within the enterprise itself or in a network of enterprises connected by their commercial or production activities.
"Tirika-Shop" is a very simple but very powerful program for a store. It can do everything, but at the same time it is so easy to use that even an inexperienced user will master it in five minutes. The program is suitable for a store of any profile: groceries, building materials, auto parts, clothing, and so on.
"RM-SKLAD Warehouse Accounting" is a program for maintaining warehouse accounting and trade operations in an enterprise of any form of ownership. It is primarily intended for small and medium-sized businesses. The program can be used in small shops, warehouses, and production for operational accounting of goods and materials.
"Warehouse and Trade" is a simple, reliable program for automating trade and warehouse accounting. It allows you to easily and quickly create primary documents (invoices, invoices, invoices, contracts, etc.), control stock balances, keep records of sales and receipt of goods, make reservations, keep records of debts to customers and suppliers, take into account purchase prices and calculate the cost of products during production, calculate the profit received and much more. The program has extensive interface customization options.
In order to add a new category to the online store, you need to go to Admin - Catalog - Categories / Products - fig. 1.

In front of you you see the current list of categories of your online store (in our case, the list of categories is empty, because the store has just been installed and not a single category has been created yet). In order to add a new category, you must click the button - New category - fig. 3.

By clicking the button, you will go to the page adding a new category - fig. 4.

On the page you will see a form with the following fields:
This field must be filled in; here you indicate the name of the category being created.
This field can be skipped, i.e. leave blank. The detailed name of the category is indicated here.
This field can be skipped, i.e. leave blank. A detailed description of the category is indicated here; the visitor will see this description when he enters this category of your store.
This field can be skipped, i.e. leave blank. This specifies the title value in the browser window for the category being created. If the field is not filled in, the browser header will display the category name that you specified above in the Category Name field.
Meta Description
This field can be skipped, i.e. leave blank. Here you specify the value of the meta description tag for the created category.
This field can be skipped, i.e. leave blank. Here you specify the value of the meta keywords tag for the category being created.
Additional tab:
This field can be skipped; here you can specify how the link to the category will look. Only ASCII characters can be entered in this field, and the address must end in .html. Example of filling out the field: roga-i-kopyta.html
Product list template
Here you can choose which template will be used to display products within the created category. Templates are located in the /templates/template/module/product_listing folder. Using this option, you can customize the appearance of the product list within a category.
Here you can choose which template will be used to display subcategories within the created category. Category templates are located in the /templates/template/module/categorie_listing folder. Using this option, you can customize the appearance of the list of subcategories within a category.
Product sorting
The parameter by which products within the category will be sorted.
Product sorting
Here you can choose exactly how the products will be sorted: ASC - ascending or DESC - descending.
Sorting order
This field can be skipped, i.e. leave blank. Here you specify the sorting order of the created category, i.e. If you have more than one category in your catalog and you want the categories to be displayed in a certain order, then you can use this field. Here you can enter numbers, i.e. if the Test category has a sort order of 1 and the Test 2 category has a sort order of 2, then the Test category will be located above the Test1 category
If you want the category to be created active, i.e. was visible to visitors of the online store immediately after creation, check the box, otherwise the category will be created inactive, i.e. the category will be visible only in the admin panel, but will not be visible to visitors in the catalog.
This must be filled in, it is recommended to use an image no larger than 80x40 pixels, or, if there is no image for the category being created, add a transparent gif image 1x1 pixels in size. The uploaded image will be visible to store visitors when viewing the category you create.


Adjusting an existing category
In order to change the category in the online store, you need to go to Admin - Catalog - Categories / Products - fig. 1.


Editing a category allows you to change any data of an already created category, i.e. change the name of an existing category, category title, category description, meta title, meta description, meta keywords, change the category picture or sort order.
For example, let's edit the Horns category. To edit the category, you need to mark the category and click the Edit button on the right - fig. 3.

By clicking the button, you should see a completed form with information about this category - fig. 4.

In this field you can see the current category name, you can change the category name to a new one.
In this field you can see the current category title if you specified it earlier, or just an empty field if you did not specify a title when creating the category. You can either do nothing with this field, i.e. leave the title as is, you can add a title to the current category if it did not exist, or delete the existing value of the category title field if it is not needed.
In this field you can see the current description of the category if you specified it earlier, or just an empty field if you did not specify a description when creating the category. You can either do nothing with this field, i.e. leave the description as is, you can add a description to the current category if there was none, or delete an existing description if it is not needed.
In this field you can see the current value of the meta title tag for this category, if it was added earlier, or an empty field if you did not fill in this field when creating the category. You can change the current value of this field, delete the existing value, or do nothing and leave everything as is.
Meta Description
In this field you can see the current value of the meta description tag for this category, if it was added earlier, or an empty field if you did not fill in this field when creating the category. You can change the current value of this field, delete the existing value, or do nothing and leave everything as is.
In this field you can see the current value of the meta keywords tag for this category, if it was added earlier, or an empty field if you did not fill in this field when creating the category. You can change the current value of this field, delete the existing value, or do nothing and leave everything as is.
Additional tab:
The current SEO URL of the category, if it was specified during creation. You can specify how the category link will look. Only ASCII characters can be entered in this field, and the address must end in .html. Example of filling out the field: roga-i-kopyta.html
Product list template
Current product list template. Here you can choose which template will be used to display products within the edited category. Templates are located in the /templates/template/module/product_listing folder. Using this option, you can customize the appearance of the product list within a category.
Current category list template. Here you can choose which template will be used to display subcategories within the edited category. Category templates are located in the /templates/template/module/categorie_listing folder. Using this option, you can customize the appearance of the list of subcategories within a category.
Product sorting
The current collation option, i.e. the parameter by which products within the category will be sorted. You can change the current value.
Product sorting
The current sort option. Here you can choose exactly how the products will be sorted: ASC - ascending or DESC - descending. You can change the current value.
Sorting order
This field must indicate the current sort order for this category, or 0 if the sort order was not specified when creating the category. You can change the current value of the field, or leave everything as it is.
This should indicate the current status of the category; if checked, the category is active; if not checked, the category is inactive.
You can change any field on this form. For example, let's change the name of the category from Horns to Hooves.


Move an existing category
In order to move a category, you need to go to Admin - Catalog - Categories / Products - fig. 1.

You will be taken to the product catalog management page of your online store and see a list of current online store categories - Fig. 2.

For example, let's move the Hooves category to the Horns category.

By clicking the button, you will go to the category moving page - fig. 4.

In the Move all to: field, select the Horns category and click the Move button - fig. 5.

You will go to the Horns category page and see that the Hooves category is now in this category - fig. 6.

Accordingly, only one Horn category remained in the root section - rice. 7.

Delete an existing category
In order to delete a category, you need to go to Admin - Catalog - Categories / Products - fig. 1.

You will be taken to the product catalog management page of your online store and see a list of current online store categories - Fig. 2.

Let's say we want to delete the Hooves category, which is located in the Horns category, for this we need to enter the Horns category, in order to go inside the category, click the folder picture to the left of the category name - fig. 3.


By clicking the Delete button, you will be redirected to the confirmation page for deleting the category - fig. 6.

If you really want to delete a category, click the Delete button (Fig. 7).

If you do not want to delete the category, or clicked the button by mistake, click Cancel - fig. 8.

| Comment | |
|---|---|
By clicking the Delete button, you will go to the general list of categories and see that the Hooves category has been deleted - fig. 9.

Working with the Manufacturers' Directory
Creating a Manufacturer
In order to add a new manufacturer to the online store, you need to go to Admin - Catalog - Manufacturers - fig. 1.

So, you have visited the Admin page - Catalog - Manufacturers. A page will be loaded with a list of already added manufacturers, or with an empty list if no manufacturers have been added at the moment.
To add a new manufacturer, click the Add button - fig. 3.
By clicking the Add button you will see a page for adding a new manufacturer - fig. 4.

The form for adding a new manufacturer contains the following fields:
Manufacturer Name
This field must be filled in; here you indicate the name of the manufacturer to be created.
Manufacturer's Picture
Here you must add the logo of the manufacturer you are creating. It is recommended to upload a logo no larger than 80x40 pixels. JPG and GIF formats are supported. If you do not have a logo for the manufacturer you are creating, upload a transparent GIF image sized 1x1 pixels.
Manufacturer URL
This field can be skipped, i.e. leave blank. Here is a link to the manufacturer's official website. If you don't know the link to the official website, or simply don't want to add a link to the official website, just skip this field.

You will see that a new manufacturer has been added to the list - fig. 6.
Adjustment of an existing manufacturer
To change the manufacturer in the online store, you need to go to Admin - Catalog - Manufacturers - fig. 1.

You will be taken to a page with a list of manufacturers of your online store - fig. 2.
Editing a manufacturer allows you to change any data of an already added manufacturer. To edit a manufacturer, you need to select the manufacturer you want to edit by clicking once on the manufacturer's name with the left mouse button. Let's say we edit the manufacturer Example.
Select the manufacturer Example by clicking on the name, then click the Edit button on the right - fig. 3.
By clicking the Edit button, you will be redirected to the manufacturer editing page - fig. 4.
You should see a completed form with information about this manufacturer. Editing a manufacturer allows you to change any data of an already added manufacturer. You can change any field in this form:
Manufacturer Name
In this field you can see the name of the manufacturer. You can change the name, or do nothing and leave everything as is. Instead of Example we will write Sony.
Manufacturer's Picture
In this field you can see a picture (logo) of the manufacturer, or just an empty field if you did not specify a picture when creating the manufacturer. You can either do nothing with this field, i.e. leave the current picture, you can add a new picture, or do nothing and leave everything as is. It is recommended to upload a logo no larger than 80x40 pixels. JPG and GIF formats are supported. If you do not have a logo for the manufacturer you are creating, upload a transparent GIF image sized 1x1 pixels.
Manufacturer URL
In this field you can see an external link to the official website of the manufacturer, if it was added when creating the manufacturer, or just an empty field if you did not specify the link when creating the manufacturer. You can either do nothing with this field, i.e. leave the current link, you can change the current link, or add a link to the manufacturer’s official website.
After making the necessary changes to the form, click the Save button - fig. 5.

Removing an existing manufacturer
To delete a manufacturer in the online store, go to Admin - Catalog - Manufacturers - fig. 1.

You will be taken to a page with a list of manufacturers of your online store - fig. 2.
Next, you need to select the manufacturer you want to delete. Let's say we want to delete the Sony manufacturer, to do this we need to select the Sony manufacturer (if it is not already selected) and click the Delete button on the right - fig. 3, in order to select a manufacturer, click once with the left mouse button on the manufacturer's name.
By clicking the Delete button, you will be asked - “Are you sure you want to delete this manufacturer?” - rice. 4.

If you really want to delete the manufacturer, click the Delete button - fig. 5.

If you do not want to delete the manufacturer, or clicked the button by mistake, click Cancel - fig. 6.

Confirmation of manufacturer deletion is necessary to prevent accidental deletion of the manufacturer.
By clicking the Delete button, you will go to the general list of manufacturers and see that the Sony manufacturer has been deleted - fig. 7.
Working with the item reference book
Creating a new product item
To add a new product to the online store, go to the Admin - Catalog - Categories / Products - fig. 1.

You will be taken to the product catalog management page of your online store - fig. 2.

Let's say you want to add a product to the Horns category, for this we need to enter the Horns category, in order to go inside the category, click the folder picture to the left of the category name - fig. 3.


To add a product to a category, click the New product button - fig. 5.

By clicking the button, you should see a page for adding a new product with the following fields - fig. 6:

Product Name
This field must be filled in; here you indicate the name of the product to be added, maximum length 255 characters.
Product URL
This field can be skipped; here you can specify an external link to the product being added, for example to the manufacturer’s website with a description of this product. Usually this field is skipped, i.e. left blank. If you still decide to add an external link, keep in mind that you need to write the address without http://, i.e. if the link address is http://www.intel.ru/product1/index.html, then you need to write www.intel.ru/product1/index.html in this field, i.e. without http://
Product description
Here you indicate a detailed description of the product to be added. The description of the product that you specify in this field will be displayed when you view the product in detail in the online store. You can skip this field, i.e. leave it blank, but without a description, the product looks less attractive; the better the description of the product, the greater the likelihood that an order for this product will be placed in your online store. Take writing product descriptions very seriously. If you have Internet Explorer 5.5 or higher, you can also use the built-in HTML editor to compose a description (the HTML editor is enabled by default, but can be turned off at any time if it interferes or is simply not necessary).
Short description
This field can be skipped; here you can provide a brief description of the product, if you wish. A brief description of the product will be displayed in the online store when viewing the list of products in your online store. In addition, a brief description is used to work with the Yandex-Market and Rambler-Shopping systems. In most cases, this field is simply skipped and left blank.
This field can be skipped, i.e. leave blank. Here you can specify words, separated by commas, by which you can find the product in the catalog.
This field can be skipped, i.e. leave blank. Here you can specify the title value in the browser window for the product being added. If the field is not filled in, the browser header will display the product name that you specified above in the Product Name field.
Meta Description
This field can be skipped, i.e. leave blank. Here you specify the value of the meta description tag for the added product.
This field can be skipped, i.e. leave blank. Here you can specify the value of the meta keywords tag for the product being added.
Additional tab:
Here you must indicate the status of the product being added. The default is Active; in most cases this field is simply skipped. If you specify Active, then this product will be visible to visitors of your online store and they will be able to order it; if you specify Inactive, then the product will be added to the catalog, but will be visible only in the administrative part and will not be visible to visitors of the online store and, Accordingly, visitors to the online store will not be able to order this product.
On the home page
Here you can specify whether to show this product on the main page in the center (Yes) or not to show it (No).
Product SEO URL
This field can be skipped; here you can specify how the link to the product will look like. Only ASCII characters can be entered in this field, and the address must end in .html. Example of filling out the field: nokia-n95.html
Quantity of goods
This field can be skipped, here you can indicate the quantity of goods that are in stock, if checking the quantity of goods is enabled (by default it is enabled), then if, when placing an order in the online store, the buyer orders a larger quantity of goods, than what is actually in stock, he will receive a notification that the warehouse does not have the quantity that he is trying to order and will be asked to either complete the order or postpone the order. In most cases, when there is no need to limit the quantity of goods, simply specify the number 1000000 in this option or disable checking the availability of goods in stock in the store settings.
Product weight
This field can be skipped; here you can specify the weight of the product; this option can be used when calculating the cost of delivering the order to the buyer. Weight is indicated in kilograms. For example, if the weight of a product is 253 grams, then you need to write 0.253, if the weight is 2 kg, then you need to write 2, etc.
Product code
This field can be skipped; here you can specify a unique product code. If you do not have a code for the product you are adding, simply skip this step and move on to the next one.
Barcode
This field can be skipped; here you can specify the barcode of the product code. If you don't have the barcode information, simply skip this step and move on to the next one.
Manufacturer
This field can be skipped if you do not want to indicate the manufacturer of the product being added. The list of manufacturers is added in the Catalog - Manufacturers section.
Product under 18 years of age
If it is set to yes, then the created product will be visible in the catalog, but only buyers whose age has reached 18 years will be able to order it; if it is set to no, then any visitor will be able to order the created product. This option is convenient to use for products that are currently out of stock, i.e. such products will simply not be available for order.
Delivery time
Estimated time for delivery of goods. Delivery options are configured in the Admin - Settings - Delivery time.
Template for product description
Here you can choose which template will be used to display the product card page. Templates are located in the /templates/template/module/product_info folder. Using this option, you can customize the appearance of the product description page.
Template for product attributes
Here you can choose which template will be used to display product attributes. Templates are located in the /templates/template/module/product_options folder. Using this option, you can configure the external attributes of the product.
Yandex Market
This field is necessary for working with systems such as Yandex-Market and Rambler-Shopping; if you do not cooperate with these systems, simply skip this item and move on to the next one. You can configure which products to show for a system like Yandex Market, and which not to show.
Availability date
In most cases, this field is simply skipped. It is necessary if the product you are adding is not in your warehouse. You can indicate the date of receipt of the goods at the warehouse by clicking once with the left mouse button on the calendar. Having indicated the date of receipt of the goods at the warehouse, in the online store on the main page in the center the block Expected goods will be displayed, in which this product will be visible and the date of receipt of the goods at the warehouse is indicated; such goods cannot be ordered by a store visitor.
Sorting (on the main page)
This field can be skipped; here you can specify the sorting order of the goods on the main page of the store, in the center, in the New Items block (the option on the Main page must be set to Yes), i.e. You can sort, display products. For example, for product A to be in first place on the main page, put 1 in this field; for product B to be in second place, put 2, etc.
This field can be skipped; here you can specify the sorting order of the goods. For example, using this field you can display any product above all others, and you can sort the product display yourself. For example, you can display product A as the very first in the list of products, and product B as the last. To do this, write 1 to product A in this field, and write 10000 to product B. That is. Using this field, product display priorities are set.
Product Pictures Bookmark:
Product picture
This field can be skipped if the product does not have a picture; here you can specify a picture of the product that will be displayed in the list of products in your online store. The added picture will be automatically cut into three sizes according to the settings of the Admin - Settings - General - Pictures. A product can have an unlimited number of pictures, not just one. If you need more than one picture, change the option Admin - Settings - General - Pictures - Number of additional product pictures.
Download directory
This field can be skipped, i.e. just skip and move on to the next one. You can upload images in subdirectories inside the /images/product_info folder. For example, create a moi_kartinki folder in /images/product_images/original_images (and also create the same folder in info_images, popup_images and thumbnail_images, i.e. create a subdirectory for all image types and sizes). Then you can select your moi_kartinki directory in this option. This option is necessary in order to arrange pictures on shelves, and not mix everything in a heap. In some cases, a very convenient and necessary feature.
Prices tab:
The price of the product
This field must be filled in, here you indicate the cost of the product in the default currency that you are adding, it costs 130 rubles, you need to indicate 130 in this field, without any symbols ($, rub., etc.), just number.
Visitor
You can skip this field if you have the same price for the product for all customers. Using this field, you can specify different prices for goods for different groups of customers. In this case, here you can specify the price of the product for buyers from the Visitor group. Buyer groups are configured in the Admin Panel - Buyers - Customer Groups.
Buyer
You can skip this field if you have the same price for the product for all customers. Using this field, you can specify different prices for goods for different groups of customers. In this case, here you can specify the price of the product for buyers from the Buyer group. Buyer groups are configured in the Admin Panel - Buyers - Customer Groups.
Wholesale buyer
You can skip this field if you have the same price for the product for all customers. Using this field, you can specify different prices for goods for different groups of customers. In this case, here you can specify the price of the product for buyers from the Wholesale buyer group. Buyer groups are configured in the Admin Panel - Buyers - Customer Groups.
Maximum possible discount
This field can be skipped; here you can specify the size of the maximum discount that this product can have. Read the corresponding section about discount settings.
Tax class
This field can be skipped; here you can specify the tax that will be added to the price of the product, which you indicate in the next field.
Show packaging unit
This field can be skipped; here you can specify whether to show the packaging or not. Packaging is configured in the Admin Panel - Settings - Packaging Unit.
Meaning
This field can be skipped; here you can indicate how many units of the product fit into the package. Packaging is configured in the Admin Panel - Settings - Packaging Unit.
This field can be skipped; here you can specify the type of packaging. Packaging is configured in the Admin Panel - Settings - Packaging Unit.


Adjustment of item item
To change an existing product in the online store, go to Admin - Catalog - Categories / Products - fig. 1.

You will be taken to the product catalog management page of your online store - fig. 2.

Let's say we edit the product Deer Antlers in the Antlers category. We need to enter the Horns category, in order to go inside the category, click the folder picture to the left of the category name - fig. 3.


To edit a product, you need to mark the product Deer Antlers and click the Edit button on the right - fig. 5.

By clicking the Edit button, you will be redirected to the product editing page. You should see a completed form with information about this product. Editing a product allows you to change any data of a product already added to the catalog. You can change any field and any option in this form:
Product Name
In this field you can see the name of the product being edited. You can change the name of the product, or do nothing and leave everything as is.
Product URL
In this field you can see the external URL link for the edited product, if it was added when creating the product. You can change the current link, delete an existing link, or do nothing and leave everything as is. If you still decide to add an external link, keep in mind that you need to write the address without http://, i.e. if the link address is http://www.intel.ru/product1/index.html, then you need to write www.intel.ru/product1/index.html in this field, i.e. without http://
Product description
In this field you can see a description of the product, or just an empty field if you did not specify a description when adding the product. The description of the product that you specify in this field will be displayed when you view the product in detail in the online store. You can either do nothing with this field, i.e. leave the description as is, you can add a description to the product if there was none, or delete an existing description if it is not necessary. You can also use the built-in HTML editor to create a description (the picture button turns on/off the HTML editor under this field).
Short description
In this field you can see a brief description of the product, or just an empty field if you did not specify a brief description when adding the product. You can either do nothing with this field, i.e. leave the short description as is, you can add a short description to the product if there was none, or delete the existing short description if it is not necessary. A brief description of the product will be displayed in the online store when viewing the list of products in your online store. In addition, a brief description is used to work with the Yandex-Market and Rambler-Shopping systems. In most cases, this field is simply skipped and left blank.
Additional search words
This field indicates the current search words, if they were specified when creating the product. You can change the current value of this field, delete the existing value, or do nothing and leave everything as is.
In this field you can see the current value of the meta title tag for the edited product, if it was added earlier, or an empty field if you did not fill in this field when creating the product. You can change the current value of this field, delete the existing value, or do nothing and leave everything as is.
Meta Description
In this field you can see the current value of the meta description tag for the edited product, if it was added earlier, or an empty field if you did not fill in this field when creating the product. You can change the current value of this field, delete the existing value, or do nothing and leave everything as is.
In this field you can see the current value of the meta keywords tag for the edited product, if it was added earlier, or an empty field if you did not fill in this field when creating the product. You can change the current value of this field, delete the existing value, or do nothing and leave everything as is.
Additional tab:
In this field you can see the current status of the product. If the status is Active, then this product will be visible to visitors of your online store and they will be able to order it; if the status is Inactive, then the product will be added to the catalog, but will be visible only in the administrative part and will not be visible to visitors of the online store and, Accordingly, visitors to the online store will not be able to order this product. You can change the current status of the product, or do nothing and leave everything as is.
On the home page
This field indicates the current value of the option. Show this product on the main page in the center (Yes) or not show it (No). You can change the value of this option.
Product SEO URL
The current SEO URL of the product, if it was specified during creation. You can specify how the product link will look. Only ASCII characters can be entered in this field, and the address must end in .html. Example of filling out the field: nokia-n95.html
Quantity of goods
In this field you can see the quantity of this product in stock. You can change the quantity, delete an existing value, or do nothing and leave everything as is.
Product weight
In this field you can see the weight of the product if it was added when creating the product. You can change the current weight of the product, delete the existing weight, or do nothing and leave everything as is. Weight is indicated in kilograms. For example, if the weight of a product is 100 grams, then you need to write 0.1, if the weight is 2 kg, then you need to write 2, etc.
Product code
In this field you can see the current product code. You can change the product code, delete an existing product code, or do nothing and leave everything as is.
Barcode
In this field you can see the current barcode of the product. You can change the product barcode, delete the existing code, or do nothing and leave everything as is.
Manufacturer
In this field you can see the manufacturer of the edited product, if it was specified when adding the product, or an empty field if the manufacturer was not specified. You can select a manufacturer for the product you are editing from the drop-down list of existing manufacturers, or do nothing and leave everything as is. The list of manufacturers is added in the Catalog - Manufacturers section.
Product under 18 years of age
In this field you can see the current status of the option. If it is set to yes, then the created product will be visible in the catalog, but only buyers whose age has reached 18 years will be able to order it; if it is set to no, then any visitor will be able to order the created product. This option is convenient to use for products that are currently out of stock, i.e. such products will simply not be available for order. You can change the current status.
Delivery time
In this field you can see the current status of the delivery time option. You can change the current status. Delivery options are configured in the Admin - Settings - Delivery time.
Template for product description
In this field you can see the current template. You can change the template. Here you can choose which template will be used to display the product card page. Templates are located in the /templates/template/module/product_info folder. Using this option, you can customize the appearance of the product description page.
Template for product attributes
In this field you can see the current template. You can change the template. Here you can choose which template will be used to display product attributes. Templates are located in the /templates/template/module/product_options folder. Using this option, you can configure the external attributes of the product.
Yandex Market
In this field you can see the status Enabled or Not enabled; the default status is Enabled. This field is necessary for working with the Yandex-Market and Rambler-Shopping systems; it allows you to control which products should be available to these systems and which should not, i.e. if Enable is specified, then this product is added to the XML file generated for the Yandex-Market and Rambler-Shopping systems; if Not Include is specified, then this product will not be added to the generated XML file and, accordingly, to the Yandex-Market and Rambler-Shopping systems . You can change the status for this product, or do nothing and leave everything as is. If you are not clients of the Yandex-Market and Rambler-Shopping systems, simply skip this option, leave it as is, this does not affect the performance of the store in any way.
Availability date
In this field you can see the date of receipt of the goods at the warehouse, if it was specified earlier, or an empty field, because in most cases this field is simply skipped when added. It is necessary if the product you are adding is in transit and is actually not in your warehouse. You can indicate the date of receipt of the goods at the warehouse by clicking once with the left mouse button on the calendar opposite the form. Having indicated the date of receipt of the goods at the warehouse, in the online store on the main page the block Expected goods will be displayed, in which this product will be visible and the date of receipt of the goods at the warehouse is indicated; such goods cannot be ordered by a store visitor. You can specify the date the goods arrive at the warehouse, or do nothing and leave everything as is.
Sorting (on the main page)
In this field you can see the current sorting value, if specified. You can change, delete the current value, or do nothing.
In this field you can see the sorting order of the product, if it was specified when adding the product. You can change the sort order, remove an existing value, or do nothing and leave everything as is. Using this option, you can display any product above all others, and you can sort the product output yourself. For example, you can display product A as the very first in the list of products, and product B as the last. To do this, write 1 for product A in this column, and write 10000 for product B, i.e. Using this option, product output priorities are set.
Product Pictures Bookmark:
Product picture
In this field you can see a product picture if it was added when creating the product. You can change the current picture, or do nothing and leave everything as is.
Download directory
In this field you can see the directory into which the image was downloaded if the download directory was selected.
Prices tab:
The price of the product
In this field you can see the current cost of the product. You can change the price of the product, or do nothing and leave everything as is.
Visitor
In this field you can see the current cost of the product for customers from the Visitors group. You can change the price of the product, or do nothing and leave everything as is. Buyer groups are configured in the Admin Panel - Buyers - Customer Groups.
Buyer
In this field you can see the current cost of the product for customers from the Buyer group. You can change the price of the product, or do nothing and leave everything as is. Buyer groups are configured in the Admin Panel - Buyers - Customer Groups.
Wholesale buyer
In this field you can see the current cost of the product for buyers from the Wholesale buyer group. You can change the price of the product, or do nothing and leave everything as is. Buyer groups are configured in the Admin Panel - Buyers - Customer Groups.
Maximum possible discount
In this field you can see the maximum possible discount if it was specified when creating the product. You can change the current value, delete the current value, or do nothing and leave everything as is.
Tax class
In this field you can see the tax that will be added to the price of the product. You can add tax to the cost of the item, remove the tax, or do nothing and leave everything as is.
Show packaging unit
Meaning
This field can be skipped, here you can see the current value of the option. Packaging is configured in the Admin Panel - Settings - Packaging Unit.
This field can be skipped; here you can see the current value of the unit field. Packaging is configured in the Admin Panel - Settings - Packaging Unit.
For example, let's change the product name Deer Antlers to Elk Antlers. After making the necessary changes to the form, click the Save button - fig. 6.


Copying an item
To copy an existing product in an online store, go to Admin - Catalog - Categories / Products - fig. 1.

You will be taken to the product catalog management page of your online store - fig. 2.

Let's say you want to copy the product Moose Antlers to the Hooves category. Create a Hoof category in the root section - fig. 3


To copy a product, you need to mark the product Moose Antlers and click the Copy button on the right - fig. 6.

By clicking the button, you will be redirected to the product copy page - fig. 7.

Since we are copying one product, we work with block One. In the category field, select Hooves, in the Copying method field, select Product Copy and then click the Copy button - fig. 8.


Moving an item
To move an existing product in an online store, go to Admin - Catalog - Categories / Products, fig. 1.

You will be taken to the product catalog management page of your online store - fig. 2.

Let's say you want to move the product Moose Antlers to the Hooves category. Create a Hoof category in the root section - fig. 3

We need to enter the Horns category, in order to go inside the category, click the folder picture to the left of the category name - fig. 4.


To move a product, you need to mark the product Moose Antlers and click the Move button on the right - fig. 6.

By clicking the button, you will be redirected to the product movement page - fig. 7.

In the Move all to: field, select the Hooves category and click the Move button - fig. 8.

You will go to the Hooves category page and see that the product Moose Antlers is now in this category - fig. 9.

Accordingly, in the Horns section of the product there is no Moose Antlers - fig. 10.

Deleting an item
To delete an existing product in the online store, go to Admin - Catalog - Categories / Products - fig. 1.

You will be taken to the product catalog management page of your online store - fig. 2.

Let's say we delete the product Deer Antlers in the Antlers category. We need to enter the Horns category, in order to go inside the category, click the folder picture to the left of the category name - fig. 3.


To delete a product, you must mark the product Deer Antlers and click the Delete button on the right - fig. 5.

By clicking the Delete button, you will be redirected to the deletion confirmation page - fig. 6.

If you really want to delete the product, click the Delete button (Fig. 7).

If you do not want to delete the product, or clicked the button by mistake, click Cancel - fig. 8.

Confirmation of product deletion is necessary to prevent accidental deletion of the product.
By clicking the Delete button, you will go to the general list of products and see that the product Moose Antlers has been deleted - fig. 9.

Creating and changing product items from a file
Start
To work with the module, we need to go to Admin - Miscellaneous - Tools - Excel import/export - fig. 1.

We went to the Excel import/export module page - fig. 2.

Using the Excel import/export module (Original name of the EasyPopulate module), you can add/update/delete products in your online store using the OpenOffice Calc spreadsheet program.
This example will use:
Exporting products from a store to Excel
Let's look at an example of how to add/update a product in an online store via Excel using the Excel import/export module.
For example, let's add a new product, Unicorn Horn, to the Horns category that costs $35, and change the existing product, Moose Horns.
First of all, we need to download the existing price list from the store for further work with it in the program.
In order to download the price list, click the Export tab, select Full download and click the Create file button - fig. 3.

You will be asked - What should you do with this file?, select Save the file to disk and click the Ok button - fig. 4, select any folder on the disk and save the file, do not forget in which folder you saved the file.

We saved the file, now go to the OpenOffice Calc program - fig. 5.

Then open the file we saved (menu File - Open) - fig. 6.

Having opened the saved file, I have it called EP2011May20-1806.csv (you will have a slightly different name), the import wizard will start - fig. 7.

In the Encoding option, select Unicode (UTF8), in the Separator option, uncheck the “Tabulator” and put it on “Semicolon” - fig. 8.

In the Fields block we need to change the type of some columns - fig. 9.

Here we need to change the type of four columns: v_products_price, v_products_weight, v_date_avail, v_date_added.
Set each of these four columns to "Text" type - fig. 10.

Only for these four columns, do not touch the remaining columns; to select a column, you need to left-click on its name. Use the bottom scroll bar to navigate - fig. eleven.

Rice. 12 - the v_products_price column is not highlighted.

Rice. 13 - v_products_price column is highlighted.

So, we have set the Column Data Format to text variable for 4 columns - v_products_price, v_products_weight, v_date_avail, v_date_added.

A new table has opened with data about the product of our online store - fig. 15.
Now we can start editing the Moose Horn product and adding a new Unicorn Horn product.
Data format description
But first, I will give a description of all the columns of the open table, read it very carefully, this is the key point, if you fill out the table columns incorrectly, the product will not be updated / added, or will be updated / added incorrectly, with errors.
Let's move on to a description of the structure of the price list, which columns are required to be filled in, what they are used for, and recommendations for filling out these columns. Let's look at all the columns from left to right. I will briefly describe the meaning of each column and small recommendations:
v_products_model
This column indicates the code (article) of the product.
v_products_name_1
It is mandatory to fill out this column. The name of the product is written here, the maximum length is 255 characters, but it may be less depending on the store database settings.
v_products_description_1
Filling out this column is not necessary, but it is advisable; a product without a description does not look very attractive. Here you need to specify a description of the product to be added; you can use HTML tags in the product description.
v_products_url_1
This column is optional. An external link to the product is indicated here, for example a link to the manufacturer’s website with a description of this product. The address must be entered without http://. For example, if you want to indicate a link to http://www.yandex.ru, then you need to write it like this - www.yandex.ru
v_products_short_description_1
This column is optional. Here you can provide a brief description of the product.
v_products_keywords_1
This column is optional. Here you can specify additional product keywords for search.
v_products_meta_title_1
This column is optional. Here the Meta Title tag for a specific product is indicated, i.e. The text entered here will be displayed in the browser title when viewing the product. Meta tags are needed for better and higher quality indexing of your online store in search engines.
v_products_meta_description_1
This column is optional. Here you specify the Meta Description tag for a specific product, i.e. a brief description of the product, literally a few sentences.
v_products_meta_keywords_1
This column is optional. Here you specify the Meta Keywords tag for a specific product, i.e. main keywords for this product.
v_products_image
This column is optional. This column contains a picture of the product. In this column you should not indicate the full address (you cannot write http://vamshop.ru/images/1.gif), you only need to enter the file name here (for example 1.gif).
v_products_quantity_min
It is mandatory to fill out this column. This indicates the minimum number of product units to order. Default value is 1.
v_products_quantity_max
It is mandatory to fill out this column. The maximum number of product units for an order is indicated here. The default value is 1000.
This column is optional. Here you can specify the sorting order of the goods. For example, using this column you can show any product above all others, you can sort the product output yourself. For example, you can display product A as the very first in the list of products, and product B as the last. To do this, write 1 for product A in this column, and write 10000 for product B. That is Using this column, product display priorities are set.
v_products_page_url
This column is optional. The SEO URL of the product is indicated here, i.e. You can specify how the product link will look. You can only enter ASCII characters in this field (are the symbols allowed? / =, etc.), and the address must end in .html.
v_products_discount_allowed
This column is optional. This indicates the maximum possible discount that this product can have. The default value is 100.
v_products_startpage
This column is optional. Show (1) or not show (0) the product on the main page of the store.
v_products_startpagesort
This column is optional. Here you can specify the sorting order of products on the main page, centered, in the New Items block. For example, using this column you can show any product above all others, you can sort the product output yourself. For example, you can display product A as the very first in the list of products, and product B as the last. To do this, write 1 for product A in this column, and write 10000 for product B. That is Using this column, product display priorities are set.
v_products_to_xml
This column is optional. Unload (1) or not unload (0) goods in Yandex Market.
v_products_price
It is mandatory to fill out this column. The price of the product is indicated here, and the price of the product must be entered in the default currency. You can see which currency is set by default in the Admin -> Miscellaneous -> Localization -> Currencies. All prices must be entered in the default currency; you cannot enter one price, for example in rubles, and another, for example in US dollars, all prices are entered in the default currency.
v_products_specials_price
This column is optional. The special price of the product (discount price, promotional price) is indicated here, if a special price is indicated. price, in the catalog the old price will be crossed out and the new price will be displayed.
v_products_quantity
Filling out this column is optional, but recommended. This indicates how many units of the product are in stock. If you don’t need to control the quantity of goods in the warehouse, just enter, for example, 100,000 and that’s it.
v_products_weight
This column is optional. The weight of the product is indicated here. For example, to indicate the weight of a product of 100 grams, you need to write 0.1, if 1 kg, then write 1, etc. What is it for?! This is necessary to calculate the cost of delivery of goods depending on weight. If in your store the cost of delivery of goods does not depend on the weight of the ordered goods, simply leave this field blank.
This column is optional. The date of arrival of the goods at the warehouse is indicated here. For most cases, this column is simply not filled in and remains empty.
It is mandatory to fill out this column. The date the product was added to the store is indicated here. The date must be specified exclusively in the following format and nothing else, example: 2011-05-15 15:07:23. This means that the product was added to the store on May 15, 2011 at 15 hours 7 minutes, 23 seconds.
v_categories_image_1
v_categories_name_1_1
It is mandatory to fill out this column. The Category to which the product is added is indicated here. In the v_categories_name_(1-7)_1 columns you can specify categories (subcategories) up to level 7. A small example. For example, you need to add a product to the 3rd level category Components - Processors - Pentium 4. Then you need to write the categories as follows: In the v_categories_name_1_1 column we write Components, in the v_categories_name_2_1 column we write Processors, in the v_categories_name_3_1 column we write Pentium 4. That's it, you have added the product to the category 3 levels, similarly, you can add products to categories up to level 7. If you need to add a product, for example, just to the Processors category, then we write in the v_categories_name_1_1 column - Processors, and leave the remaining v_categories_name_(2-7)_1 columns blank, i.e. empty.
v_categories_image_2
This column is optional. The category picture is indicated here. For example, if you write test.png, do not forget to upload the image file test.png to the /images/categories/ folder after importing.
v_categories_name_2_1
v_categories_image_3
This column is optional. The category picture is indicated here. For example, if you write test.png, do not forget to upload the image file test.png to the /images/categories/ folder after importing.
v_categories_name_3_1
Read the description of the v_categories_name_1_1 column.
v_categories_image_4
This column is optional. The category picture is indicated here. For example, if you write test.png, do not forget to upload the image file test.png to the /images/categories/ folder after importing.
v_categories_name_4_1
Read the description of the v_categories_name_1_1 column.
v_categories_image_5
This column is optional. The category picture is indicated here. For example, if you write test.png, do not forget to upload the image file test.png to the /images/categories/ folder after importing.
v_categories_name_5_1
Read the description of the v_categories_name_1_1 column.
v_categories_image_6
This column is optional. The category picture is indicated here. For example, if you write test.png, do not forget to upload the image file test.png to the /images/categories/ folder after importing.
v_categories_name_6_1
Read the description of the v_categories_name_1_1 column.
v_categories_image_7
This column is optional. The category picture is indicated here. For example, if you write test.png, do not forget to upload the image file test.png to the /images/categories/ folder after importing.
v_categories_name_7_1
Read the description of the v_categories_name_1_1 column.
v_manufacturers_name
This column is optional. The manufacturer of the product is indicated here.
v_tax_class_title
It is mandatory to fill out this column. This column indicates the name of the tax. Taxes are added in the Admin - Places/Taxes - Types of taxes. In most cases, there is no tax on the added product, then in this column you need to write: --no--.
It is mandatory to fill out this column. The status of the product is indicated here, i.e. whether the product is available to customers or not. This column can have the following values - Active, if the product is available to customers, Inactive - if the product is not available to customers (but visible to the administrator in the admin panel), you can also specify the value Delete - this means that you want to delete the product from the store. The column must be filled with exactly one of three values (Active, Inactive, Delete), nothing else.
It is mandatory to fill out this column. And here you just need to duplicate the word EOREOR in each line, i.e. in each product, this means that the line is complete.
Let's move on to our example, i.e. to editing the product Moose Horn and adding a new product Unicorn Horn.
Editing products
Let's change the name of the product from Moose Antlers to Updated Moose Antlers. To do this, in the v_products_name column, change the Moose Antlers cell - fig. 16.
On the updated moose antlers - fig. 17. We only changed the name of the product, but you can change any fields; read the description of the fields above.
The product Moose Horns has been changed, now we will add a new product Unicorn Horn
Adding a new product
To add a new product, we need to fill in the empty free line after the last filled line (in this example, line No. 4 - Fig. 18) with data about the new product.

We have already read the description of all the columns and know that the following columns must be filled in (i.e. this is a mandatory minimum that must be filled in in any case, otherwise the product will not be added to the store, or will be added incorrectly):
v_products_model
Here we will indicate the product code, even if we do not know it, it must be specified and must be unique for each product, i.e. There cannot be two identical codes for different products. For example, let's write kod3.
v_products_name_1
Here we indicate the names of the goods, in this example we write Unicorn Horn.
v_products_quantity_min
This indicates the minimum number of product units to order. We put 1.
v_products_quantity_max
The maximum number of product units for an order is indicated here. We bet 1000.
v_products_price
Here we indicate the cost of the product in the default currency, in this example it is US dollars. For example, we write 35, which will mean that the product Unicorn Horn will cost $35.
v_categories_name_1_1
v_tax_class_title
Here we indicate the tax, even if there are no taxes on the product, you must fill out this cell. In this example it is not installed and we write --no--
Here we indicate the status of the product. In this example we write Active, i.e. The product is active in the store and can be purchased.
This is a system column, you should always specify EOREOR here, so we write it that way.
v_products_weight
The weight of the product is indicated here; the weight is necessary to calculate the shipping cost. For example, we write 0.8, this means that one unit of goods weighs 800 grams.
The date of arrival of the goods at the warehouse is indicated here; if the goods are in stock, simply write the same date as in the * v_date_added column, in our example you need to write 2011-05-15 15:07:23. The date must be specified exclusively in the following format and nothing else, example: 2011-05-15 15:07:23. This means that the product was added to the store on May 15, 2011 at 15 hours 7 minutes, 23 seconds. I repeat, the date must be indicated in this format and nothing else, be careful.
The date the product was added to the store is indicated here. The date must be specified exclusively in the following format and nothing else, example: 2011-05-15 15:07:23. This means that the product was added to the store on May 15, 2011 at 15 hours 7 minutes, 23 seconds. I repeat, the date must be indicated in this format and nothing else, be careful. We write in this cell 2011-05-15 15:07:23
v_products_quantity
This indicates how many units of the product are in stock. If you don’t need to control the quantity of goods in the warehouse, just enter, for example, 100,000 and that’s it. We assume that there is an unlimited quantity of goods, we write 100,000
v_products_model - kod3
v_products_name_1 - Unicorn horn
v_products_quantity_min - 1
v_products_quantity_max - 1000
v_products_price - 35
v_products_weight - 0.8
v_date_avail - 2011-05-15 15:07:23
v_date_added - 2011-05-15 15:07:23
v_products_quantity - 100000
v_categories_name_1_1 - Horns
v_tax_class_title - --no--
v_status - Active
Now save the file by selecting the menu File - Save - fig. 19.


That's it, your file with the updated price list has been successfully saved, now you need to upload the updated price list to the store.
Importing products from Excel to the store
To do this, go to the admin panel of the online store, to the Excel import/export module page - fig. 24.

Opposite the Import field, click the Browse button - fig. 25.

Select the file with the updated price list (in this example it is EP2011May20-1806.csv, please note that files with the xls extension cannot be loaded through this module, only Text files (delimited by semicolons) and then click the Import button - Fig. 26.


Or a new product has been added (Product added) to the store - fig. 28 if it was not in the store before.

Removing products
You also have the opportunity to remove products from the store using this module. Let's delete the newly created product Unicorn Horn
We unload goods from the store (read a detailed description of how to do this above), open the file in Excel. We find the v_status column, it is located almost at the very end on the right. And opposite the product Unicorn Horn we write in this column the word Delete (translated from English it means to delete) - fig. 29.

Save the file and upload the file to the online store (read a detailed description of how to do this above). That's it, the product has been removed from the store - fig. thirty.

Working with item attributes
Let's say we have a product called Socks and there are different colors for this product.
Black socks, white socks, blue socks.
So, in order not to add three separate products (after all, in fact, these are one product, just different colors) and there are product attributes. We will simply add three attributes to the Socks product: Black, White, Blue.
Let's take a closer look at how to do this:
Creating new item attributes
To create product attributes in an online store, you first need to log into the Administrator of the online store - fig. 1.

Attributes are managed in three sections: Admin - Catalog - Attributes - Names, Attributes - Values, Attributes - Installation - fig. 2.

A product attribute consists of two parts: Attribute Name and Attribute Value. Knowing that in our example we need to create a color attribute, we create the Color attribute.
Go to the Admin section - Catalog - Attributes - Names - fig. 3.

The attribute creation page looks like this - Fig. 4.

To create a new Color attribute, enter a name, select the Dropdown type (we’ll talk more about attribute types below) and click the Add button - fig. 5.

By clicking the Add button we can see that the Color attribute has been added to the list - Fig. 6.
Now let's add values for the newly created Color attribute.
Values for attributes are created in the Admin Panel - Catalog - Attributes - Values - fig. 7.

We went to the page for creating attribute values - fig. 8.

I already wrote above that we will create the colors Black, White and Blue.
Let's create these values.
To do this, in the Attribute Name option, select the Color attribute in the drop-down list, enter Black in the Attribute Value text box and click the Add button - fig. 9. You can also provide a description for the attribute value if needed, i.e. provide any additional information.

By clicking the Add button, we can see that the Black attribute value has been added to the list - Fig. 10.