How to set up a satellite dish for 3 satellites
class = "eliadunit">
After we have decided on the location of the antenna and its approximate direction, the pre-assembled antenna is hung on the bracket. After that, additional multifeeds and converters, cables and other structural elements are installed.
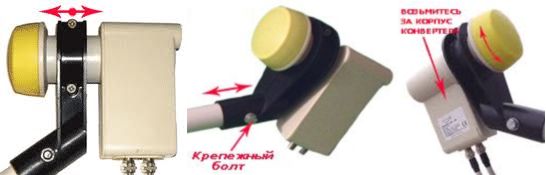
- IMPORTANT: To fine tune the antenna, you must move it vertically / horizontally. BUT, you should clamp the mounts just enough so that the antenna itself does not move and does not change the slope, but you could, although with effort, still move the antenna in planes. For this, the left / right screws are not fully tightened.
For example, the free lower left screw on the U-shaped adjustable antenna element (see photo) allows you to adjust the antenna to vertical, and those that are on the clamp for fixing the antenna to the wall mount, usually two of them, - by horizontal lines.
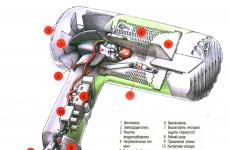
What is multifeed and how does it work
Multifeed is a design that allows you to simultaneously receive several satellites on one satellite dish due to the possibility of installing additional heads (converters). This saves you money on the purchase of an additional satellite dish.
Multifeed law: angle of incidence = angle of reflection
An antenna is often called a mirror. And in the case of multifeed, the laws of optics and reflection apply (remember physics?) Specifically: The angle of incidence is equal to the angle of reflection. That is, if you tune the antenna to the corresponding satellite so that it is in focus, then the signal from a neighboring satellite located at a different orbital position will no longer be reflected to the converter that is in focus, but to some other point. This whole thing works according to the same law!
To understand this law is simple:
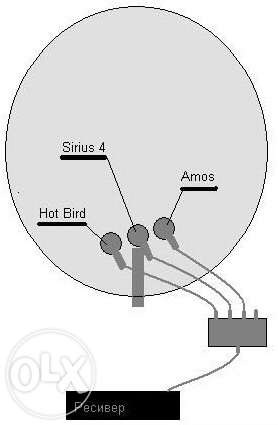
If a neighboring satellite (Amos 4) in geostationary orbit is to the right of the focus of the central converter (Sirius 4.8) of the satellite dish, then the reflection of its signal (yellow arrow in the figure) from the dish mirror will focus to the left of the place where the central converter is in the focus of the antenna. (see pic)
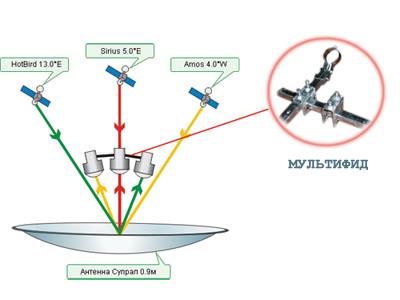
If the satellite is higher, the signal will focus lower. In general, a mirror effect.
Tuning an antenna to a satellite with installed multifeeds
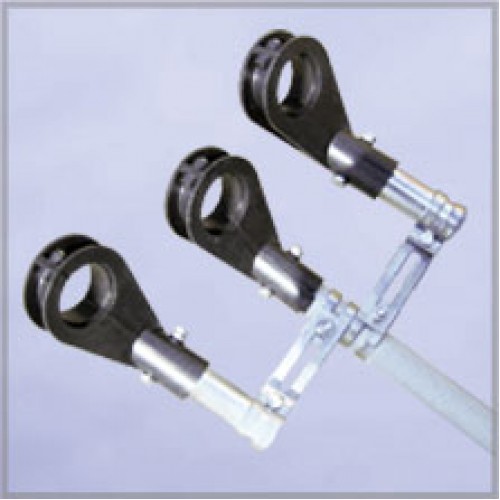
Then you need to put 2 mutifeeds on the antenna nose mount, which already has an installed holder for the main converter, (converters are fixed in all holders). Then everything must be tightened securely, but leave the ability to rotate the converters in multifeeds in all directions and planes with some effort. The cable system is connected at the very end.
Setting up: stages of a painstaking process
Setting up the equipment is quite troublesome and takes a lot of time. It all starts with screwing to the center. converter F-connector with a length of cable from 2 meters. The other end of this cable is fixed to the receiver.
The receiver itself connects to the TV receiver. Be careful: power supply (220 V) must be turned on only after connection. Another important point to remember: when you wind the F-connector, make sure that the shielding film and the thinnest conductors on the cable sheath do not close with the central core. Otherwise, everything may end up with a breakdown of the receiver!
Setting up a satellite dish to the main Sirius 4.8E satellite
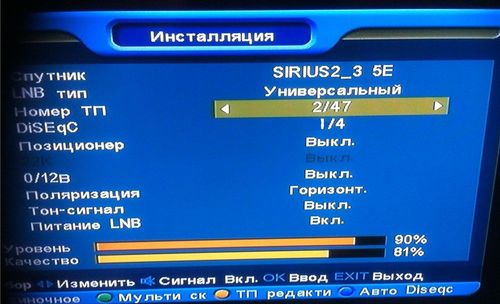
Turn on your TV and receiver. Go to MENU - INSTALLATION, then - to SEARCH CHANNELS. On the left you will see a list of satellites from which the reception will occur. Select the desired one, for example, Sirius 2 / Ku 4.8E, if the central converter is tuned to it, which was previously firmly fixed.
- LNBP- turning on the converter.
- LNBP Type- choose Universal (the type can be found in the documents for the converter).
- LNBP Freq- 10600/9750 (these data are also indicated in the instructions for the converters).
- 22Khz- select the AUTO item (this is the signal that switches the disc).
- DISEqC- leave NONE (if you connected the signal reception directly, without using DISEqC).
Then look for the corresponding button on the remote: it will take you to the transponder submenu. It is here that you will need to look for a satellite signal. TIP: check in advance for yourself a couple of transponders from satellites with different polarizations and any channels (preferably free) that actually WORK (FTA). These are easy to find on the Internet at specialized sites.
- EXAMPLE: let's analyze the variant with the 11766H transponder. It broadcasts at a frequency of 11,766 Mega Hertz (horizontal polarization). To make it easier to adjust the picture and signal quality, it is better to display all information in full screen mode. There is an INFO button for this. It will be convenient to navigate the quality by the microscale located below.
Do not be alarmed if at first the "quality" of the signal is equal to 0. The reason for this failure is quite understandable: at the very beginning we discussed options for the direction of the antenna and turned it in the right direction using the "scientific poke" method. And now it's time to tune the antenna in all planes. Get ready right away for a long and monotonous process that requires accuracy, attentiveness, and self-control. Why? A couple of millimeters and the signal will be lost. The point will not even be in its poor quality, but in its complete absence!
Tuning the receiver antenna in planes
First you need to find one perfect vertical position. Then slowly and smoothly try to unfold the antenna horizontally. In this case, you need to constantly monitor the signal quality scale. As soon as the number moves from 0, then you are doing the right thing. In this way, the scale should be brought to at least 15 mark. It is possible that all manipulations with horizontal movements will be unsuccessful. Then you will have to return to the vertical position and slightly change it. And then start all over again: gentle left and right movements until a signal appears, at least a small one. Your task is to achieve the best possible reception. To do this, of course, is not easy, but without it, as they say, nowhere.
You can try to turn the converter slightly in the holder (around the axis). There are even special marks on the case for this. You can also move it a little back and forth along the holder, while achieving maximum readings on the QUALITY scale.
The bottom line is that to get the best signal quality, you need to try ALL of the adjustments. Only in this way will the result completely suit you.
- IMPORTANT: if you have rechecked everything a hundred times, tried to adjust the antenna, repeatedly changed the receiver settings, but still did not find the signal, try replacing the converter. There is a possibility that it is simply broken.
Have you achieved the best possible reception? Congratulations! Seems like it's time to tighten the screws and enjoy a job well done ?! Not everything is so cloudless. Remember: the tuning was carried out with a transponder broadcasting ONLY in horizontal polarization (“H” mark on the body). It is also necessary to adjust the V-transponder, that is, with vertical polarization. Yes, and again into battle!
In each case, completely different actions can help. Somewhere a small turn of the converter around the axis clockwise or counterclockwise leads to success. And some have to scan transponders in a manual search. A description of this process can be found in the documents for the purchased receiver. And after that, visually track the reception of certain channels, their correspondence to the desired satellite.
Tighten the nuts!
The long-awaited moment has come when signals in both polarizations give the highest possible quality. Now you need to tighten the nuts very tightly and firmly. And here again difficulties can overtake you: by tightening the adjusting nut, you, unwittingly, slightly change the direction of the antenna. As a result, the signal quality decreases markedly again! Therefore, this must be done very carefully, with painful caution.
Position of converters on multifeeds
Before you start setting up converters on multifeeds, you need to know the angle of their inclination to the horizon and understand how they will be located.
Satellites in the sky in a geostationary orbit relative to the territory of Russia are located in an arc that runs closer to the south of the sky. To an observer, it will look something like this:
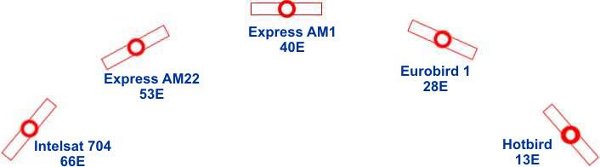
Therefore, the location of the converters on the antenna must be inverted-mirrored. If the antenna is directed to the southern sector, then the adjacent converters will be positioned conditionally as follows: 
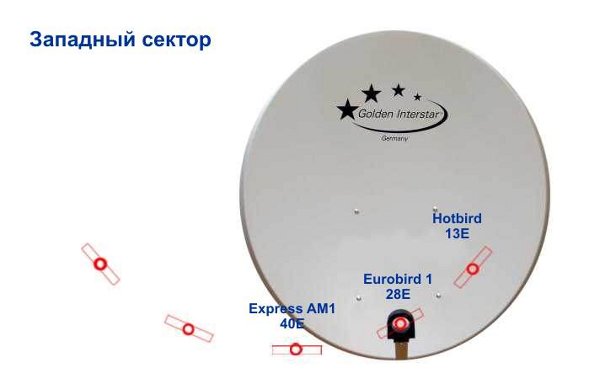
If the "dish" is tuned to a western satellite, then the converters on the multifeed should be located as follows:
And finally, if the satellite dish is directed towards one of the eastern satellites, then the "heads" in the neighborhood must be positioned as follows:
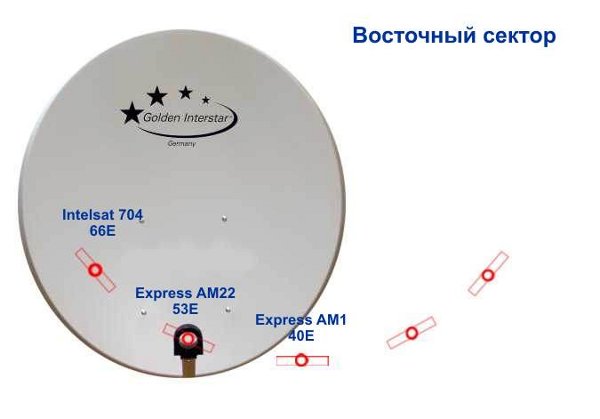
Let's look at another important point that you should always remember. Since the satellite transmits the signal in most cases in horizontal or vertical polarization, then for different satellites, the vertical polarization will not always be "vertical", and, accordingly, the horizontal is not always "horizontal". Vertical and horizontal polarization will remain exclusively for the southern satellites, while for all others the polarization will be slightly "tilted", as shown in the figures. Therefore, both the central converter and the converter on the multifeed must be positioned at a certain angle relative to its axis. For this, the converters have special tick marks.
Calculation of the position of converters on multifeeds relative to the central head
The program "Rainbow TV: Installer Assistant", which can be downloaded here, is intended for calculating the angles of installation of a satellite dish. It also contains all the information for setting up a multifeed. To calculate the multifeed, you can use the corresponding tab in the program. The converters will need to be placed according to the calculation scheme presented on the tab as a result of the calculation.
Here is an example of how our multifeeds are calculated using the program with distances relative to the central converter:
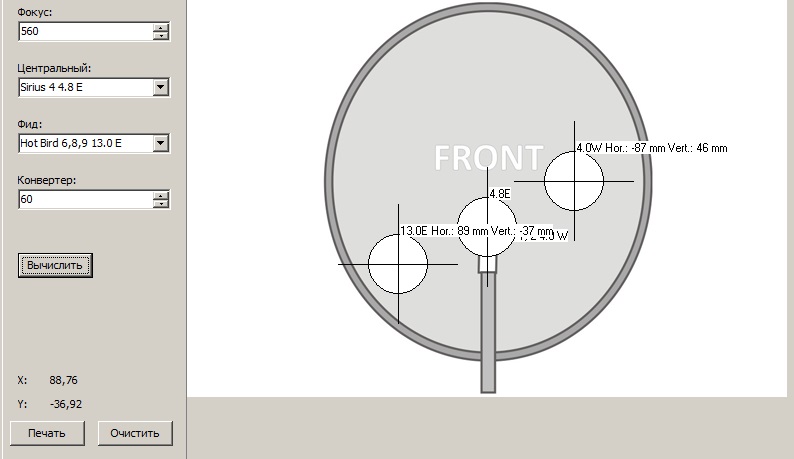
where Hor- distance from the center of the central converter to the center of the head on a multifeed a Ver- distance from the center of the main converter to the center of the head on a multifeed.
Setting up multifeed to satellite
So, the antenna itself and one of the converters are safely tuned. After that, turn off the receiver and twist the cable from the central converter to the converter from the multifeed. Then turn everything ON again.
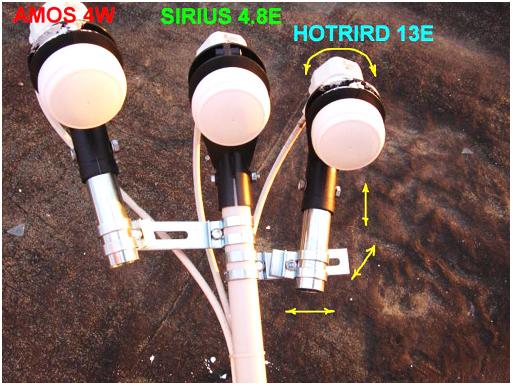
The already familiar menu will appear in front of you, only now you should select Hotbird 13E and another valid transponder. As in the case described above, it is necessary to systematically achieve excellent signal reception. However, you will not have to move the antenna itself, but the multifeed converter. By the way, he is able to move in any planes: up / down; right left; back forward.
![]()
If you see a good signal, tighten the nuts. But don't forget to check the polarizations. Scan the transponders and check any unpaid channel visually. Everything is okay?
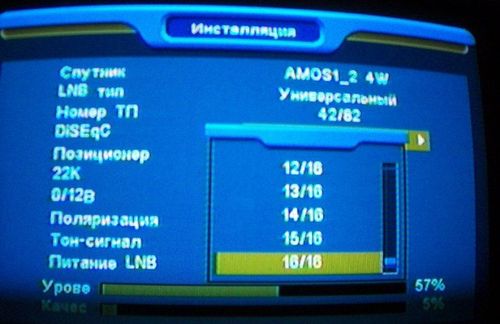
Amos 4w satellite multifeed
Turn off all equipment again and twist the cable, as before, onto the last converter. Then the tuning process is repeated with some changes: in the receiver menu, the Amos 4w satellite and its operating frequency are selected.
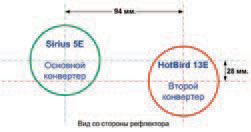
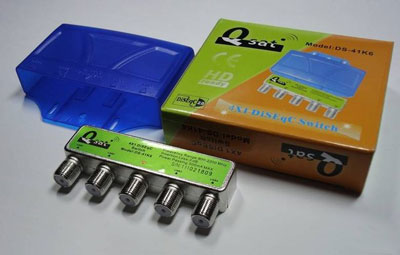
Having set up the multifeed, connect all three converters with a disc with the included short cables, in accordance with the attached picture.
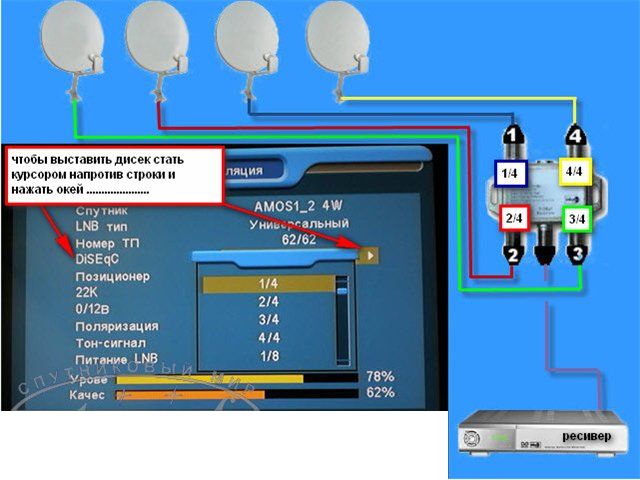
In the receiver settings, it is necessary to set the port parameters in accordance (set the following numbers in the Diseqc 1.1 menu: Sirius 2 / Ku 4.8E - 1, Hotbird 13E - 2, Amos 4w - 3) with the cables connected to the disk.
Then, perform automatic channel search by satellites. If not all channels are found as a result of the search, you should switch to the manual search mode and search for them by entering the parameters of the missing transponders.
Is it worth covering the discs from rain or moisture
Of course, yes, the disc is also an electronic device and operates on electricity, and if water gets in, a short circuit cannot be avoided. Lucky if only he burns. Just a bag of duct tape will not help, it will only aggravate the situation.
But a plastic bottle with a cut off top is another matter, simple and reliable. You can fantasize and find a bottle or box of a suitable shape and cover the cracks with silicone or sealant.
Modern discs are already on sale with a plastic protective cover included.
The disc must be installed in such a way that water does not reach through the cable to the joints. Therefore, it must be raised above the level of the converters.
ANTENNA tuned to 3 satellites INSTALLED SUCCESSFULLY!