DIY hair dryer repair
This electrical appliance is very popular and is often indispensable in everyday life. When the hair dryer breaks down, you can contact the service center, or you can try to fix the hair dryer yourself. The accumulated repair experience indicates that breakdowns are most often eliminated without serious financial costs. To repair a hair dryer with your own hands, you need to know how it works and disassemble it correctly.
How the device works
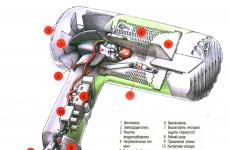
Any hair dryer has an impeller motor and a heater. The impeller sucks in air from one side of the hair dryer, after which it blows over the heater and comes out hot on the other side. The hair dryer also has a mode switch and elements to protect the heater from overheating.
1 - impeller; 2 - electric motor; 3 - heater; 4 - thermal protection; 5 - mode switch; 6 - power cable
In household hair dryers, the fan is assembled on a DC collector motor designed for a voltage of 12, 18, 24 or 36 volts (sometimes there are electric motors operating at an alternating voltage of 220 volts). A separate spiral is used to power the electric motor. The constant voltage is obtained from a diode bridge mounted on the terminals of the electric motor.
The hair dryer heater is a frame assembled from non-combustible and non-conductive plates, on which a nichrome spiral is wound. The spiral consists of several sections, depending on how many operating modes the hair dryer has.
This is how it looks:
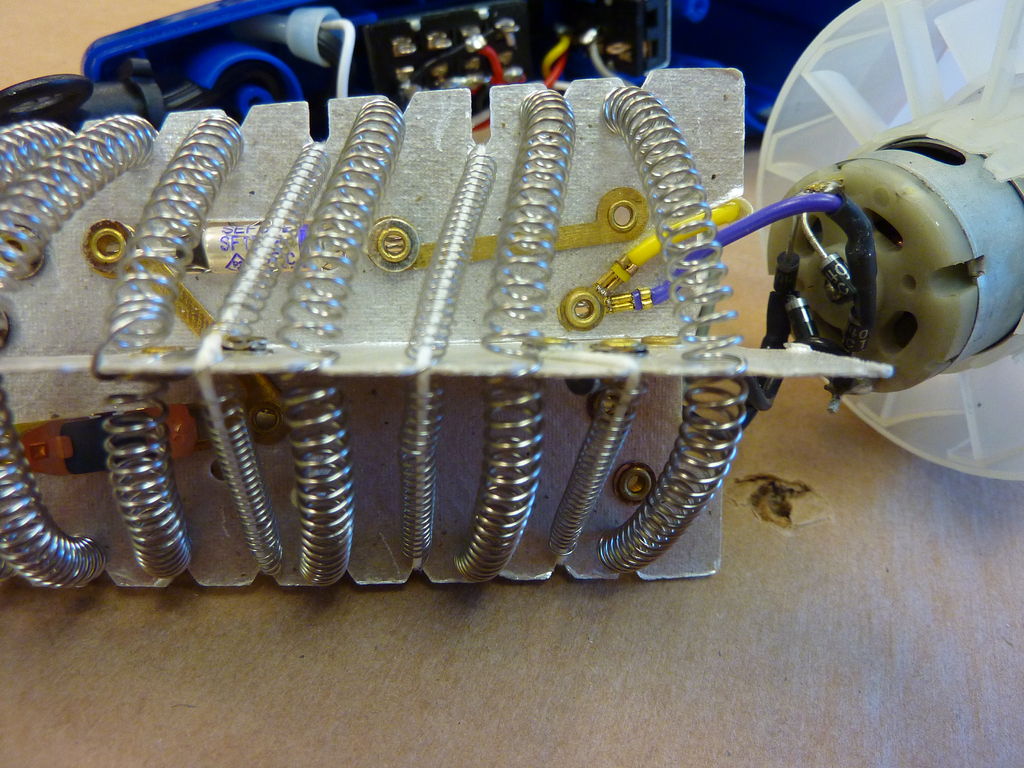
The spiral is wound on a heat-resistant frame
The hot heater must be constantly cooled by the passing air stream. If the coil overheats, it may burn out or cause a fire. Therefore, the hair dryer is designed to automatically shut off when it overheats. A thermostat is used for this. This is a pair of normally closed contacts placed on a bimetallic plate. The thermostat is located on the heater closer to the outlet of the hair dryer and is constantly blown with hot air. If the air temperature exceeds the permissible, the bimetallic plate opens the contacts and the heating stops. After a few minutes, the thermostat cools down and closes the circuit again.
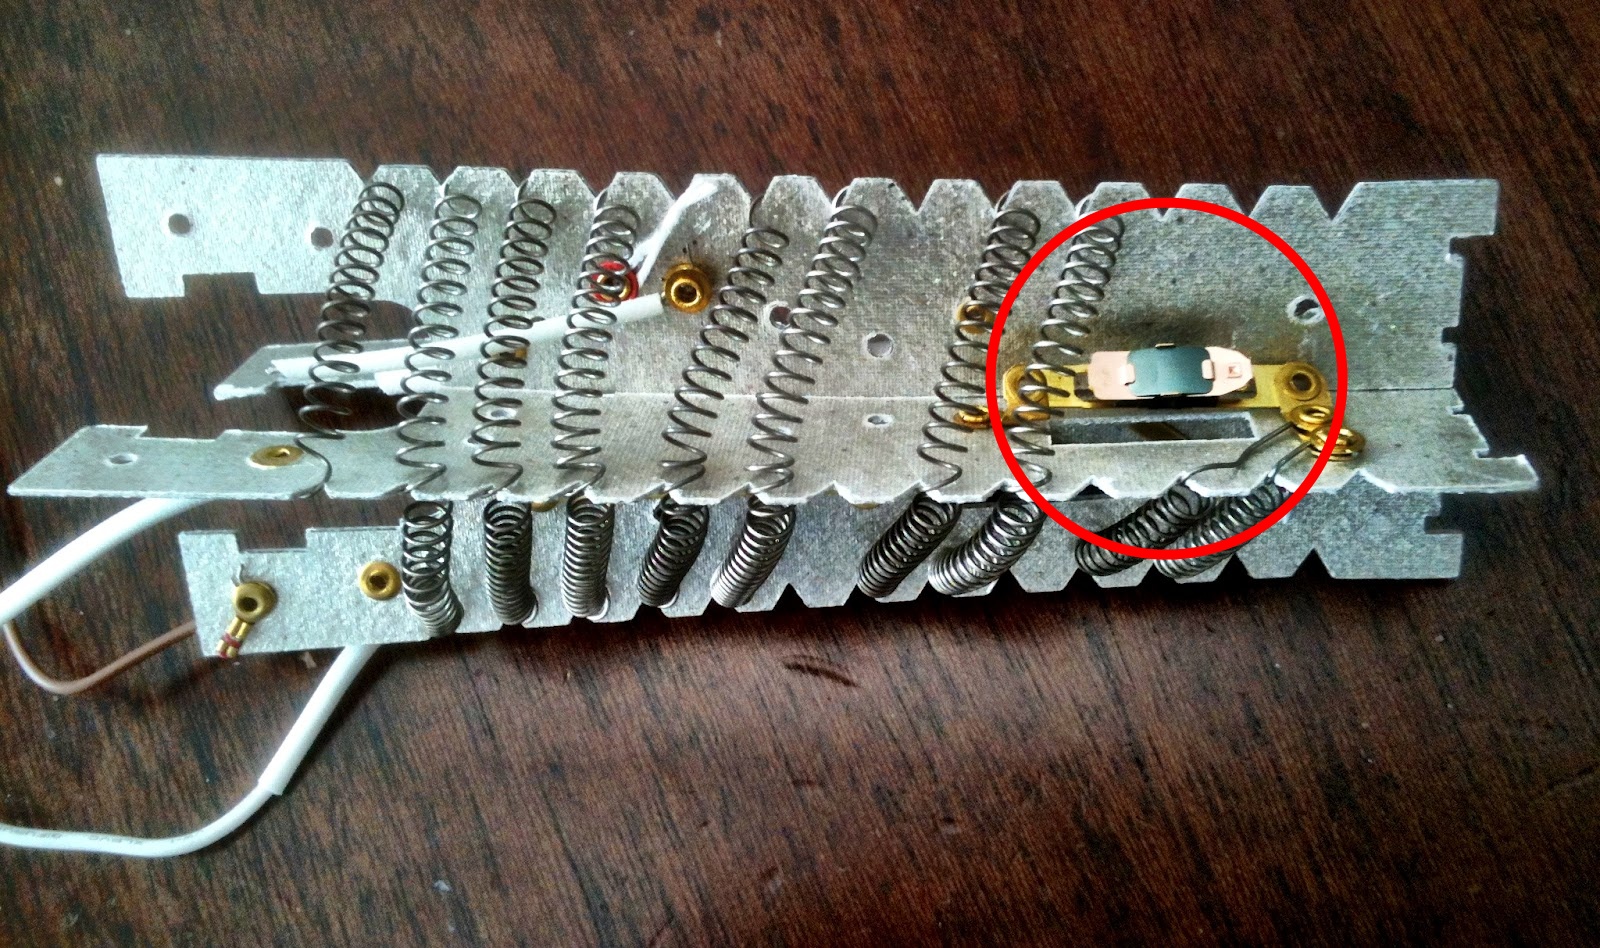
The thermostat is highlighted in a red circle
Sometimes a thermal fuse is also used as additional protection. It is disposable and burns out when a certain temperature is exceeded, after which it must be changed.
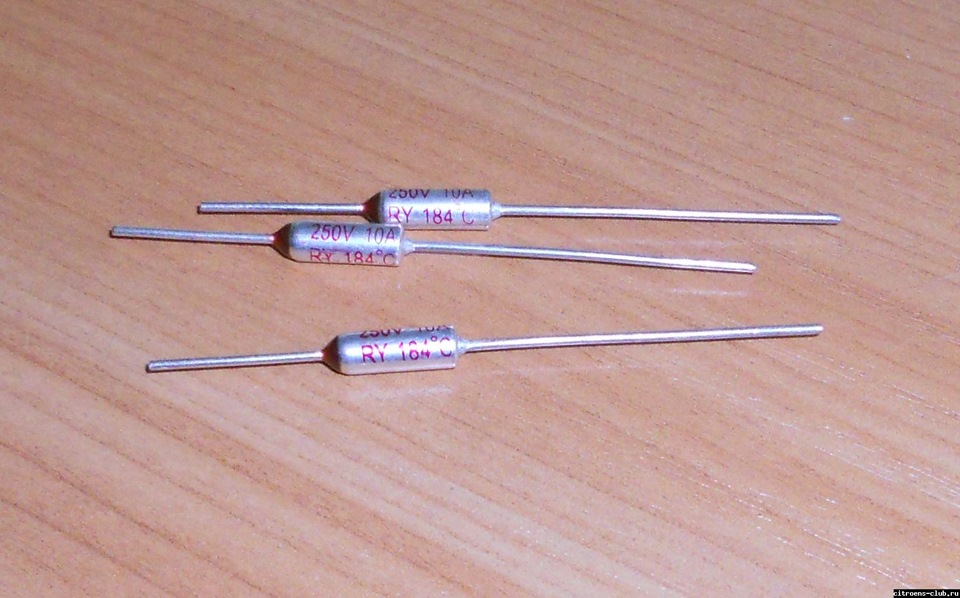
Thermal fuse, appearance
To better understand how the hair dryer works, you can watch these two videos (watch the first video from the 6th minute):
Video: how the hairdryer works
Video: what's inside the hair dryer
Schematic diagram
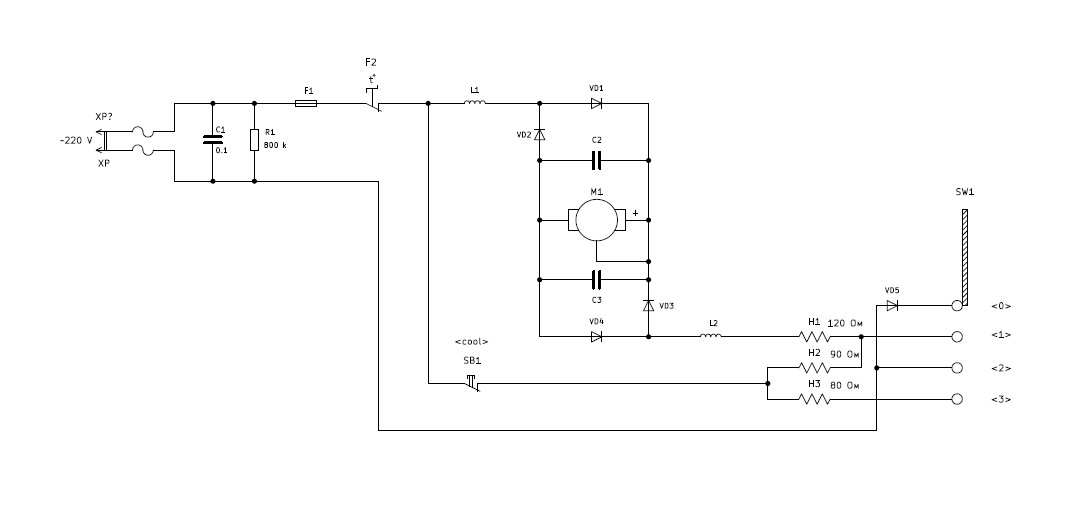
Household hair dryer circuit
The scheme of most household hair dryers is close to the one above. Let's consider it in more detail. The heater consists of three coils: H1, H2 and H3. Through the H1 spiral, power is supplied to the engine, the H2, H3 spirals serve only for heating. In this case, the hair dryer has three operating modes. In the upper position SW1, the circuit is de-energized. Pregnant<<1>> the hair dryer operates at minimum power: power is supplied through the VD5 diode, which cuts off one half-wave of the alternating voltage, only one heating coil H2 is turned on (not at full power), the motor rotates at low rpm. Pregnant<<2>> the hair dryer operates at medium power: the VD5 diode is short-circuited, both half-waves of alternating voltage are supplied to the circuit, the H2 helix operates at full power, the motor rotates at nominal speed. Pregnant<<3>> the hair dryer operates at the maximum possible power, since the H3 coil is connected. When the button is pressed<
How to disassemble a hair dryer
Attention! Unplug the hair dryer from the socket before disassembling!
Parts of the hair dryer body are attached to each other using screws (screws) and special latches. Screw heads often have a non-standard shape: an asterisk, a plus sign, a pitchfork. Therefore, you may need the appropriate bits for your screwdriver. The latches, in turn, are sometimes very difficult to disconnect and even experienced craftsmen sometimes simply break them off. Sometimes the recesses for the fastening screws are covered with stickers, plastic overlays or plastic plugs. The plugs are removed using a sharp object such as a knife or needle. In this case, there is a high probability of wrinkling the case and plugs a little. True, the hair dryer from this will not work worse. Sometimes the body halves are glued together. In this case, you have to cut them with a knife or scalpel, and after repair, glue them together (for example, with epoxy glue).
You can watch an example of disassembling a hair dryer in this video:
Video: how to disassemble and repair a Scarlet hair dryer
Typical malfunctions: DIY repair
Consider the most common hair dryer malfunctions:
Drives cold air
Possible malfunctions: the spiral is burnt out
What to do:
As a rule, a break is visible to the naked eye, even without a multimeter. There are several ways to repair a coil:
- You can place the dangling ends of the coil in a thin brass or copper tube and squeeze it with pliers.
- The spiral rests on a frame made of heat-resistant, non-conductive plates. In such a plate, carefully make a round hole with a diameter of about 2-3 millimeters with a sharp object, insert a short bolt with a washer there, tuck the broken ends of the spiral under the washer and tighten.
- Throw one dangling end over the other.
- The dangling ends can simply be twisted together. It should be noted that the third and fourth methods are less reliable than the first two. The fact is that when connecting the dangling ends with a throw and twist, the repaired section of the spiral has increased resistance and therefore overheats and burns out soon enough in the same place.
- Disassemble the donor hair dryer (of course, if you have one) and take it from there.
- (not for everyone): you can wind the spiral yourself. Where to get nichrome? For example, order in China.
- you can buy a ready-made spiral. To find the one you need, enter in the search bar of your browser<<спираль электрическая для бытовых электроприборов купить>>. Spirals come in different capacities and are sold in sachets of several.
You can watch examples of repairing the spiral in these videos:
Video: repairing the Viconte VC-372 hair dryer (the spiral burned out)
Video: where you can buy nichrome
Does not turn on, i.e. the fan does not heat up and does not spin
Possible malfunctions: voltage is not supplied, that is, there is a problem with the power cable
How to repair:
First, carefully examine the cable from the mains plug to the case for obvious damage. If so, remove the damaged section and solder the cable ends. Perhaps this is all a malfunction and the hair dryer will work. An example of cable repair is in the above video: How to disassemble and repair a Scarlet hair dryer.
The impeller is not spinning or is spinning at low rpm
Possible malfunctions: the engine is faulty or hair is wound on its shaft.
If hairs are wound around the motor shaft, to remove them, you will have to dismantle the impeller. You will also need to remove the impeller if you are going to lubricate or replace the motor shaft. How to do this can be seen in these two videos:
Video: remove the impeller from the hair dryer
Video: how to remove the fan from the hair dryer motor
Also, in some cases, you can grasp the base of the impeller with your fingers and pull it off.
Regarding checking the electric motor, the author believes that the best way - from a safety point of view - is to dismantle the motor and connect it to a suitable short-circuit protected power supply. If the motor does not rotate, you need to check the integrity of the windings with a multimeter. If the winding breaks, you will have to buy a new motor (although you can rewind the old one, but this, perhaps, makes sense only as entertainment). If the engine sparks a lot, you will also have to buy a new one. Rubbing with alcohol in this case, if it helps, then not for long. One of the options where you can purchase a new engine is: order in China (look for<
Hairdryers with ionization function and infrared devices
Hair dryers with ionization- when this mode is turned on, they emit a lot of negative ions, neutralizing the positive charge on the hair, which makes it smooth and does not dry out. To create negative ions, a special module is used, located in the handle of the hair dryer. The wire coming out of this module is located in the area of the heater. The air is ionized when it comes into contact with this conductor.
It is possible to diagnose the health of the ionization module without special devices by indirect signs. If you no longer feel the difference when the ionization module is turned on and off - and you are convinced that the module receives a normal supply voltage - therefore, the module is faulty. Next, you need to find a module for the required voltage and suitable size. Look, again, in China.
Photo gallery: an approximate view of the ionization modules
Infrared hair dryers they do not dry their hair with hot air, but with infrared radiation. They are quite expensive, belong to the professional category and dry your hair much faster than conventional hair dryers. Instead of a nichrome spiral, they use an infrared heating element (as in infrared heaters). Otherwise, their design is similar to that of a conventional hair dryer.
Video: h2d infrared hair dryer
You don't need to be a certified professional to disassemble and repair a hair dryer. It is enough to know a high school physics course and have straight arms growing from the right place. Go for it and you will succeed!