DIY hair dryer repair
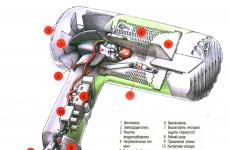
A hair dryer consists of a motor, a fan, heating elements, an electrical circuit that makes the elements work in concert. Depending on the number of modes, the manufacturer, the element base, appearance, and the composition of the switches are different. But nothing more complicated than a semiconductor thyristor will not be inside. Therefore, we will carry out home repair of hair dryers with our own hands.
The body is held in place by screws. The heads are often of a non-standard design. This is a plus sign, an asterisk, a pitchfork. Therefore, first of all, before fixing the hair dryer, let's take care of a tool that can cope with such a task. Fortunately, a set of bits costs 600 rubles today.
Sometimes the case flaps are additionally fastened together with special latches. This is a separate problem: experienced craftsmen often break plastic, desperate to cope with civilized methods. There are no subtleties, they come up with hidden screws hidden under stickers, plastic inserts, removable regulator caps. The fasteners are fictitious. There are no useful functions.
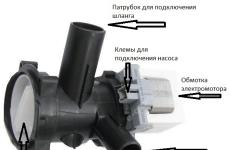
The hair dryer motor is powered by direct current 12, 24, 36 V. A diode bridge is used to rectify the mains voltage, in cheap models - a single diode. Power harmonic filtering is carried out by a capacitor connected parallel to the motor windings or included in a more complex filter. Inductors are rarely used in hair dryers due to their exorbitant mass. Therefore, knowledge of the principles of smoothing pulsations with RC-chains is enough to cope with the construction of a schematic diagram of a hair dryer being repaired. Sometimes a single coil (inductance) is used by the filter element.
The hair dryer switch simultaneously closes the circuit through which the spirals will be powered, starts the motor. Further schematic of the intervention is determined by the complexity:
- only the speed of rotation or only the temperature is regulated;
- the ability to select heating and air flow rate separately.
In most models of hair dryers, in parallel, there is protection against turning on the heaters when the motor is inactive. Protects the spiral.
Optionally available thermostat in the form of a special resistance or other sensitive element. Let's describe the breakdowns encountered by the faithful helpers of the beautiful half of humanity.
Typical inspection procedure
If the device is devoid of signs of life, it is unstable, the inspection begins with the power supply circuit. The repair of Rowenta hair dryers is schematically described below.
Attention! The described types of work require skills in handling electrical appliances. The authors discard responsibility for damage to health, property, arising from attempts to follow the recommendations given for repairing hair dryers.
Cord
Inspection of the power cord begins with a socket. There is a part of the malfunction: there is no voltage - the hair dryer does not work. If there is voltage in the outlet, the inspection of the cord begins with the point of entry into the case, go towards the plug. Work is performed on a de-energized device. A visual search for breaks and irregular formations - burners, insulation damage, breaks is carried out.
Then the body of the hair dryer is disassembled. Inside you have a chance to see the options for electrical resistance:
- A pair of detachable contacts.
- Soldering.
- The wiring is sealed in plastic caps.
One-piece connection
The last element of the list characterizes a non-separable connection, therefore, the case for testing is too complicated. Skillful hands, or rather, smart heads, Ukrainian brothers in mind are advised to use an ordinary needle to repair a hair dryer. Those who immediately grasp the train of thought will skip the next paragraph, start testing directly.

Do-it-yourself hair dryer repair begins with a continuity of the wiring. A Chinese tester, a light bulb, an indicator will do. A needle is attached to one terminal, which is then inserted into the power core in the area of the cap through the insulation to copper. The second terminal probes the legs of the plug. The call goes through for both cores. It is not worth doing more than 1 puncture per core when repairing a hair dryer (some will try to look for the breakage point as well), since the nature of the operation involves the ingress of moisture from wet hair.
Contact area
Even a child can ring the wire, having visually distinguishable docking points in front of his eyes. If damage is found, it is recommended to buy a new cord fitted with a non-separable plug. The likelihood of moisture ingress imposes restrictions on the choice of insulation of conductive parts used to repair a hair dryer.
Cases are common: the first glance reveals the place of damage to the cord entrance into the case. Slabs, carbon deposits, black insulation indicate the location of the fault.
At the junction with the body of the hair dryer, there is a vulnerable point of the wiring. The hostess takes the delicate device by the cord, shakes it from side to side, winds the cable around the handle. A vein with a crack sparks, the insulation heats up, burns out, the copper melts. This is the mechanism of damage to copper conductors.
On / off switch and switch
When updating, it is useful to short-circuit the switch, check: the hair dryer will change the behavior radically in response to an uncomplicated step. There are three-position switches, each position in a short-circuited state is checked separately. Remember, sketch out the original wire layout before you start fixing the hair dryer.
Checking the speed, temperature switches uses a similar circuit.
Examine the defective element identified during the restoration of the hair dryer. The carbon deposits are cleaned off with a file, sandpaper, eraser. The contacts are wiped with alcohol. Defective components are replaced with equivalents. A radical method is to short-circuit the power button while searching for suitable components.
Fan
Relatively often, the air duct is clogged with a hair dryer. It is necessary to remove the filter, if any, and clean it thoroughly. Remove dust from crevices with a soft brush.
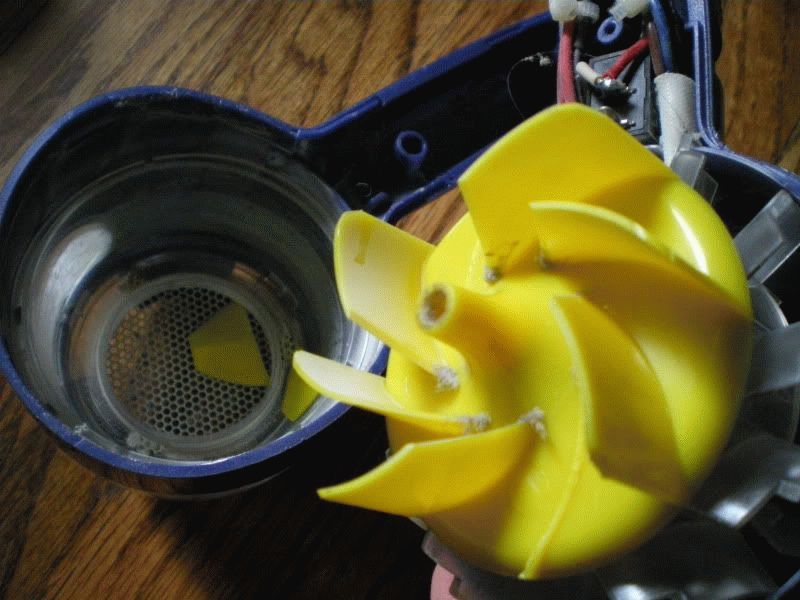
Lack of blade rotation or low rpm is often observed when the hair is coiled around the motor shaft. The propeller must be carefully removed from the shaft, in every possible way avoiding unnecessary efforts and distortions. After that, foreign objects are removed.
Spirals
A hair dryer usually has several heating elements. Visually, they should all look uniform. Make sure of this when fixing the hair dryer by opening the case. The detected breaks are eliminated by twisting the ends, soldering and tinning. You can also get some thin copper tubes and squeeze the ends of the broken spiral inward.
We observe defects of heating elements during repairs visually. A close inspection will tell you how to fix your hair dryer. Replacing spirals with similar purchased or home-made products made of nichrome wire is effective.
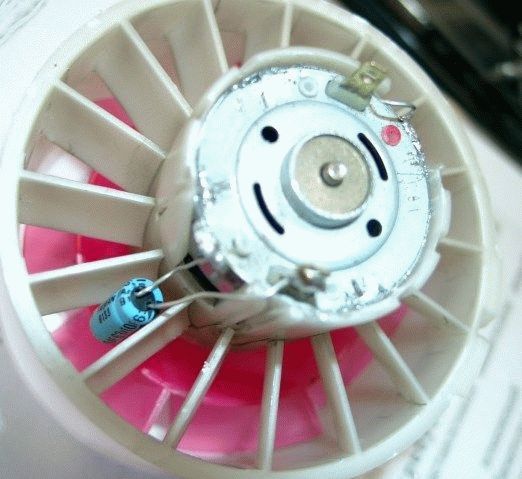
Engine
The electric motor of the hair dryer can be powered by both direct current and alternating current. If the diode bridge is burned out, the windings are damaged, normal functioning is impaired. A terrible crackle and sparks when turned on indicate a malfunction of the motor.
The motor windings are desoldered when repairing the hair dryer from the electrical circuit. For each wire, find a pair that rings. The conclusions are connected in threes, none should hang in the air. Replacement of the winding when repairing a hair dryer is carried out only in a workshop. However, folk craftsmen shake not worse than machine tools. Those who wish will try.
If the windings are in good working order, the brushes are examined, the copper surface under them is cleaned, and the tightness is estimated.
The axis should rotate freely. When repairing a hair dryer, it will not hurt to lubricate the rubbing surfaces, manually break in problem areas.
Chip
The getinax backing sometimes cracks, tearing the track. Tin the damaged area, lightly cover with solder.
Broken capacitors swell slightly. The upper edge of the cylinder contains shallow slots, when the product breaks, the sidewall inflates, bending outward. Replace such a capacitor first if you find a characteristic defect.
Burnt-out resistors darken. Some remain operational, it is advisable to replace such a radio element.
Thermostat
Some hair dryers are self-regulating. The effect is achieved by using a resistive divider, one arm of which is an element that responds to temperature. Further actions are determined by the parameter control implementation scheme. We recommend:
- eliminate the sensor altogether by breaking the circuit, try the device's reaction;
- short-circuit the wires after that, turn on, see what happens.
There is a great chance of failure if the device is trained to respond only to a fixed resistance value. It remains to look for a schematic diagram on the Internet or draw it yourself.
Repairing professional hair dryers is more difficult. Structural elements are often complemented by smooth controls and additional options such as the Care button. The spirals are made of special alloys that create negative ions when heated, which have a beneficial effect on the hair. The technique remains the same:
- cord;
- switches and buttons;
- dust removal;
- spirals;
- motor;
- visual inspection of capacitors, resistors.
Before repairing it, it is advisable to get a schematic diagram.
Industrial models are not much different from household ones. But drying your hair is not recommended. Such products are distinguished by their increased resistance to dust, shock, vibration, humidity, and other climatic factors. Home restoration of industrial hair dryers will not end well.
Electric radio products used in household models are not suitable for use in harsh environments. Requirements apply to wires, power cord, motor and coils.