How to install a satellite dish and set up the receiver. How to install and configure a satellite dish yourself
This article is intended for those who are still going to buy satellite dish or thinking about improving his receiving installation. In this case, the future viewer faces a logical question - what kind of equipment should he buy? I can immediately say that in order to get an answer to this question you need to find an answer to one more question for yourself - what do you want to watch?
And what can be seen on the vast expanses of our Motherland from satellites? Of course, the first magnitude stars are Hot Bird 13 ° E satellites. and Eutelsat W4 36 ° e. (NTV +, Tricolor). Programs from the Hot Bird satellite in Ukraine are received on a 60 cm antenna in Moscow and St. Petersburg are received with good quality on an antenna of 0.9 meters, and in the Urals an antenna of 1.8 meters. The signal power smoothly decreases from west to east, but it is this satellite that is most relevant in the European part of the former USSR. On these satellites you can see such popular channels as Eurosport, music - MCM, VIVA 2, Onyx, news - Euronews, EBN, a whole range of entertainment channels - movies, shows and everything else. In total digital format more than 600 channels are coming from this satellite, but many of them are encoded. Which of course does not stop satellite TV lovers!
In the western regions - Kaliningrad, Lithuania, Latvia, Western Ukraine and Western Belorussia - perhaps more relevant is the grouping of Astra satellites in the orbital position of 19 degrees. With these satellites you can take hundreds television programs. This position in these regions successfully competes with Hot Bird 13 ° E. In these areas, it makes sense to receive programs from both the Astra satellites and the Hot Bird / Eutelsat 2F1 satellites, although some channels are duplicated on them. There are simple technical solutions to implement this technique. For more details, you can read on this topic at http://sathome.0pk.ru/viewtopic.php?id=53
Now touch the choice satellite receiver
Many people often make mistakes, believing that the more expensive the receiver, the better it is. This is not entirely true. An expensive receiver is, of course, a good receiver with wide possibilities, but, more often, in everyday life you can do without them. The receiver is selected individually, specifically for your requirements and for your system. All receivers present on the market can be divided into several groups according to their capabilities, and based on this, classify them to a specific price category. But it is immediately worth noting that there are exceptions. These include, for example, devices of well-known companies, which always cost more than their fellows.
1. All receivers allow viewing free feeds (then they are free). If you do not want to contact pay-TV, pay a monthly fee, look for pirated cards, etc., or you are just completely satisfied with the channels that are broadcast in the open (free) form (there are such channels on all satellites), then you will you need the simplest FTA receiver (channels Free To Air) - the receiver of the lowest price category, which costs from 60 to 150 cu They differ from each other, as, in general, and all the rest, by the manufacturer, the quality of the output image and sound, additional functions and other technical characteristics.
More details can be found at http://sathome.0pk.ru/viewtopic.php?id=19
And at the end of this article, a little about popular satellites and TV channels.
This article was written according to observations from the southern part of Ukraine and is aimed at lovers satellite reception on small diameter antennas (90/110 cm.). I can assure you that in most cases all of the below can be extended to the whole territory of Ukraine and in general to the European part of the CIS.
The variety of satellites and the channels and services provided from them is impressive today. Many of you have noticed that, unfortunately, it makes no sense to tune in to some satellites. Why? Because the number of channels broadcast from them is usually very low, and it can be limited to a couple of channels in general, and all and most of them even these channels are of no interest to us.
On some satellites, broadcasts are conducted in the C-band, which requires the installation of an additional converter on your antenna (the standard Ku-band converter installed on most antenna systems is naturally not suitable for reception in C-band).
Hispasat 30 ° W
Basically, the channels of Spain and Portugal, or rather their paid packages, which our sat-lovers quite often can watch, thanks to pirates. There is something to watch, several football channels, a lot of music, including several MTV channels, many English-language channels, popular Disney, Discovery, National Geografic, etc. Lovers of XXX will also be satisfied. The only thing is that the satellite is hanging quite low and problems may arise in densely forested areas, especially for those who live in the private sector (in 1-2 floor houses). Reception on antennas from 60 cm.
NSS-7 22 ° W
In the Ku-band we watch Italian channels, almost everything can be watched from the popular Hot Bird satellite. Of interest is the channel of the agency Reuters - World News Service, which broadcasts world news stories for TV companies. At the time of the last test, the broadcasts were open.
Intelsat-901 18 ° W
Several coded German channels.
Telstar-12 15 ° W
A popular Internet provider is SpaceGate. The satellite is interesting by receiving several very popular Russian-language channels - National Geografic, NatGeo Wild, Extreme Sport, Zone Reality, as well as the popular channels Zone Club, PlayBoy, E! and others in English and some other languages.
Atlantic Bird-1 12.5 ° W
At the moment, we are watching several Arab channels from it, a few more little-known ones, as well as Italian channels, including MTV Italia.
Express-3A 11 ° W
Express-3A 11 ° W
In the C-band we look at channel 1, the World Wide Web and RTR-Planet. In the Ku-band a set of several Italian channels, television of Georgia, Serbia.
Amos-2/3 4 ° W
There are several dozen channels, most of which are closed. One of the satellites on which a part of the Ukrainian TV channels settled (for more details, see the article "Ukrainian satellite broadcasting").
Intelsat-10-02 / Thor 3/5 1 ° W
Conax-encoded Scandinavian Digital + package with many programs and channels in English (all Discovery, A1, VH-1 Classic ...), several Bulgarian and Slovak channels, Romanian packages, etc. It is very similar to the Sirius satellite. Antenna - 90-110 cm. Depending on the desired satellite rays.
Sirius-4 4.8 ° E
Part of Ukrainian channels, several channels in Russian TVCi, First Musical, NTV World (Via 2.6), First Channel World Wide Web (Via 2.6), RTR-Planeta (Via 2.6), Ren-TV (Via 2.6) - and several Baltic channels , including Russian-speaking 1st Baltic, 3+ Baltika (encoded in Via 2.5 / 2.6 and Videoguard), Viasat also encoded by Videoguard is of considerable interest thanks to excellent Western channels, as well as Russian channels TV1000, Russian TV1000 Cinema, Explorer, History, Discovery. Thanks to all this, the satellite is well known to our viewers. Presently. Reception of Ukrainian packages for antennas from 60 cm., Scandinavian - 90-110 cm.
Eutelsat W3a 7 ° E
Several European channels, distilling programs for Eurosport and Eurosportnews, 5-7 open channels from Turkey and several dozen interesting channels paid Turkish package.
More details can be found at http://sathome.0pk.ru/viewtopic.php?id=25
Among the usual, unprepared, users, there is an opinion that it is almost impossible to independently install and configure a satellite system. In fact, this is not the case. Below is a simple guide for dummies on how to set up and configure a satellite dish without calculations, satfinders and other attributes of professionals. If you are a professional installer, then the material below is unlikely to be of interest to you.
Although any information can now be found on the Web, I still tried to collect all the basic information I received on one page - for convenience. I will simply try to tell in my own words and with pictures how I installed and set up the satellite system. At once I will say that the installation is considered ONLY offset non-rotary antenna, and not direct focus or motorized. And yet - there is a possibility that no matter how you try, you may not be able to install and configure the antenna yourself. Then you have to invite a professional installer. It is hard for me to guess how this can be, but in the forums there were people fighting for a couple of days in useless attempts to tune the antenna. In other cases, an independent choice of components and self-installation can save some, sometimes considerable, amount. Among other things - I personally was just curious to install everything myself :) What is the difference between installing and configuring the system "by eye" from a professional installation? Almost nothing. Except for a more accurate initial calculation (which saves time), the mounting system and the antenna tuning principle are the same.
A warning: all work related to height and electricity is life threatening !!! If at least something causes the slightest fear, do not take risks, trust the professionals !!! Self install you produce at your own risk !!! In any case, remember about safety and that all dangerous high-altitude work is performed only by professionals in the presence of proven safety devices !!!
List of basic concepts.
TV satellite- a spacecraft located in the geostationary orbit of the Earth and sending television signal to a certain territory of the Earth by means of a transponder. All satellites are located in the equatorial plane, therefore, they are at the same latitude, but differ in longitude. In addition to the name, they also have the designation of longitude. For example, Amos 4W means that the satellite is called Amos and is located at 4th degree West (W is West). Hotbird 13E is a Hotbird satellite located at the 13th degree of east longitude (E is East). Based on the fact that the satellites are "fixed" at certain points in orbit, they also have certain areas of coverage of the Earth’s territory.
Transponder-the transceiver located on the satellite. It is characterized by the width and directionality of the beam being sent and the broadcast frequency. Broadcasting is conducted in two main bands-C-Band and Ku-Band. In the C band (4 GHz), mostly American and Russian satellites broadcast, in the Ku band (10.700-12.750 GHz), they are European. Broadcasting is conducted in linear or circular polarizations. Which in turn differ on vertical (V) and horizontal (H) for linear polarization and left (L) and right (R) for circular polarization. When they say "signal c transponder 11766H", imply a transponder that broadcasts at a frequency of 11766 MHz with horizontal polarization. Transponders on the satellite can be from a few to dozens of pieces.
Satellite antenna- the main element satellite system subscriber to receive the signal from the satellite. In simple words, the antenna “collects” a weak reflected satellite signal across its surface and focuses it to a certain point at which the converter is installed. The most common antennas are direct focus and offset. The focal points are a parabolic mirror with a focus in the geometric center, while offset ones have an offset focus (below the geometric center of the antenna). Accordingly, the converter at the direct-focus antenna is installed in the center, at the offset-offset to the bottom. Offset antennas received the greatest distribution among ordinary users. They are cheap, easy to install and configure. Antennas of various diameters and from various materials are produced. The material is usually either aluminum alloy or steel. There are non-rotating antennas (rigidly fixed) and antennas with an actuator (motor suspension). The motor suspension rotates the antenna to the specified angles and allows you to receive a signal from a huge number of satellites that are in sight. Configuring the last for a beginner is not very simple. The size of the antenna is chosen individually, depending on the signal power required to view the satellite. The diameter of the antenna must be chosen with a certain margin, since the atmospheric precipitation (heavy rain, snow) creates significant interference with the satellite signal. This is especially true of the Ku-band. But it does not need to go to extremes, if the antenna with a diameter of 0.9 m is enough, it is not necessary to buy a 1.5 m antenna, and it weighs more and its area is more exposed to the wind.
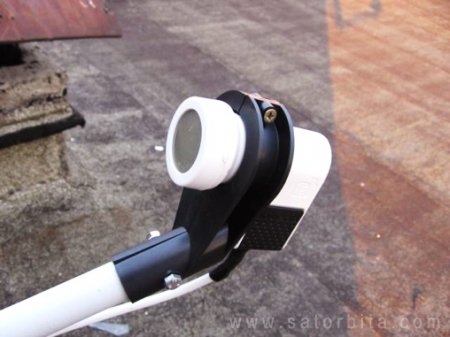
Converter- a device designed to receive the signal of the satellite reflected from the antenna and mounted on the appropriate holder in the focus of the antenna. The main purpose of the converter is to convert the frequency of the received satellite signal (for example, for the Ku-band it is from 10.7 to 12.75 GHz) to the intermediate (900 - 2150 MHz), at which the attenuation of the signal transmitted in the cable will be less. Since the power of the received satellite signal is very small, the second important task of the converter is to amplify it to an acceptable level for the receiver receiver path. Since any converter introduces its own noise level into the signal, but it is also low-noise, it is also called LNB (Low Noise Block). Converters are designed to work in linear polarization or circular and are selected depending on which of the polarizations the satellite is broadcasting (for example, popular NTV + packages are broadcast in circular polarization and the universal linear polarization converter, despite the name “universal”, is not suitable for reception). If the converter is universal, it switches to the specified polarization of 13/18 V supplied by the receiver. 13 V - vertical polarization, 18 V - horizontal. Another caveat: converters come in 1st output, 2, 4, 8th. Based on how many independent viewing points will be installed, a converter with a corresponding number of outputs must be installed, since all outputs of the converter are independent.
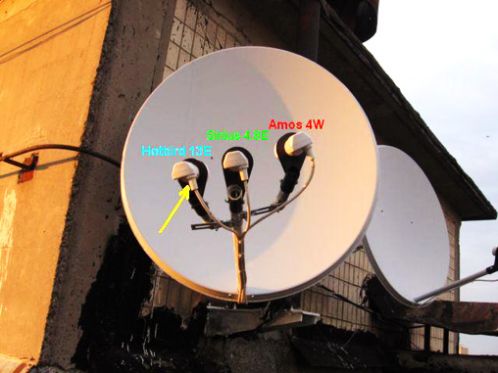
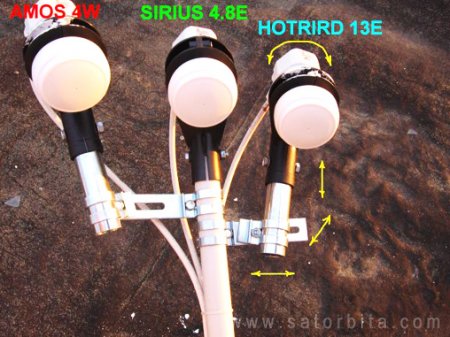
Multifeed- holder for an additional converter. Since the satellites are located in a geostationary orbit relatively close to each other (by certain measures), it is possible to simultaneously receive a signal on one antenna with the help of a multifede with several adjacent satellites. The classic example is 3 satellites (Hotbird 13E, Sisius 4.8E, Amos 4W) taken on 1 fixed antenna. As a rule, on the main (focal) holder of the antenna, the converter is configured to be tuned to Sisius 4.8E, to the 1st multi-converter to Hotbird 13E, to the 2nd multi-converter to Amos 4W.
Disek (DiseqC)This is a device that switches the signal from several converters to 1 cable. Since at the same time the receiver can receive a signal from only one satellite, the converter associated with that satellite must be connected to the receiver. This is exactly what the disk drive does — it connects the converter that is currently needed to the receiver. Diskek are different, designed to work on a specific protocol. The DiseqC 1.0 protocol is unidirectional and is used with a number of converters no more than 4. DiseqC 2.0 is the same, only bidirectional and compatible with 1.0. DiseqC 1.1 is used to connect a large number of converters. Protocol 1.2 is used to control the positioner.
A coaxial cable is connected to the inputs and output of the diskek through F-connectors. I think it's not worth the storyspeak about connectors and cable, everything is clear. However, the cable must have an impedance of 75 Ohms, made from high-quality materials that can withstand severe temperature drops and have a good shielding braid. The material of the core is steel, copper, copper-plated steel — unequivocally to say that it is unlikely to work out better.
Antenna bracket- a simple metal holder that is attached to the wall (as a rule) and to which the antenna is attached. Gotta bs it is made as securely as possible so that the wind does not tear the antenna.
Satellitesnd receiver-the device receiving the satellite signal from the converter and outputting it to the TV as a familiar picture with sound:) You bor receiver is the most difficult task when choosing a satellite system. Receivers are for openunencrypted channels (FTA), as well as for coded channels, with card readers, with slots for additional decoding modules, with an emulator, with various video outputs, with a hard disk and other useful and not so useful functions. Here, as they say, to any preferences and any wallet. There is one important point: today is actively put into operation satellite broadcasting in HD format (high definition video) and in MPEG4. Receivers supporting these formats are usually much more expensive than usual. Therefore, before buying a satellite system, you need to decide what content you will watch and what kind of receiver you need for this. Cheap receivers, as a rule, do not differ in high quality of the image and sound, big functionality and fast switching of channels. Although there are exceptions. Separate nuance emulator in the receiver. As its name implies, the emulator is designed for software emulation of a smart card. What is it for? A huge number of channels from different satellites are protected by encodings. Encodings come in various — Viaccess, Seca, Irdeto, Nagravision, Biss, etc. For example, some channel package in Biss coding is broadcast and you want to watch it (the antenna is tuned to the desired satellite), but you do not have a smart card. Then look for a software emulator in your receiver (usually written in undocumented features) and turn it on. Enter the channel access keys — and if everything is fine — watch it. As a rule, emulators in modern receivers support several encodings. Another application of the emulator is a phenomenon, popularly referred to as "sharing" or card-sharing. Yes, and also when choosing a receiver, you should pay attention to the availability and regularity of the outgoing software. Simply put-firmware. In new firmware, as a rule, errors are removed, parameters of satellites, transponders, new codes for emulator operation, etc. are added.
The choice of components.
To begin with, for some time I studied the Internet to familiarize myself with the question (since I was a complete teapot and the concept that such a diske or transponder had a very elusive, but I wanted to watch satellite TV). I decided on what content and from which satellites I want to watch (at the end of this article you can look at the lists of the most popular channels in our field and some links), what is accepted in my region and what antenna diameter, and also got acquainted with the advice of experienced including a lot of help Vladbel,for which a special thank you to him :) As a result, the satellites Amos 4W, Sirius 4.8E, Hotbird 13E were selected for viewing at one antenna 0.95m and Eutelsat W4 36E at 0.85m. As a Kiev store, I chose http://www.agsat.com.ua/ - everything is in one place and among other things, they are one of the manufacturer’s recommended Openbox vendors original the brand’s technology of the same name, and my soul was precisely for Openbox :) By the way, both the receivers I bought in Agsat and the receivers bought there for my friends were already flashed with satellite lists and lists of favorite channels from popular 4W + 5E satellites (4.8E) + 13E, and it concerned not only Openbox "s. It is convenient for those who do not want to bother too much with stuffing favorites :)
What was purchased and what were the selection criteria:
Two brackets for antennas.
- Disek - signal switch from 4 converters to 1 cable connected to the receiver.
Coaxial antenna cable, characteristic impedance 75 Ohm, bay 100m.
10 antenna screw-on F-connectors.
6 anchor bolts "" under the nut "8x72, washers, nuts and washers.
Plastic self-locking screed.
Steel cable with clips for fastening on it antenna cable and lowering it from the roof.
Plastic box for diskek.
- Lanсombox is a device for sharing (whoever wants, can search by any search engine the concept of "card sharing").
The budget of all this stuff was 1346 hryvnia or ~ $ 270.
Agree, the amount is small :)
Installation
The antenna must be installed in a line of sight to the south. Direct means that in front of the antenna there should be no obstacles in the form of houses, trees and other things. It is for this reason that the most optimal places for the installation of antennas, balconies and roofs. Since my windows are on the ground floor and are not far south, it was decided to install antennas on the roof. Fortunately, the roof of my typical 9-storey panel house is flat, thus facilitating installation (if there is no free access to the antenna with the converter number more than 1 after installing it on the bracket, see below *). What I needed on the roof other than antennas with their mounts:
- The puncher with drills with pobeditovy tips. The diameter of the drill is chosen slightly smaller than the diameter of the anchor bolt. Much less - it is impossible - the anchor will not enter the wall. More - will "hang out" and it really will not be able to tighten.
- Cross screwdriver.
- Cap key on 10.
- Spanner wrench at 13.
- Adjustable wrench.
- Hammer.
- Knife for cutting papers (for stripping the cable under the connectors).
- Nippers
- Receiver with remote control.
- Small tv.
- 220V with extension for 3 sockets.
The most interesting questions are where to send antennas? How to determine the direction? How to set up antennas without a satfinder (a device for tuning satellite antennas costs $ 400)? Since, in my case, it was decided to make the setting "by eye", I decided to determine the direction logically simply — I just looked at the direction of the antennas on the next roof and decided to turn mine in the same direction :)
The antenna with 3 converters is uniquely Sirius, Hotbird, Amos - we have a lot of these and the installer companies basically put them. Looking at the neighboring houses, you can find many of these and they are directed in one direction. That is why I have no doubts. To the left of it with one converter-probably NTVshnaya-we also have enough of these. If you have no such guidelines, the matter is worse. It is necessary to determine the southern direction and try to direct the antenna there. Once again an indispensable condition - in no case should there be any visible obstacles in the direction of the satellite in front of the antenna !!! Among other things, in a situation where the antenna is installed under someone's balconies or visors, make sure that streams of water or snow from the upper visor do not fall directly on your antenna. This does not bode well for reception.
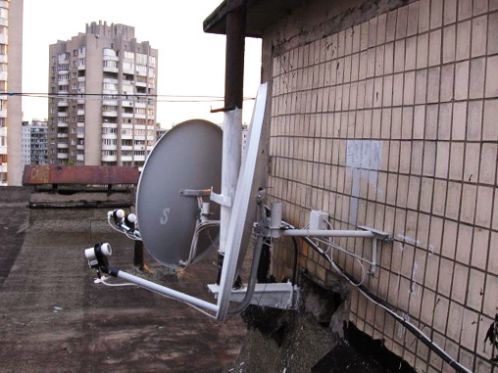
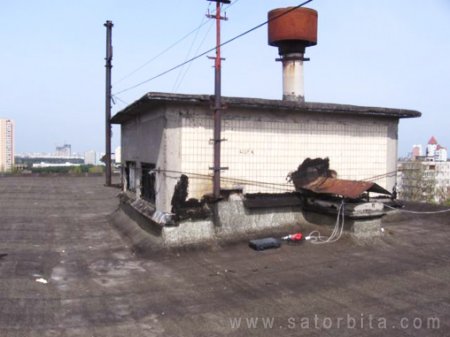
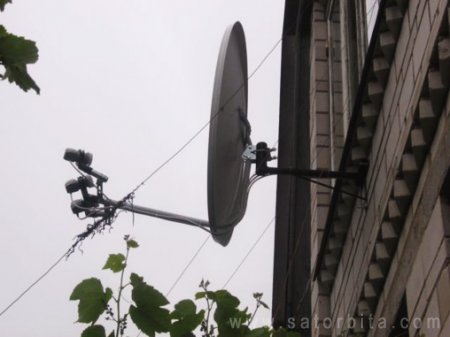
I decided to mount my antennas to this lift shaft:
![]()
Dull, of course, on the roof, but this is not a European-quality repair in the apartment :) I determined the installation location, marked the holes for the brackets, drilled them with a perforator, hammered in the anchors and secured the brackets (I didn’t completely take the further steps, so almost all the photos will be from the already installed systems). I will not dwell on fixing the brackets in detail — I think that everything is clear with this, the work is mechanical. Nevertheless, if someone does not know what an anchor bolt is, I'll show you how it looks:
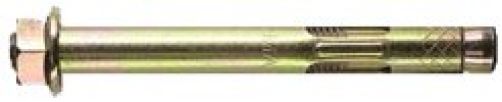
It consists of a glass and a bolt inside it. The bolt has a nut thread on one side and a thickening cone on the other. Just like in the figure, from left to right, carefully, in order not to damage the thread under the nut, it is driven into the drilled hole. I recommend that the nut be relaxed, but not unscrewed to the end, otherwise the bolt runs the risk of completely falling inside the hole, then you will not reach it. The same applies to putting on the bracket bolts (the nuts will still have to be removed) - make sure that the bolts do not fall into the inside of the glass, I recommend them to pull yourself or slightly tighten the cone so that the bolts do not loose. . The glass should be flush with the wall, and the thread with the nut, respectively, outside the hole. The principle of operation of the anchor bolt is as follows: when the nut begins to tighten with a key, it pulls the bolt inside the glass out due to the thread. The cone located at the end of the bolt enters the glass and burst it as much as possible inside the hole. As a result, to pull such a bolt out of the wall is a far from trivial task. That is why it is recommended to hang the bracket on self-expanding anchor bolts, and not on screws with plastic dowels. However, the choice of attachment is a personal matter of each. The only thing is if you still choose anchors, look at their quality, in particular, on the material and thickness of the glass. Because the anchors are too flimsy and will hold accordingly.
When installed on a balcony, you can even drill a wall and pass through it threaded rods of appropriate length (such as are sold in stores). Secured on both sides with nuts.
I will return to the installation.
The first tuned antenna with 3 converters on Sirius, Hotbird, Amos, the second on Eutelsat 36E. At the beginning, the brackets were bolted onto the screw anchors, later I changed them to wrenches. Screw turned out to be unreliable. The photo shows the first unsuccessful attempts in the form of the remaining holes. The brackets were also repainted by that time to enhance the original painting (and besides, there was just a lot of extra white paint, which can be seen in many slips :)):

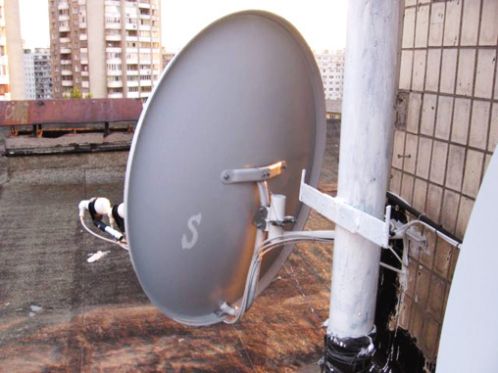

In the photo above, the antenna is already assembled, with converters, cable, etc. Initially, the antenna was simply assembled, hung on a bracket, and the converters with a cable clung only later. Thin metal cable — he just had one and I passed it through the antenna mount and screwed it to the elevator shaft rack in case the wind would pull out the anchors so that the antenna did not drop from the roof :) Actually, it’s almost unrealistic, but let it be - so I thought. To adjust the antenna in the vertical and horizontal planes, it is necessary to clamp the mount so that the antenna itself does not change its inclination, but at the same time it can be moved in planes with some effort. These nuts do not tighten up much until the final adjustment:
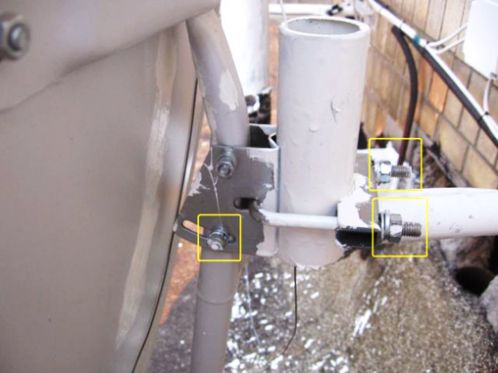
An unstressed left screw allows you to tune the antenna in a vertical plane, 2 unstressed right-rotate the antenna relative to the bracket in the horizontal plane.
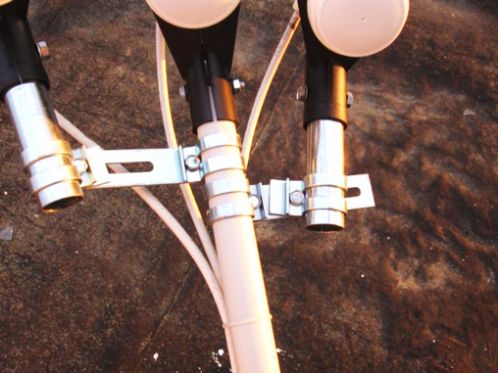
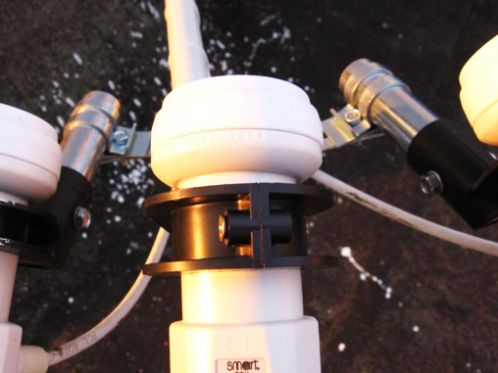
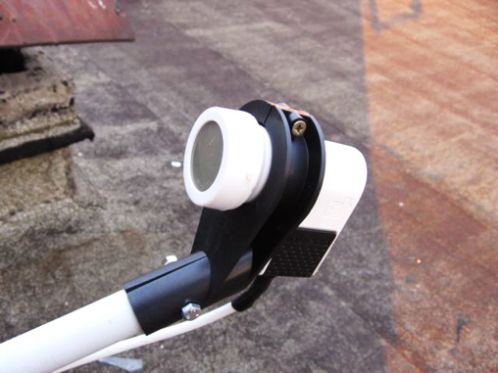
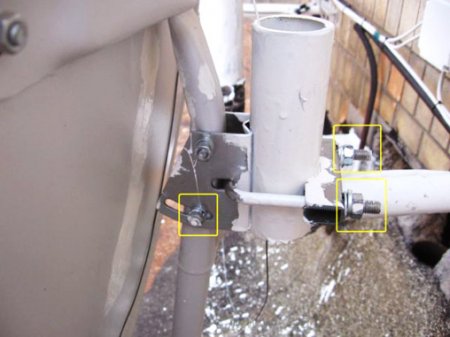
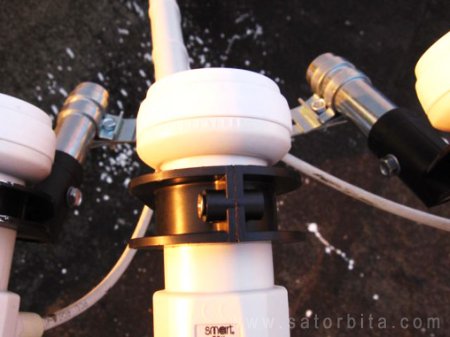
Then both multifids are put on the antenna's central holder of the converter, converters are inserted into all holders, and everything is tightened so that the converters in multifids can be turned with some effort in all planes (the cables to the converters are connected later). In the photo below you can see what multifeeds are and how they are mounted:
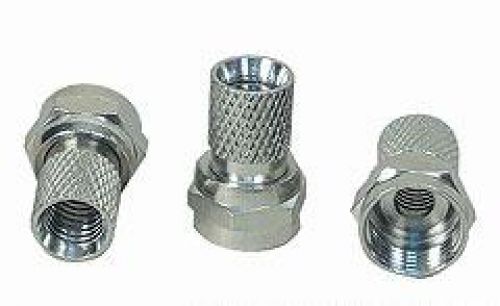
After this, the setup process begins. The F-connector is screwed to the central converter with a cable length of a couple of meters, the other end of the cable is screwed to the receiver. From some site I have pictures of what an F-connector is and how to properly wind it onto a cable. Here they are:
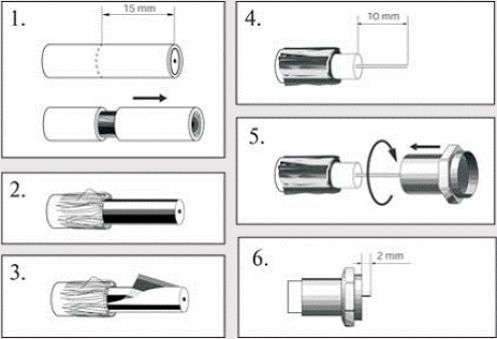
The receiver is connected to the TV, only after that the 220V power is turned on. An important moment - when winding on the cable of the F-connector, it is necessary to carefully monitor that the thin conductors of the cable shielding do not close with the central core, otherwise you can damage the receiver !!!
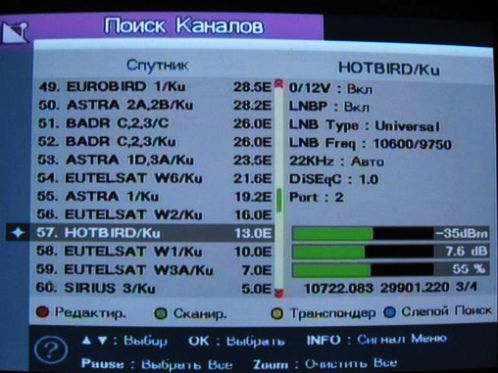
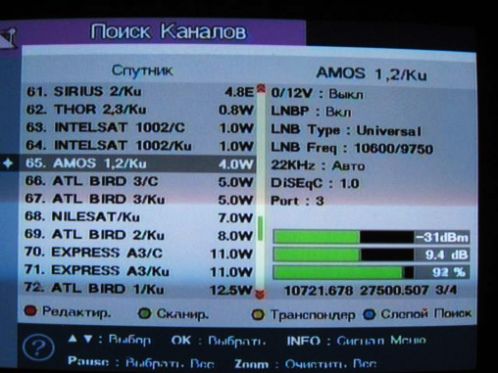
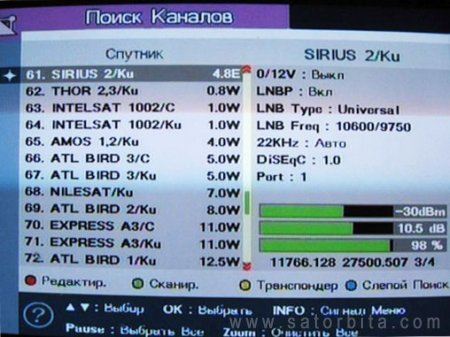
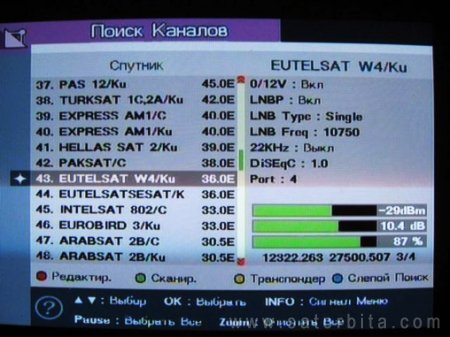
I turn on the TV, receiver, I go into the menu Installation-Search channels. In the list of satellites on the left, I choose Sirius 2 / Ku 4.8E — the fixed central converter will be tuned exactly to this satellite. On the right in the menu I choose:
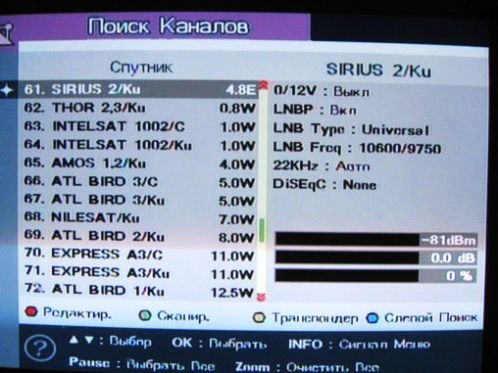
LNBP: On (turn on the converter power)
LNBP Type: Universal (universal type of converter, according to the one I bought)
LNBP Freq: 10600/9750 (indicated on converters)
22Khz: Auto (the signal to switch the Deceka, so leave)
DISEqC: None (I leave it, because the signal is connected directly for now, and not through the disk)
Then, using the yellow button on the remote, I go to the Transponder submenu and select a transponder to search for a signal in (I advise you to prescribe yourself several transponders selected from satellites with different polarizations and REALLY WORKING free channels (FTA). The list can be found on the links below. I decided for myself tune in to the following transponders:
| Satellite | Transponder | Channel for visual inspection |
| Sirius 4.8E | 11766 H | Novy Kanal, 5 Kanal (Ukraine) |
| Sirius 4.8E | 11996 H | Russia Today |
| Sirius 4.8E | 12073 H | Inter + |
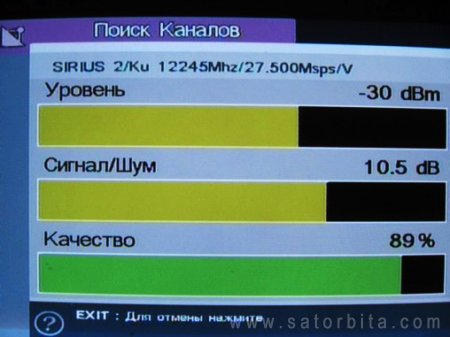
| Sirius 4.8E | 12245 V | Europe by Satellite |
| Hotbird 13E | 10971 H | 3 Channel |
| Hotbird 13E | 11034 V | RTR Planeta |
| Hotbird 13E | 11411 H | Adjara TV |
| Hotbird 13E | 11766 V | Rai uno |
| Hotbird 13E | 12207 H | Fashion TV Europe |
| Amos 4W | 10722 H | , 1 + 1, Kino |
| Amos 4W | 10759 H | Telekanal STB, Tonis, MTV Ukraine |
| Amos 4W | 10925 V | Russia Today |
| Eutelsat W4 36E | 11727 L | Gameplay TV, Ru TV |
| Eutelsat W4 36E | 12322 R | NTV Plus Infokanal |
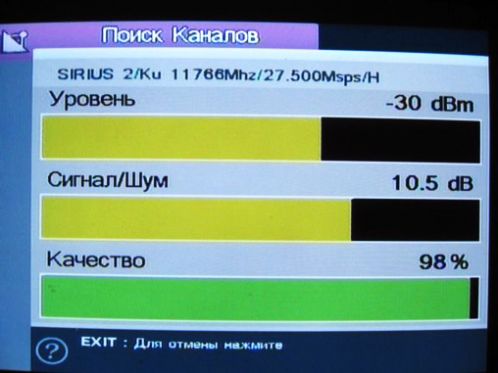
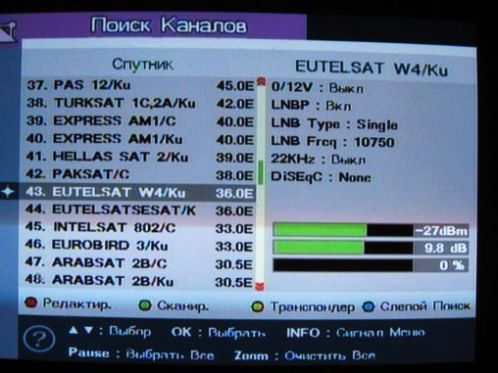
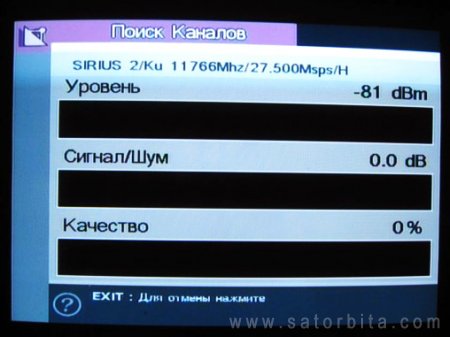
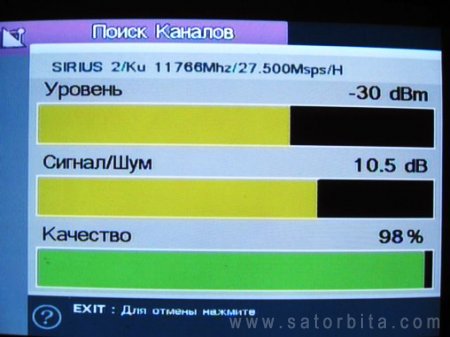
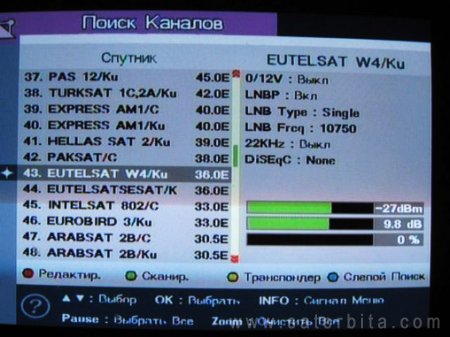
For example, in my case, for a start, it will be a 11766H transponder that broadcasts at 11,666 MHz with horizontal polarization. For convenience, the signal quality can be displayed full screen with the Info button. I will be guided on the bottom scale "Quality":
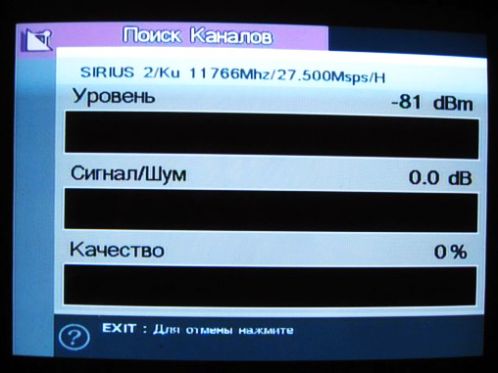
What do we see in this photo? Sad picture-signal quality-0! As a matter of fact, what was to be expected? The antenna, for the time being, “looks” toward the satellite very approximately.
Then comes the most difficult moment that requires a lot of exposure - this is setting up the antenna in the planes. Why the shutter speed is needed is literally a few millimeters and there will be no signal. Not that he will be bad, but he will not be at all! The setting is as follows: it is necessary to install the antenna in a certain vertical position, in my position it was approximately like this:
After that, you need to rotate the antenna very, very smoothly in a horizontal direction and at the same time carefully look at the quality scale, first in one direction, and if the scale does not change from 0, then to another. When it is found that the quality scale has grown to at least 10-15 - this is already the first success, you can stop and rest :) If you cannot find a signal in the whole horizontal plane, you need to slightly change the vertical angle of the antenna and start moving again in the horizontal plane to appearance of the signal. When a signal is found at least some: now you need to try to move the antenna even more smoothly left and right and achieve the maximum level of signal quality. Having achieved this, you need to try to achieve an even larger signal by very smoothly moving the antenna up and down. After that, you can try turning the converter slightly around its axis in the holder (there are marks on the converter for this):
To achieve the maximum signal can ONLY be a combination of all these adjustments. Another nuance - if you can’t find the signal under any circumstances, and you double-check everything, including the receiver settings, it makes sense to try another converter, perhaps this one is faulty. I get the maximum signal level that I can pull out:
It would seem, you can calm down and tighten all the adjusting screws? As if not so! After all, the setting was made for the transponder broadcasting in horizontal polarization (in the picture at the end of the 2nd timeline there is the letter H), but you also need to configure some transponder in the vertical (V) polarization:

In my case, turning the converter in the counterclockwise holder helped to achieve a better signal quality in vertical polarization.
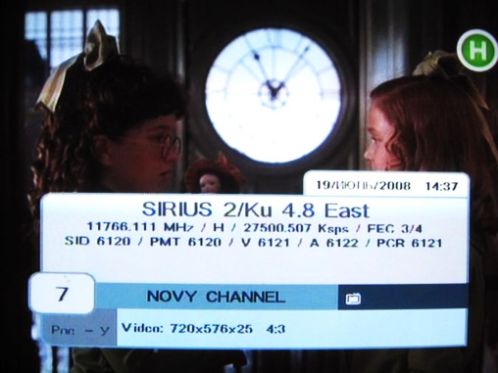
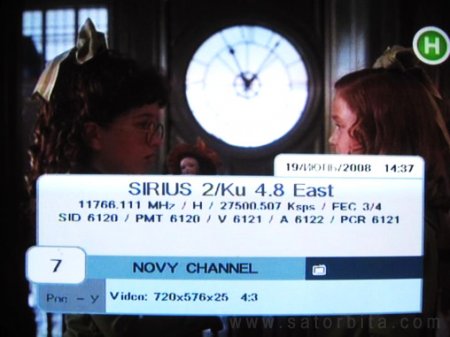
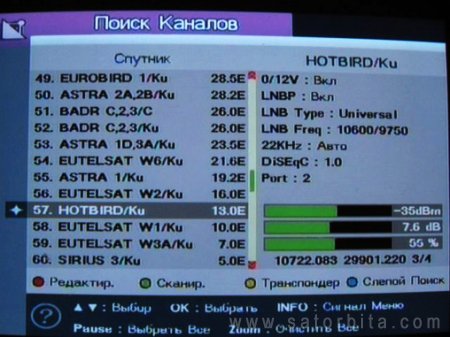
After that, you can scan the transponders (look in the documentation with your receiver for how to do it) and visually see if the channels are received and match the selected satellite:
When the signals in the horizontal and vertical polarizations are maximal from what can be pulled out, it is necessary to tightly tighten all the adjusting undersized nuts. And here there is one unpleasant moment - you tighten the nut, while the antenna slightly changes its direction, and the signal quality can significantly go away! So it is also necessary to tighten very carefully. Everything, the antenna and the first converter are configured. I turn off the receiver from the outlet, wind the cable from the central converter to the converter on the left (to the one on the multifid, if you look at the antenna from the front), turn everything on, choose Hotbird 13E in the menu, the same menu settings on the right as for Sirius, select working transponder and trying to adjust the maximum signal quality. Only this time I’m not adjusting the antenna, but the converter itself on a multifeed. It can move in all planes with respect to the antenna focus — left, right, up, down, forward, backward:

All nuts are tightened when the signal is maximum. I do not forget about checking in both polarizations. I scan Hotbird's transponders and check some free feeds visually.
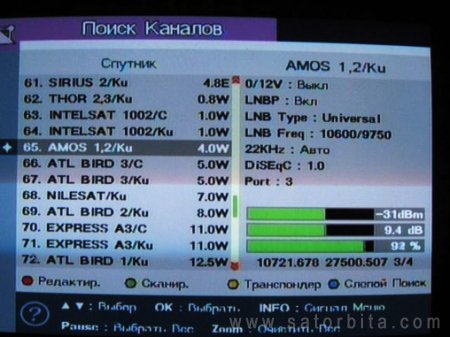
I turn everything off again, twist the cable to the 3rd converter, turn everything on, select Amos 4w and make the settings for it. All the same. After that, the setup of the first antenna can be considered finished.
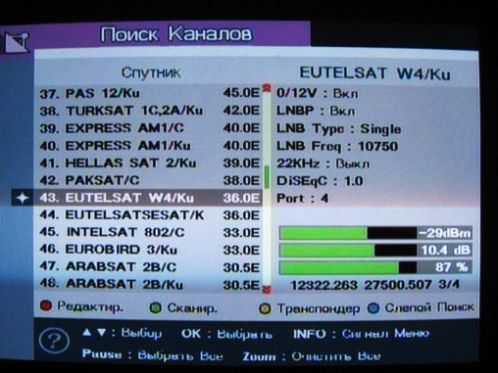
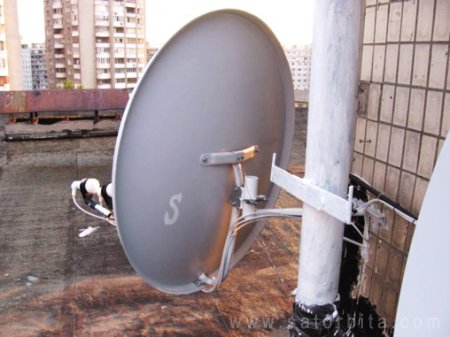
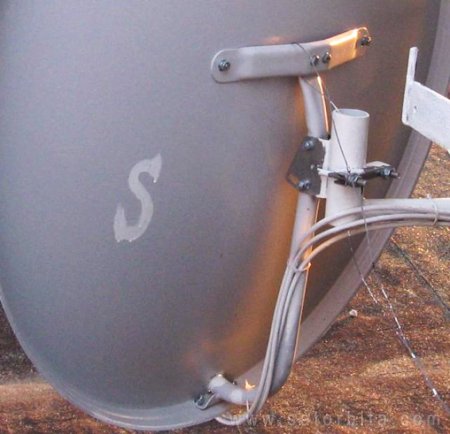
Second antenna Which I am going to configure on Eutelsat W4 36E (NTV +). Here it is easier - one converter. And since it is of circular polarization, it is not very important how it will be deployed inside the holder. Best of all, with the cable down so that it does not accumulate sediments:
Accordingly, you need to adjust the antenna in the horizontal and vertical planes. I turn everything off, twist the cable to this converter. Settings according to the purchased converter are:
I tune the second antenna, check the antenna in both polarizations on different transponders. Since the converter is designed for circular polarization, it is checked not for H and V, but for L and R (left and right).
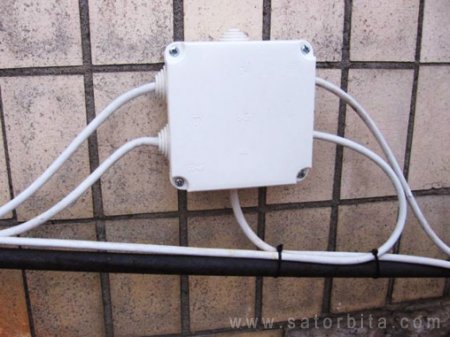
That's all. You can turn everything off. Now you need to make the signal switching through the disk. It looks like this:
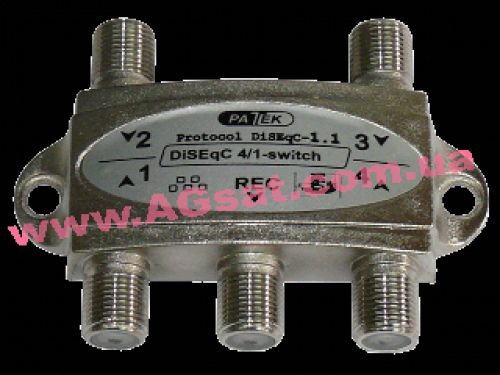
My disk has 1 output to the receiver, denoted by REC and 4 inputs for converters, called 1,2,3,4. Converters connect as follows:
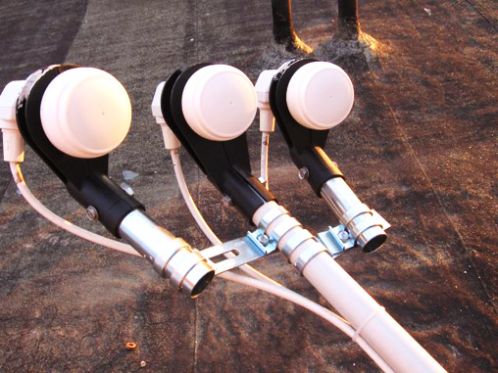
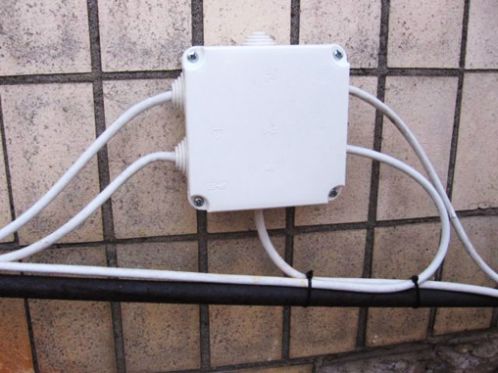
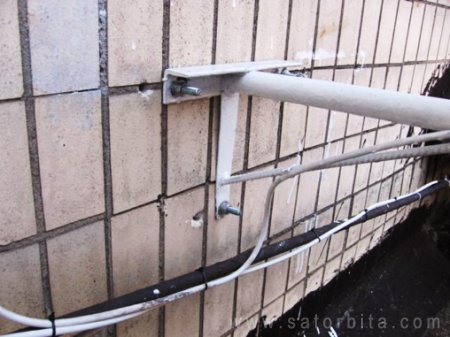
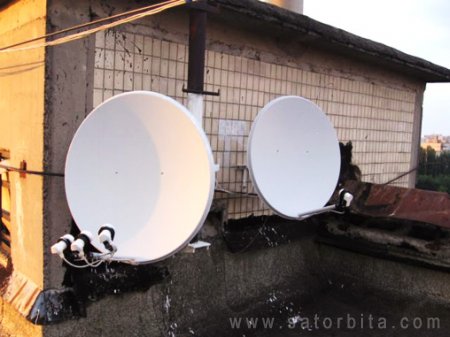
With the connection, everything is simple - a cable section is connected to each converter, which is connected to the corresponding input of the device. If you install one antenna with the 1st converter, then the diske is not needed. If there is one antenna for 2 converters and there will be 2 ports free at the diske, that's okay. The disk is installed close to the antennas and preferably is in a waterproof box (I bought it from an electrical goods store) in order to avoid precipitations:
Ventilation holes are desirable in the bottom of the box for the diskek. Sharp cable bends are not allowed! F-connectors on the converters are closed or included with a set of caps or shrink tubing:
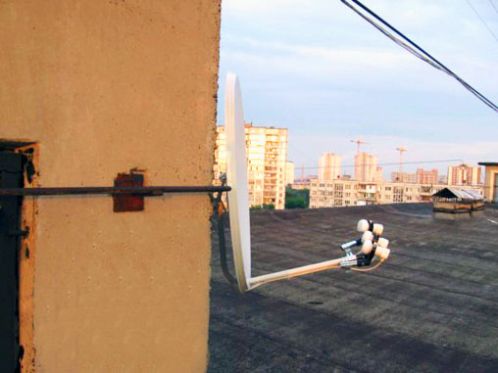
By the way, the above photo shows the distances between the converters and their angles of inclination. Right antenna directed to the Eutelsat W4.
I configure the Diske protocol (in my case 1.0) in the receiver's menu and the distribution of the converters according to the inputs (ports) of the Diske:

In the pictures you can see which inputs (ports) of the disk which converters are assigned to (which satellite). 0 / 12V: On only for LanComBox "a. If you do not have it, then you do not need to turn on 12V. I save the changes, check whether all the inputs of the disk are working (i.e. there is a signal on all configured satellites).
Someone may have a question, but why not immediately connect all the converters to the disk, all the inputs to register and configure the antenna? The answer is simple - with a really non-working diske you will kill a LOT of time and nerves, trying to set up a signal that cannot be found by definition. Among other things, without a disk, you will quickly determine whether you have purchased the converter.
Cable pull ties, so that nothing dangles. It remains to stretch the cable to attach the cable, pull the cable down and pull. Dissolve the cable in the apartment, connect the receiver, TV and watch satellite TV :)
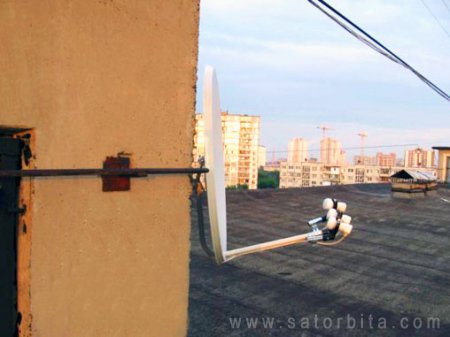
That's in the end what I got on the roof:

* - If the antenna after installation on the bracket will not be accessible:
when the converter on the antenna is one-here, everything is clear, nothing complicated — it is fixed rigidly on the antenna, the antenna is hung out of the window (or somewhere else) on the bracket, and is adjusted in the vertical and horizontal planes all from the same window (go back to the warning in the beginning of the instructions !!!). What to do if you need to configure another 1 additional converter (or more) on the multifeed? At the dacha I did this: screwed the bracket to the old tall cabinet, put the assembled antenna on it, put all this construction in front of the wide-open window and set it up. By the way, the funny moment is with the very first switching on, with the approximate inclinations of the antenna, without additional tuning, I got a quality level on Sirius more than 70%! I could not believe my eyes :)) In a word, in this form I set up all 3 converters, carefully pinched everything, hung the bracket by the window and hung the antenna on it with the converters already tuned. It remains only to adjust it in the planes.

The important moment in the high-altitude installation of satellite antennas: in addition to safety and self-insurance first of all, when you hang an antenna on a bracket or mast, always insure the antenna. Just imagine what an antenna that could have been planted from a height with a casual passerby’s head or with a body of an expensive BMW can do it :)
Something else that is installed on the roof of the antenna is grounding, but some installers are ardent opponents of this. I tend to conclude that grounding the antenna still does not hurt.
And finally:
The list of the most popular channels according to the information I have found for today from the trinity Hotbird, Sirius, Amos (be prepared for the fact that some rotation and channel coding can occur from time to time):
Channels of Ukraine (satellite Sirius)
Inter +,
Russian speaking channels (Hot Bird)
RTR-Planeta, RTR-Sport, ORT-international, Russian music channel, RBC TV, R1, TBN Russia, Ajara TV - channel t
Watched: 19529
0
At once I will say that the installation is considered ONLY offset non-rotary antenna, and not direct focus or motorized. And yet - there is a possibility that no matter how you try, you may not be able to install and configure the antenna yourself. Then you have to invite a professional installer. What is the difference between installing and configuring the system "by eye" from a professional installation? Almost nothing. Except for a more accurate initial calculation (which saves time), the mounting system and the antenna tuning principle are the same.
A warning!!! Warning !!! All work related to height and electricity is life threatening !!! If at least something causes the slightest fear, do not take risks, trust the professionals !!! You make your own installation at your own risk !!! In any case, remember about safety and that all dangerous high-altitude work is performed only by professionals in the presence of proven safety devices !!!
List of basic concepts.
TV satellite - a spacecraft located in the geostationary orbit of the Earth and sending a television signal to a certain territory of the Earth via a transponder. All satellites are located in the equatorial plane, therefore, they are at the same latitude, but differ in longitude. In addition to the name, they also have a longitude designation. For example, Amos 4W means that the satellite is called Amos and is located at 4th degree West (W is West). Hotbird 13E is a Hotbird satellite located at the 13th degree of east longitude (E is East). Based on the fact that the satellites are "fixed" at certain points in orbit, they also have certain areas of coverage of the Earth’s territory.
Transponder - transceiver located on the satellite. It is characterized by the width and directionality of the beam being sent and the broadcast frequency. Broadcasting is conducted in two main bands-C-Band and Ku-Band. In the C band (4 GHz), mainly American and Russian satellites broadcast, in the Ku band (10.700-12.750 GHz), they are European. Broadcasting is conducted in linear or circular polarizations. Which in turn differ on vertical (V) and horizontal (H) for linear polarization and left (L) and right (R) for circular polarization. When they say "signal c transponder 11766H", imply a transponder that broadcasts at a frequency of 11766 MHz with horizontal polarization. Transponders on the satellite can be from a few to dozens of pieces.
Satellite antenna - the main element of the subscriber’s satellite system for receiving a signal from a satellite. In simple words, the antenna “collects” a weak reflected satellite signal over its entire surface and focuses it at a certain point at which the converter is installed. The most common antennas are direct focus and offset. The focal points are a parabolic mirror with a focus in the geometric center, while offset ones have an offset focus (below the geometric center of the antenna). Accordingly, the converter at the direct-focus antenna is installed in the center, at the offset-offset to the bottom. Offset antennas received the greatest distribution among ordinary users. They are cheap, easy to install and configure. Antennas of various diameters and from various materials are produced. The material is usually either aluminum alloy or steel. There are non-rotating antennas (rigidly fixed) and antennas with an actuator (motor suspension). The motor suspension rotates the antenna to the specified angles and allows you to receive a signal from a huge number of satellites that are in sight. Configuring the last for a beginner is not very simple. The size of the antenna is chosen individually, depending on the signal power required to view the satellite. The diameter of the antenna must be chosen with a certain margin, since the atmospheric precipitation (heavy rain, snow) creates significant interference with the satellite signal. This is especially true of the Ku-band. But it does not need to go to extremes, if the antenna with a diameter of 0.9 m is enough, it is not necessary to buy a 1.5 m antenna, and it weighs more and its area is more exposed to the wind.
Converter - a device designed to receive the satellite signal reflected from the antenna and mounted on the appropriate holder in the antenna focus. The main purpose of the converter is to convert the frequency of the received satellite signal (for example, for the Ku-band it is from 10.7 to 12.75 GHz) to the intermediate (900 - 2150 MHz), at which the attenuation of the signal transmitted in the cable will be less. Since the power of the received satellite signal is very small, the second important task of the converter is to amplify it to an acceptable level for the receiver receiver path. Since any converter introduces its own noise level into the signal, but it is also low-noise, it is also called LNB (Low Noise Block). Converters are designed to work in linear polarization or circular and are selected depending on which of the polarizations the satellite is broadcasting (for example, popular NTV + packages are broadcast in circular polarization and the universal linear polarization converter, despite the name “universal”, is not suitable for reception). If the converter is universal, it switches to the specified polarization of 13/18 V supplied by the receiver. 13 V - vertical polarization, 18 V - horizontal. Another caveat: converters come in 1st output, 2, 4, 8th. Based on how many independent viewing points will be installed, a converter with a corresponding number of outputs must be installed, since all outputs of the converter are independent.
Multifeed - holder for an additional converter. Since the satellites are located in a geostationary orbit relatively close to each other (by certain measures), it is possible to simultaneously receive a signal on one antenna with the help of a multifede with several adjacent satellites. The classic example is 3 satellites (Hotbird 13E, Sirius 4.8E, Amos 4W) taken on 1 fixed antenna. As a rule, on the main (focal) holder of the antenna, a converter is installed that can be adjusted to Sirius 4.8E, to the 1st multi-converter to Hotbird 13E, to the 2nd multi-converter to Amos 4W.
Disek (DiseqC) This is a device that switches the signal from several converters to 1 cable. Since at the same time the receiver can receive a signal from only one satellite, the converter associated with that satellite must be connected to the receiver. This is exactly what the disk drive does — it connects the converter that is currently needed to the receiver. Diskek are different, designed to work on a specific protocol. The DiseqC 1.0 protocol is unidirectional and is used with a number of converters no more than 4. DiseqC 2.0 is the same, only bidirectional and compatible with 1.0. DiseqC 1.1 is used to connect a large number of converters. Protocol 1.2 is used to control the positioner.
A coaxial cable is connected to the inputs and output of the diskek through F-connectors. I think you should not talk about connectors and cable, everything is clear. However, the cable must have an impedance of 75 Ohms, made from high-quality materials that can withstand severe temperature drops and have a good shielding braid. The material of the core is steel, copper, copper-plated steel — unequivocally to say that it is unlikely to work out better.
Antenna bracket - a simple metal holder that is attached to the wall (as a rule) and to which the antenna is attached. It must be done as safely as possible so that the wind does not tear the antenna.
Satellite receiver - a device that receives the satellite signal from the converter and displays it on TV as a familiar picture with sound :) Choosing a receiver is the most difficult task when choosing a satellite system. Receivers are for open uncoded channels (FTA), as well as for coded channels, with card receivers, with slots for additional decoding modules, with an emulator, with various video outputs, with a hard disk and other useful and not so powerful functions. Here, as they say, to any preferences and any wallet. There is one important point: today satellite broadcasting in HD format (high resolution video) and MPEG4 is actively being commissioned. Receivers supporting these formats are usually much more expensive than usual. Therefore, before buying a satellite system, you need to decide what content you will watch and what kind of receiver you need for this. Cheap receivers, as a rule, do not differ in high quality of the image and sound, big functionality and fast switching of channels. Although there are exceptions. Separate nuance emulator in the receiver. As its name implies, the emulator is designed for software emulation of a smart card. What is it for? A huge number of channels from different satellites are protected by encodings. Encodings come in various — Viaccess, Seca, Irdeto, Nagravision, Biss, etc. For example, some channel package in Biss coding is broadcast and you want to watch it (the antenna is tuned to the desired satellite), but you do not have a smart card. Then look for a software emulator in your receiver (usually written in undocumented features) and turn it on. Enter the channel access keys — and if everything is fine — watch it. As a rule, emulators in modern receivers support several encodings. Another application of the emulator is the phenomenon, popularly referred to as "sharing" or "card sharing". Yes, and also, when choosing a receiver, you should pay attention to the availability and regularity of the outgoing software. Simply put-firmware. In new firmware, as a rule, errors are removed, parameters of satellites, transponders, new codes for the emulator, etc. are added.
What will be used and what were the selection criteria:
Offset antenna 0.95m made in Kharkov. Painted steel. To receive a signal from Amos 4W, Sirius 4.8E, Hotbird 13E.
Offset antenna 0,85m made in Kharkov. Painted steel. To receive a signal from the Eutelsat W4 36E.
Openbox X-810 receiver. Firstly, Openbox has the most powerful technical support (new firmware comes out almost every couple of weeks), secondly, excellent picture quality, thirdly the built-in emulator, fourthly, support LanComBox (for fans of sharinga).
Three universal linear polarization converter SINGLE TITANIUM TSX 0,2dB. Low noise level declared.
One SINGLE Circular INVERTO IDLP-40SCIRCL converter for Eutelsat W4 36E (NTV +).
Two multifida.
Two brackets for antennas.
Disk signal switch with 4 converters to 1 cable connected to the receiver.
Coaxial antenna cable, characteristic impedance 75 Ohm, bay 100m.
10 antenna screw-on F-connectors.
6 anchor bolts "" under the nut "8x72, washers, nuts and washers.
Plastic self-locking screed.
Steel cable with clips for fastening the antenna cable on it and lowering it from the roof.
Plastic box for diskek.
Lanсombox is a device for sharing (who wants, can search by any search engine the concept of "card sharing").
Installation
The antenna must be installed in a line of sight to the south. Direct means that in front of the antenna there should be no obstacles in the form of houses, trees and other things. It is for this reason that the most optimal places for installing antennas are balconies and roofs. Since my windows are on the ground floor and are not far south, it was decided to install antennas on the roof. Fortunately, the roof of my typical 9-storey panel house is flat, thus facilitating installation (if there is no free access to the antenna with the converter number more than 1 after installing it on the bracket, see below *). What was needed on the roof except antennas with their fixings:
The puncher with drills with pobeditovy tips. The diameter of the drill is chosen slightly smaller than the diameter of the anchor bolt. Much less - it is impossible - the anchor will not enter the wall. More - will "hang out" and it really will not be able to tighten.
- Cross screwdriver.
- A cap key on 10.
- The spanner key at 13.
- Adjustable wrench.
- Hammer.
- Knife for cutting papers (for stripping the cable under the connectors).
- Nippers.
- Receiver with remote control.
- Small TV.
- 220V with extension for 3 sockets.
The most interesting questions are where to send antennas? How to determine the direction? How to set up antennas without a satfinder (a device for tuning satellite antennas costs $ 400)? Since, in my case, it was decided to make an "on-the-eye" adjustment, I determined the direction logically, I just looked at the direction of the antennas on the neighboring roof and turned mine in the same direction.
The antenna with 3 converters is uniquely Sirius, Hotbird, Amos - we have a lot of these and the installer companies basically put them. Looking at the neighboring houses, you can find many of these and they are directed in one direction. That is why I have no doubts. To the left of it with one converter-probably NTVshnaya-we also have enough of these. If you have no such guidelines, the matter is worse. It is necessary to determine the southern direction and try to direct the antenna there. Once again an indispensable condition - in no case should there be any visible obstacles in the direction of the satellite in front of the antenna !!! Among other things, in a situation where the antenna is installed under someone's balconies or visors, make sure that streams of water or snow from the upper visor do not fall directly on your antenna. This does not bode well for reception.
I decided to mount my antennas to this lift shaft:
Unsightly, of course, on the roof, but this is not a European-quality repair in the apartment. I determined the installation location, marked out the holes for the brackets, drilled them with a perforator, hammered in the anchors and secured the brackets (I didn’t take pictures of the further steps, so almost all photos will be from the systems already installed) . I will not dwell on fixing the brackets in detail — I think that everything is clear with this, the work is mechanical. Nevertheless, if someone does not know what an anchor bolt is, I'll show you how it looks:

It consists of a glass and a bolt inside it. The bolt has a nut thread on one side and a thickening cone on the other. Just like in the figure, from left to right, carefully, in order not to damage the thread under the nut, it is driven into the drilled hole. I recommend that the nut be relaxed, but not unscrewed to the end, otherwise the bolt runs the risk of completely falling inside the hole, then you will not reach it. The same applies to putting on the bracket bolts (the nuts will still have to be removed) - make sure that the bolts do not fall into the inside of the glass, I recommend them to pull yourself or slightly tighten the cone so that the bolts do not loose. . The glass should be flush with the wall, and the thread with the nut, respectively, outside the hole. The principle of operation of the anchor bolt is as follows: when the nut begins to tighten with a key, it pulls the bolt inside the glass out due to the thread. The cone located at the end of the bolt enters the glass and burst it as much as possible inside the hole. As a result, to pull such a bolt out of the wall is a far from trivial task. That is why it is recommended to hang the bracket on self-expanding anchor bolts, and not on screws with plastic dowels. However, the choice of attachment is a personal matter of each. The only thing is if you still choose anchors, look at their quality, in particular, on the material and thickness of the glass. Because the anchors are too flimsy and will hold accordingly.
When installed on a balcony, you can even drill a wall and pass through it threaded rods of appropriate length (such as are sold in stores). Secured on both sides with nuts.
I will return to the installation.
The first tuned antenna with 3 converters on Sirius, Hotbird, Amos, the second on Eutelsat 36E. At the beginning, the brackets were bolted onto the screw anchors, later I changed them to wrenches. Screw turned out to be unreliable. The photo shows the first unsuccessful attempts in the form of the remaining holes. The brackets were repainted by that time to enhance the original painting:
In the photo above, the antenna is already assembled, with converters, cable, etc. Initially, the antenna was simply assembled, hung on a bracket, and the converters with a cable clung only later. A thin metal cable — he just had one and I passed it through the antenna mount and screwed it to the lift shaft rack in case the wind pulled out the anchors so that the antenna did not drop from the roof. In fact, it is almost unreal, but let it be, I thought so. To adjust the antenna in the vertical and horizontal planes, it is necessary to clamp the mount so that the antenna itself does not change its inclination, but at the same time it can be moved in planes with some effort. These nuts do not tighten up much until the final adjustment:
An unstressed left screw allows you to tune the antenna in a vertical plane, 2 unstressed right-rotate the antenna relative to the bracket in the horizontal plane.
Then both multifids are put on the antenna's central holder of the converter, converters are inserted into all holders, and everything is tightened so that the converters in multifids can be turned with some effort in all planes (the cables to the converters are connected later). In the photo below you can see what multifeeds are and how they are mounted:

After this, the setup process begins. The F-connector is screwed to the central converter with a cable length of a couple of meters, the other end of the cable is screwed to the receiver. From some site I have pictures of what an F-connector is and how to properly wind it onto a cable. Here they are:

The receiver is connected to the TV, only after that the 220V power is turned on. An important moment - when winding on the cable of the F-connector, it is necessary to carefully monitor that the thin conductors of the cable shielding do not close with the central core, otherwise you can damage the receiver !!!
I turn on the TV, receiver, I go into the menu Installation-Search channels. In the list of satellites on the left, I choose Sirius 2 / Ku 4.8E — the fixed central converter will be tuned exactly to this satellite. On the right in the menu I choose:
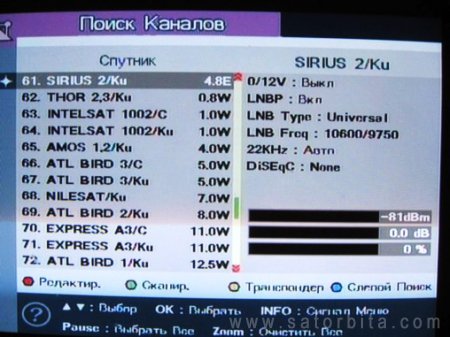
LNBP: On (turn on the converter power)
LNBP Type: Universal (universal type of converter, according to the one I bought)
LNBP Freq: 10600/9750 (indicated on converters)
22Khz: Auto (the signal to switch the box, and leave)
DISEqC: None (and leave, because the signal is connected while directly, and not through the disk)
Then, using the yellow button on the remote, I go to the Transponder submenu and select a transponder to search for a signal in (I advise you to prescribe yourself several transponders selected from satellites with different polarizations and REALLY WORKING free channels (FTA). The list can be found on the links below. I decided for myself tune in to the following transponders:
Satellite Transponder Channel for visual inspection
Sirius 4.8E 11766 H Novy Kanal, 5 Kanal (Ukraine)
Sirius 4.8E 11996 H Russia Today
Sirius 4.8E 12073 H Inter +
Sirius 4.8E 12245 V Europe by Satellite
Hotbird 13E 10971 H 3 Channel
Hotbird 13E 11034 V RTR Planeta
Hotbird 13E 11411 H Adjara TV
Hotbird 13E 11766 V Rai Uno
Hotbird 13E 12207 H Fashion TV Europe
Amos 4W 10722 H K1, 1 + 1, Kino
Amos 4W 10759 H Telekanal STB, Tonis, MTV Ukraine
Amos 4W 10925 V Russia Today
Eutelsat W4 36E 11727 L Gameplay TV, Ru TV
Eutelsat W4 36E 12322 R NTV Plus Infokanal
For example, in my case, for a start, it will be a 11766H transponder that broadcasts at 11,666 MHz with horizontal polarization. For convenience, the signal quality can be displayed full screen with the Info button. I will be guided on the bottom scale "Quality":
What do we see in this photo? Sad picture-signal quality-0! As a matter of fact, what was to be expected? The antenna, for the time being, “looks” toward the satellite very approximately.
Then comes the most difficult moment that requires a lot of exposure - this is setting up the antenna in the planes. Why the shutter speed is needed is literally a few millimeters and there will be no signal. Not that he will be bad, but he will not be at all! The setting is as follows: it is necessary to install the antenna in a certain vertical position, in my position it was approximately like this:

After that, you need to rotate the antenna very, very smoothly in a horizontal direction and at the same time carefully look at the quality scale, first in one direction, and if the scale does not change from 0, then to another. When it is found that the quality scale has grown to at least 10-15 - this is already the first success, you can stop and rest :) If you cannot find a signal in the whole horizontal plane, you need to slightly change the vertical angle of the antenna and start moving again in the horizontal plane to appearance of the signal. When a signal is found at least some: now you need to try to move the antenna even more smoothly left and right and achieve the maximum level of signal quality. Having achieved this, you need to try to achieve an even larger signal by very smoothly moving the antenna up and down. After that, you can try turning the converter slightly around its axis in the holder (there are marks on the converter for this):
To achieve the maximum signal can ONLY be a combination of all these adjustments. Another nuance - if you can’t find the signal under any circumstances, and you double-check everything, including the receiver settings, it makes sense to try another converter, perhaps this one is faulty. I get the maximum signal level that I can pull out:
It would seem, you can calm down and tighten all the adjusting screws? As if not so! After all, the setting was made for the transponder broadcasting in horizontal polarization (in the picture at the end of the 2nd timeline there is the letter H), but you also need to configure some transponder in the vertical (V) polarization:
In my case, turning the converter in the counterclockwise holder helped to achieve a better signal quality in vertical polarization.
After that, you can scan the transponders (look in the documentation with your receiver for how to do it) and visually see if the channels are received and match the selected satellite:
When the signals in the horizontal and vertical polarizations are maximal from what can be pulled out, it is necessary to tightly tighten all the adjusting undersized nuts. And here there is one unpleasant moment - you tighten the nut, while the antenna slightly changes its direction, and the signal quality can significantly go away! So it is also necessary to tighten very carefully. Everything, the antenna and the first converter are configured. I turn off the receiver from the outlet, wind the cable from the central converter to the converter on the left (to the one on the multifid, if you look at the antenna from the front), turn everything on, choose Hotbird 13E in the menu, the same menu settings on the right as for Sirius, select working transponder and trying to adjust the maximum signal quality. Only this time I’m not adjusting the antenna, but the converter itself on a multifeed. It can move in all planes with respect to the antenna focus — left, right, up, down, forward, backward:

All nuts are tightened when the signal is maximum. I do not forget about checking in both polarizations. I scan Hotbird's transponders and check some free feeds visually.
I turn everything off again, twist the cable to the 3rd converter, turn everything on, select Amos 4w and make the settings for it. All the same. After that, the setup of the first antenna can be considered finished.
Second antenna Which I am going to configure on Eutelsat W4 36E (NTV +). Here it is easier - one converter. And since it is of circular polarization, it is not very important how it will be deployed inside the holder. Best of all, with the cable down so that it does not accumulate sediments:
Accordingly, you need to adjust the antenna in the horizontal and vertical planes. I turn everything off, twist the cable to this converter. Settings according to the purchased converter are:
I tune the second antenna, check the antenna in both polarizations on different transponders. Since the converter is designed for circular polarization, it is checked not for H and V, but for L and R (left and right).
That's all. You can turn everything off. Now you need to make the signal switching through the disk. It looks like this:
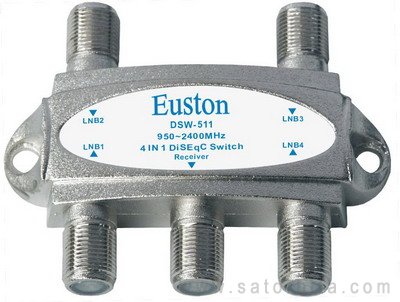
My disk has 1 output to the receiver, denoted by REC and 4 inputs for converters, called 1,2,3,4. Converters connect as follows:
With the connection, everything is simple - a cable section is connected to each converter, which is connected to the corresponding input of the device. If you install one antenna with the 1st converter, then the diske is not needed. If there is one antenna for 2 converters and there will be 2 ports free at the diske, that's okay. The disk is installed close to the antennas and preferably is in a waterproof box (I bought it from an electrical goods store) in order to avoid precipitations:
Ventilation holes are desirable in the bottom of the box for the diskek. Sharp cable bends are not allowed! F-connectors on the converters are closed or included with a set of caps or shrink tubing:

By the way, the above photo shows the distances between the converters and their angles of inclination. Right antenna directed to the Eutelsat W4.
I configure the Diske protocol (in my case 1.0) in the receiver's menu and the distribution of the converters according to the inputs (ports) of the Diske:
In the pictures you can see which inputs (ports) of the disk which converters are assigned to (which satellite). 0 / 12V: On only for LanComBox "a. If you do not have it, then you do not need to turn on 12V. I save the changes, check whether all the inputs of the disk are working (i.e. there is a signal on all configured satellites).
Someone may have a question, but why not immediately connect all the converters to the disk, all the inputs to register and configure the antenna? The answer is simple - with a really non-working diske you will kill a LOT of time and nerves, trying to set up a signal that cannot be found by definition. Among other things, without a disk, you will quickly determine whether you have purchased the converter.
Cable pull ties, so that nothing dangles. It remains to stretch the cable to attach the cable, pull the cable down and pull. Dissolve the cable in the apartment, connect the receiver, TV and watch satellite T
That's in the end what I got on the roof:
* - If the antenna after installation on the bracket will not be accessible:
when the converter on the antenna is one-here, everything is clear, nothing complicated — it is fixed rigidly on the antenna, the antenna is hung out of the window (or somewhere else) on the bracket, and is adjusted in the vertical and horizontal planes all from the same window (go back to the warning in the beginning of the instructions !!!). What to do if you need to configure another 1 additional converter (or more) on the multifeed? At the dacha I did this: screwed the bracket to the old tall cabinet, put the assembled antenna on it, put all this construction in front of the wide-open window and set it up. By the way, the funny moment is with the very first switching on, with the approximate inclinations of the antenna, without additional tuning, I got a quality level on Sirius more than 70%! In a word, in this form, I set up all 3 converters, carefully pinched everything, hung the bracket out of the window and hung an antenna on it with the converters already tuned. It remains only to adjust it in the planes.
The important moment in the high-altitude installation of satellite antennas: in addition to safety and self-insurance first of all, when you hang an antenna on a bracket or mast, always insure the antenna. Just imagine what an antenna that could have been planted from a height with a casual passerby’s head or with a body of an expensive BMW can do it :)
Something else that is installed on the roof of the antenna is grounding, but some installers are ardent opponents of this. I tend to conclude that grounding the antenna still does not hurt.
And finally:
The list of the most popular channels according to the information I have found for today from the trinity Hotbird, Sirius, Amos (be prepared for the fact that some rotation and channel coding can occur from time to time):
Channels of Ukraine (satellite Sirius)
Inter +, Enter – Musical, Enter - Film, Tete-a-Tete *, Channel 5, Rada, Glas, Star TV Ukr, UBC, OCK, Tisa 1
Channels of Ukraine (satellite Amos)
1 + 1, 1 + 1 international *, 1 + 1 cinema, Tonis, Kiev, M1, M1-international *, O-TV, MTV Ukraine, K-1, K-2, KTM, Channel 7, 24-news, Megasport *, STB, Music Box UA
Channels of Russia (Hot Bird Satellite)
ORT International, RTR-Planeta, Euro News in Russian, CNL Christian Satellite — First Christian Channel in Russian, Russian Music Channel
Russian-speaking channels (satellite Sirius)
1 Baltic Music Channel, TV Center, TV5-Latvian Channel, Romance-1 *, Romance-2 *, Travel (travel) *, Department Store
Russian-language channels (Hot Bird)
RTR-Planeta, RTR-Sport, ORT-international, Russian music channel, RBC TV, R1, TBN Russia, Ajara TV - Adjara television channel, news and latest films in Russian, National TV of Armenia - Armenian Television Channel, Euro News - a round-the-clock news channel in Russian, CNL Christian Satellite TV Channel - the first Christian channel in Russian, Caspio Net - a Kazakh television channel, Agency Khabar, Caspio Net broadcasts round-the-clock informational broadcasts with hour blocks in three languages: English, Kazakh and Russian, Lider TV, AZE-TV of Azerbaijan - fil Emma in Russian.
English Channels (Hot Bird)
Euronews, CNN, BBC, Russia Today, Jetix *, Supreme Master, Word Network, MRTV, Gog TV, Gospel Channel, TV, Get Green Card TV, Al Jazeera English, Pentagon Channel, The Prophetic Word, Denaro TV , TBN, The Church Channel, JCTV, Smile of a Child, Inspiration Network, Daystar TV, MTA International, EWTN, DW, Bloomberg, Dub Sports, Real Madrid TV, Words of Peace, Caspio.net, 3ABN, TCT, VoA ( The Voice of America), The Rainbow, The Spirit Word, The Cool TV, The Luxe TV, The Derby Race TV, The Jame-Jam Network, The Jame-Jam Network 2, Europe by Satellite, Love World, Nile TV, The Hope Channel
Sports (Hot Bird)
Planet Sports, Prima, Rai Sport Sat, Dub Sports Channel, *, AB Moteurs *, Action *, Motors TV *, Sailing Channel *, English Premiere League *, Equida Outlist *, GlobalDraw Greyhounds, Equida *, ESPN Classic Sport *, Real madrid tv
Cartoons (Hot Bird)
Baby TV * - for the youngest., Jetix *, AJ - Children "s Channel, Mangas *, Super RTL, Smile of a Child, MI TV, Boomerang *, Children" s - for the youngest, Berbere TV *
Music channels (Hot Bird):
RU TV, Mezzo (Muzik) *, MCM Europe *, Music Box Russia, Deejay TV, Viva Polska, 102.5 Hit Channel, 123 SAT, Magic, Countdown, Music Box Italia, Video Italia, Onyx, Khalifa TV, Gay TV, Krisma Tv
Erotic: (Hot Bird, Sirius, Amos)
Hustler TV *, Blue Hustler TV *, Sexy Sat 1, Sexy Sat 2, Sexy Sat 3, Eurotic TV, Eurotic Plus, Eurotic Dreams, E-Sat TV, Arab Girls, Supreme Master TV, Sexy Arab, G Point, Gay TV , Top Sexy TV, Free Sex Sat, Free Sex Zone, Sensuality, 4sexTV, All Sex, AAA sex channel, Xstream TV, Full-X 4Free, Hot Love, Hot Chili, MCT (6 channels, XXX, coded.), (Red Licht (5 canal, XXX, coded), SexView (14 canal, XXX, coded)
Fashion: (Hot Bird)
Fashion, Fashion men, World Fashion, TV Moda
News: (Hot Bird)
News, 24 News, Euro News, Fox News, BBC World, NBC Europe, EBS, World Net Europe, Canal 24 Horas, Rai News 24, Al Jazeera, Al Arabia, Khalifa News
German channels: (Hot Bird)
4 Fun TV, Euronews, Vox, Das Vierte, ZDF, EWTN, ARD Das Erste, DW, RTL2, Super RTL, Arte, Bloomberg, Words of Peace, SF Info, Europe by Satellite, Terra Nova, Luxe TV
French Channels: (Hot Bird)
MTA International, Euronews, Meteo Express, Home Shopping, Demain, MTV France *, Boomerang *, TV5 Monde FBS, TV5 Monde Europe, France 24, BFM TV, EWTN, NRJ 12, Arte, Best of Shopping, NT1, La Locale, Words of Peace, Gulli, Mezzo, Europe 2, Luxe TV, Europe by Satellite, Direct 8, TV8 Mont Blanc, Nile TV, 3A Telesud, Liberty TV, JET, KTO, Walf TV
Spanish Channels: (Hot Bird)
Euronews, Bethel TV, Arcoiris TV, Enlace TBN Europa, EWTN Europe, TVE, Canal 24 Horas, TVE, Internacional, Words of Europe, Satellite
Italian channels: (Hot Bird)
Administra.it, All TV, Arte & Atre, Blu, Calabria Channel, Camera dei Deputati, Canale 10, Canale 5, Canale Italia, Canale 8, Carpe Diem, Cartomanzia Lotto, Ceramicanda, Challenger TV, Cinquestelle TV, Coming Soon TV, Cortona Notizie, Count Down TV, Diva Futura Channel, Diva Futura Live, Diva Futura Plus, Elite Shopping TV, E-TV Emilia Romagna, Euroconference, Euronews, Europe by Satellite, Expo Club, Family Life TV, Forte Rosso Sat, Free Channel , Future Sat, GBR, Gioielli D "Anna, Italia 1, Italia Channel, Italiamia, Italian Italia, Italy & Italy, Jolly Sat, Julie Channel, La 9, Lazio Channel, Libera, Libera, Magic TV, Mare TV, MediaShopping, Mediatel, Mediolanum Channel, Mediterraneo Sat 1, Mediterraneo Sat 2, Milano TV Sat, Motori TV, Music Box Italia, Napoli International, Napoli Mia, Napoli TLA, Nessuno TV, New TV, Nostradamus, Nova mosaic, Oasi TV , Odeon Sat, People TV, Planet Italia, Play TV, Puglia Channel, Punto Sat, Puntoshop, Radio Italia TV, Radio TV, RAI Doc, RAI Due, RAI Edu 1, RAI Edu 2, RAI Futura, RAI Med, RAI Nettuno Sat Due, RAI Nettuno Sat Uno, RAI News 24, RAI Sport Satellite, RAI Tre, RAI Uno, RAI Utile, Rete 4, Rete Oro Sat, Rete Capri, Roma Sat, Roma Uno, RTB International, RTL 102.5 TV, S 24, Sardegna Uno Sat, Sat 8, Sat 9, Sat 2000, Senato Italiano, Sensuality, SET, Sicilia Channel, Sicilia International, Sixty Sky Meteo 24, Sky Meteo 24, Sky Meteo 24, active, Sky Meteo 24, Sky On Air, Sky Neighborhood 24, Sky Neighborhood 24, mosaic, Sky Neighborhood 24 active, Sportien , Star Sat, StarMarket, Studio 100 Sat, Studio Europa, Taxi Channel, TBM, TBN Italia, Tele A, Tele A piu Sat, Tele Padre Pio, TeleCampione, Telecolore, Telefortune Sat, Telelombardia, Telemarket, Telemarket 2, Telenord, Telepace, Teletirreno, Tiziana Sat, Tiziana Sat 2, Toscana Channel, TR 2 Sat, Trentino TV, TRSP, TV 7 Lombardia, TV Koper Capodistria, TV Moda, TVA Vicenza, UnoSat, Varese Sat, Veneto, Venice Channel, Vid eoBergamo, Videolina, Videolook Channel Italy, Vip TV, Words of Peace, Xex
Polish channels: (Hot Bird)
4 Fun TV, Baby TV *, Edusat, Europe by Satellite, ITV, Mango 24, Podroze TV, Polonia 1, Polsat 2, Polsat Zdrowie i uroda, Tele 5, TMT, TV Biznes, TV Polonia, TV Puls, TVN Gra, TVP Kultura, Viva polska
Arab channels: (Hot Bird)
123 Sat, 2M Maroc, Abu Dhabi TV Europe, Al Aqariya TV, Al Arabiya, Al Baghdadia, Al Fayhaa TV, Al Forat Network, Al Hayat, Al Hiwar TV, Al Jazeera Channel, Al Jazeera Documentary Channel, Al Jazeera Documentary , Al Jazeera Mobasher, Al Masriyah, Al Mustakillah TV, Al Ordoniyah, Alalam News Channel, AldiyarSat, Alhurra Europe, Al-Iraqiya TV, Alkawthar TV, Almaghribya TV, Alsharqiya TV, Al-Zahra TV, ANB, ANN, Arab 69, Arrabia , Arriyadiya, Assadissa, Canal Algerie, Dubai Sports Channel 2, Dubai TV Europe, Galaxy Sat TV, Infinity, Iqraa, Ishtar TV, Jamahirya Satellite Channel, Kuwait Space Channel, MBC Maghreb Al-Arabia, Medi 1 Sat, Miracle, Mlive, MTA International, Nile News, Oman TV Satellite TV, Satellite TV, TV Channel, Shahrazad TV, Sharjah TV, Spirit Channel, Strike TV, Syrian Satellite Channel, Thalitha TV, The Healing Channel, Tunis 7, TVM Europe, TV Channels
Indian Channels: (Hot Bird)
TRT Tamil, Ceylon TV, AsiaNet, Maharishi Open University
National Channels: (Hot Bird)
Armenia - National TV of Armenia. Bangladesh - ATN Bangla. Bulgaria - TV Bulgaria. Holland - BVN TV. Greece - OTE, Magic Peiraia, ERT SAT, Extra Channel, Tele Asty, Alpha TV. Georgia - Ajara TV. India - Maharishi Open University. China -CCTV. Korea - Arirang TV. Kurdistan - KurdSat. Macedonia - MKTV Sat. Poland - TV Polonia, TVN. Romania -TV Romania International, Pro TV International. Thailand -Thai TV. Yugoslavia -TV Montenegro, BK Sat, RTS Sat.
* Channel can be received if there is an emulator in the receiver, but not guaranteed. The remaining channels are open (FTA).
Good luck in choosing and using satellite systems :)
Source not specified