Do-it-yourself strip foundation: types, laying depth, step-by-step instructions for construction. Strip foundation 1 strip foundation
A monolithic strip foundation is a one-piece structure made of steel reinforcement and a concrete strip. It is located along the perimeter of the building and under all load-bearing walls and elements. If the technology is followed, the structure becomes a single whole - a monolith - and has a very high reliability and strength characteristics. For this reason, it is popular both in the construction of multi-storey buildings and private cottages.
It is advisable to use a monolithic strip foundation at a low level of groundwater: when they are located below the required depth of the foundation. Otherwise, it is necessary to organize drainage, and these are additional (and considerable) funds.
Device and types
According to the depth of occurrence, strip foundations are shallow and deep occurrence. Shallow ones can be used on calm, non-fluffy soils with good bearing capacity for buildings of small mass - made of wood and erected using frame technology.
In this case, the tape should go 10-15 cm into the hard layer, which is located under the fertile one. At the same time, according to the standards, it cannot be less than 60 cm.

Deep monolithic strip foundations are made for heavy, massive houses. In the general case, they are lowered 10-15 cm below the level of soil freezing for a given region. In this case, the sole must rest on a layer with good bearing capacity. If this is not the case, you have to go deeper. For example, if the level of soil freezing is 1.2 m, and the fertile layer ends at 1.4 m, then you have to fall below 1.4 m.
With or without formwork
In general, the technology for erecting a monolithic strip foundation provides for installation. These are structures made of shields that give shape to concrete and prevent it from spreading. It is clear that the formwork is an additional cost for materials, as well as additional time for its assembly and installation.

Formwork - a structure made of boards or plywood that gives the foundation a shape
Sometimes, in order to save money, on good soils, a foundation pit is dug exactly according to the markup - to the desired width and depth. And concrete is poured into these pits without formwork. Such a technology cannot guarantee the required degree of reliability, and it is impossible to predict the result. The fact is that concrete needs a certain amount of water to gain normal strength. Without formwork, water, although a little, is absorbed into the ground, which can affect the quality of the concrete stone itself. In the worst case, it may crumble.
They get out of the situation by spreading a plastic film in the trench. But then they walk along it - reinforcement needs to be done. Both rods and boots damage the film more than once. As a result, moisture still leaves.

Foundation without formwork - a risky undertaking
In some cases, such foundations can stand for a certain number of years without problems. But sooner or later, cracks appear or concrete begins to crumble. The second difficulty in working with such a foundation is its far from ideal geometry. In order to reduce heat loss, the foundation is insulated, most often with foam boards or extruded polystyrene foam. Try sticking them on an uneven surface. The situation is the same with vapor barrier: the film is very difficult (almost impossible) to stick on uneven, porous concrete with soil inclusions. Whether or not this approach is justified is up to you, but such a foundation can only be recommended for a fence or a barn.
Basement in a house with a strip foundation
The basement can be the same area as the house, or it can occupy only part of the space. And you need to decide on its dimensions before the design stage.
If the basement occupies only a certain part of the space, it will be possible not to take out all the soil, but to dig only trenches under the tape. They also dig the basement according to certain rules. Its placement and arrangement can also be developed at the design stage.

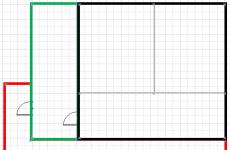
A tape monolithic foundation with a basement is a difficult task to design (to increase the size of the picture, right-click on it)
If it was decided to make the basement later, then you need to choose a place and determine the depth so that when drawing lines from the base of the house at an angle of 45 °, they do not pass through the voids (shown in the photo on the right).
If the basement is located under the entire area of the house, then the entire soil is removed to the required depth. In general, such a project cannot be called a budget one: there is much more work and expenses. Firstly, reinforced reinforcement of the walls and their greater thickness are required. Since there will be no soil inside, the walls of the basement will need to resist the pressure of the soil from the outside. Therefore, the thickness of the tape will be much larger and the reinforcement is needed more powerful, it is laid with a smaller step, and the number of reinforcement belts will also increase. As a result, only the consumption of reinforcement for the foundation will increase. Secondly, concreting and, possibly, reinforcement of the basement floor over the entire area will be required. And these are again materials - concrete and reinforcement. Thirdly, effective ventilation will be needed to remove underground gases. Such a structure can no longer be designed independently. The job must be done by a professional with extensive experience.

One of the options for building a foundation for a house with a basement (to enlarge the image, right-click on it)
Monolithic strip foundation: construction stages
Even if an organization or a team will build a house, the developer needs to know the technology: this is the only way to control the process and be sure of the quality of the work.
In general, the technology is as follows:
- Site marking.
- Land works.
- Consolidation of the base, basic bedding and tamping.
- Ribbon layout.
- Waterproofing.
- Assembly and installation of formwork.
- Knitting reinforcement.
- Concrete pouring and vibrating.
- Curing.
Some explanation is required. Double marking - a plot and a tape - is needed if the house will have a basement under the entire area of \u200b\u200bthe house. The first time you mark out the area of \u200b\u200bthe house, taking into account allowances for the installation of formwork. There is no way to do without it. Then, after the pit is dug and the bottom is poured and rammed, it will be necessary to mark the tape. According to these marks, formwork will then be installed, which will form the “profile” of your house.
Now a little more about each of the stages.
Plot marking
Since for the design the soil was examined in a certain area, it is necessary to bind rigidly. The underground structure is often heterogeneous and a shift of half a meter can be critical: suddenly there are subsidence rocks or a cavity. It is hardly worth positioning with an accuracy of up to a centimeter, but it is advisable not to miss much.

earthworks
Their volumes and the equipment used depend on whether you have a house with or without a basement. If not, then you marked the tape - and you will need to remove the soil. Only with a margin for the installation of formwork - and this is sometimes 50 * 80 cm on each side. Shields need spacers to keep them from falling apart.
If the house has a basement, all the soil will need to be removed. The dimensions of the pit are 2-5 m larger than the dimensions of the foundation. This is all the same stock for formwork spacers.

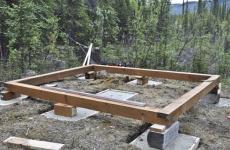
If the house has a basement - the pit turns out to be big
For large volumes, it is better to use special equipment. Renting it costs a lot, but the work of a brigade of "diggers" for several days will not be cheaper. The speeds are incommensurate.
The upper fertile layer is laid separately, it can be immediately distributed throughout the garden. The rest of the soil is piled up: partly it will be backfilled, partly it will need to be taken out.

Sealing the bottom of the pit and backfilling
After the bulk of the soil has been removed, the bottom must be leveled and compacted. When working with an excavator, it often happens that some areas are 20-30 cm deeper than necessary. All these irregularities must be corrected: fall asleep and tamp.
Ramming and leveling are needed over the entire area of the pit or trench. And not with a deck. It can be used if you are building a fence. Even during the construction of a bath or cottage, it is better to use a vibrating plate.
Let's see why. This level accounts for the entire load of the building. Even small voids and irregularities can cause uneven shrinkage and cracking. And the bottom after excavation of the earth is uneven. And you can eliminate this with a rammer. It is even better if a layer of sand with medium or fine grain is poured onto the bottom. Due to its smaller size, it aligns better. But for better and faster compaction, it needs to be moistened (pour water to wet its entire volume). The vibrating plate creates a force that compacts the sand by 15-20 cm. It is this layer that needs to be poured at a time. If according to the project, a layer of sand is 30 cm, then it is first necessary to pour 15 cm, shed and compact it to a high density. Then pour the second one and spill and tamp it too.

Often the project requires the creation of sand and gravel bedding. Then another layer of crushed stone with a fraction of 30-60 mm is poured over the compacted sand. And he, too, rambles. The thickness of this layer of backfill is 10-15 cm. It also needs to be poured in small layers of about 5 cm each and compacted.
In this case, the soil is not only leveled, it also becomes more dense: crushed stone is driven into the underlying rock, increasing its bearing capacity. Since the plate hits the pebble with great force, the compaction occurs to a depth of 40-50 cm. And this is very good.
Formwork for a monolithic strip foundation
The formwork is made of boards with a thickness of at least 40 mm, low-grade plywood or OSB. Plywood is inexpensive, special - formwork. It has a lamination on one side - there is a protective film. Therefore, it can be used several times.
Shields made of sheet materials are reinforced with transverse and longitudinal bars. From the boards are fastened with crossbars. The assembled shields are exposed according to the marking of the tape, fixed on the outside with slopes, and spacers are installed inside. All these fasteners must give the formwork the specified dimensions. They will not allow the shields to fall apart or bulge when pouring concrete: the mass will put considerable pressure on the walls, therefore the fasteners must be reliable.

- an inapplicable attribute of a quality foundation
Reinforcement
Due to the structural features - large length and small width - the strip foundation is mainly affected by forces that try to break the strip across. Therefore, it must be strengthened along the long side. Here they use powerful ribbed reinforcement from 10 mm in diameter and more. All transverse reinforcement only stabilizes the longitudinal bars in space, therefore it can be taken smooth and used with a small thickness - 6-8 mm.

Moreover, in most cases, regardless of the depth, two reinforcing belts are sufficient: at the top and bottom of the tape. The exception is the foundation device with a basement under the whole house.
The scheme is shown in the photo. At each connection point, the reinforcement is tied with a special wire. This is done manually using hooks or automatic devices - knitting guns.
There is another way: welding. But its use is not always justified. The work goes faster, but the connection is tough. When knitting with wire, the reinforcement has some freedom. And it helps to compensate for some deformations without destroying the concrete. When welding, the joints are rigid, which on the one hand is not bad, but on the other hand, a too rigid structure can cause cracks.

Another point: the welding site always begins to collapse first. Although the reinforcement is located in the thickness of the concrete, and therefore does not corrode (oxygen does not penetrate to it), but in case of any violations and the supply of oxygen, the welded joints are destroyed first.
At this stage, ventilation products and ducts are laid, through which engineering communications will be brought to the house. If you forget about it, you will have to destroy the monolith, and this is very undesirable: the fewer flaws, the stronger the structure will be.
Filling the strip foundation
When building a more or less large house, it is easier and better to order the delivery of ready-made concrete to the site in a mixer. Then the filling can be done in one day.
You can make your own concrete. But this requires a concrete mixer. Manually, mixing the components in troughs, it is impossible to ensure the proper degree of uniformity.

For manual pouring, at least three people will be needed: one kneads the concrete in a concrete mixer, the second distributes the finished portion, and the third vibrates the newly poured area.
Vibration of concrete is carried out using manual or portable submersible vibrators. This process allows you to remove all voids, more evenly distribute the aggregate. As a result, the strength characteristics of concrete are much improved, it acquires frost resistance due to the fact that it absorbs water much less. Therefore, do not skip this stage: with the same components in the solution, we get a higher grade concrete as a result.

Another point: when pouring from a machine, you need to use special gutters. Firstly, it is easier for them to deliver concrete to the desired point, and secondly, the solution should not fall from a great height. If the fall height exceeds 150 cm, it delaminates. The result is low strength.
Curing
If the work was carried out in hot, dry weather, the tape must be covered with plastic wrap or any other material that prevents the rapid evaporation of moisture. Since the depth of the concrete is large, wetting the surface will not give tangible results. The main thing is not to let the top dry out and the film copes with this task perfectly.
If the temperature during and after pouring is kept around +20°C, three days after pouring, the concrete will gain a strength of about 50%. And on the fourth day, the formwork can be removed and proceed to further work.
At lower temperatures, you need to wait longer: at +10°C it is already 10-14 days, and at +5°C the setting process practically stops. In such conditions, it is necessary either to insulate the formwork or to heat the concrete.
The monolithic strip foundation is ready, but there is still work to be done on its insulation and waterproofing. Only after that it is covered (backfill).
The concept of "strip foundation" characterizes only its form. In practice, for low-rise buildings, there are several options for manufacturing a base of this shape. We will briefly talk about some and give instructions for the step-by-step construction of a monolithic foundation.
Tape depth options
There are two types of tape in depth. If the sole is no deeper than 60 cm, then this is a shallow foundation.

This also includes bases when the sole is on the surface of the ground. And to be more precise, a little lower, given that the site is leveled. In practice, such a foundation in its pure form is placed where there is no fertile layer. Such conditions are rare. In most cases, there is a humus layer on the construction site, so the scheme for arranging an unburied foundation looks like this:
- completely cut off the fertile layer along the entire base of the future structure;
- a layer of sand is covered (if necessary, improve the bearing capacity of the soil - also crushed stone);
- water, level and tamp the pillow;
- put the formwork for the tape.
- Concrete floors on the ground, raised to the height of the basement.

- Basement with underground and floors on the floor.

But the foundation deepened into the ground up to 60 cm is more common.
All these options are common in private construction, when the project does not provide for a basement. It has been proven that the heaving forces at a shallow depth are compensated by the weight of a low-rise building, and the bearing capacity of a shallow-depth tape is sufficient to withstand the loads.
The sole of the buried lies in the ground below the freezing point.

This type is the most durable, but it is also the most material-intensive. It is laid when a basement or an underground technical floor is needed to accommodate engineering systems equipment.
Classification by technology
According to the manufacturing method, there are three types of base tape: prefabricated, monolithic, combined. And already these technologies have their subspecies.
The prefabricated base is assembled, as a rule, from concrete blocks (FBS).

They also use a more “small format”: ceramic brick or cinder block. But even for a solid building block foundation, the bearing capacity is weakened by the seams - and even the reinforcing belts cannot fully compensate for this. Therefore, in its pure form, a brick or cinder block foundation is rare, and building blocks go to the base of combined foundations.
If for FBS a mortar is needed to fill the irregularities of the spoon and there are no special requirements for the brand (the adhesion strength of the blocks is provided by weight), then when using “small forms”, a full-fledged masonry mortar is required. In addition to the FBS assembly, medium-sized natural stone foundations are also popular.

And the popularity is explained simply - high decorative properties.

Combined foundations can also have different technological schemes. For example, an underground part made of reinforced concrete plus a brick base.

There are two types of monolithic tape: with rubble stone, poured with concrete, and from reinforced concrete.
In the first version, the reinforcing role is assigned to a small rubble stone. Unlike a “clean” rubble foundation, a rubble concrete foundation provides for: formwork installation, laying a pillow, pouring a small layer of concrete, laying the first row of stone into it, pouring a mortar layer, laying the second row, etc. The distance between the stones is about 5 cm, and the ratio of the volumes of mortar and stone is approximately 1:1.

The attractiveness of this type of foundation is in reducing the volume of concreting, and, consequently, the cost of materials.
But the most reliable is a monolithic concrete tape with a reinforcing frame.
Monolithic strip foundation
Manufacturing technology has the following sequence.
On the ground, a pit is marked (for a deep foundation) or a trench system (for a shallow foundation). Carry out excavation work.


If the tape is shallow and communications enter / exit under the sole, then they dig a trench for them and lay sleeves for laying pipes under the tape. Align (plan) the bottom of the pit or trenches. They fall asleep, level, moisten and ram the sand and gravel cushion. The total thickness of the pillow is up to 30 cm (the ratio and volume of the parts depend on the characteristics of the soil), and the width of the pillow is 30 cm wider than the heel of the foundation. Install the formwork.

The materials are edged board and timber. It is allowed to use an edged board with a wane, but so that there are no gaps between them.

To simplify the assembly procedure, it is possible to make shields from boards and timber on the ground. The wall thickness of the formwork must withstand the pressure of the concrete. The strength of the formwork is increased by connecting the racks along the horizon with steel wire and reinforcing the side stops on the ground on one or both sides.
For a deep foundation, when constructing a basement, it is recommended to install a non-removable foam formwork.

At the formwork of the buried foundation, holes are cut out for sleeves for engineering communications. For sleeves, pieces of plastic or asbestos-concrete pipes are used. The diameter of the sleeve is chosen based on the dimensions of the passing pipes and the insulation layer. At the time of work on the arrangement of the foundation, the sleeves are filled with sand and the holes are closed.
Install reinforcing frame. The diameter of the reinforcement, the mesh parameters depend on the design indicators of the bearing properties. The main purpose of the "iron" is to improve the resistance of the foundation to fracture and to lateral loads, the compressive strength of the concrete stone is already high. The distance between the reinforcement and the walls of the formwork is at least 50 mm.

The concrete is poured in layers. If there are access roads, and a concrete plant is nearby, then it is better to use a ready-mix.

Otherwise, the mixture is prepared by themselves, observing the proportions to obtain the required grade.
The optimal layer thickness is up to 20 cm. And the filling of the layer should be continuous around the entire perimeter. Each layer is compacted in one of the ways: with a deep vibrator or bayoneted with a piece of reinforcement (for small volumes).
After pouring the last layer, it is covered with a plastic film (this is a necessary condition for the normal hydration of concrete). It is allowed to cover the basement of the foundation with burlap and periodically moisten it. The first seven days are critical, when the concrete stone gains 70% of the design strength.

Four weeks later, the formwork is removed. Then carry out waterproofing. The choice of materials and technology depends on the nature of the soil and the level of groundwater. Roll materials are popular, which are deposited on a prepared surface.
The foundation is a very important building structure. Up to a third of all financial investments in construction can be spent on work below the floor mark of the first floor. In addition, the situation is complicated by the fact that after the workers proceed to the construction of the box, access to the foundation will be limited, and its repair is very laborious. The choice of the type of support for the building depends on its design, the presence of a basement and the characteristics of the base soil. One of the most common types is strip foundation.
The design is a stone tape that serves as a support for the walls and can be made of the following materials:
- reinforced concrete;
- brick;
- rubble stone.
The most common option is the manufacture of concrete with reinforcement. This solution can be implemented using two technologies:
- prefabricated strip foundation;
- monolithic construction.
When using a brick, it is necessary to pay attention to its brand in terms of strength and frost resistance. If possible, it is better to dwell on other materials (concrete, rubble). The foundation tape is provided for all walls, both load-bearing and non-bearing. There is no need to lay foundations under the partitions.
The tape type is suitable for the construction of massive buildings on soils with fairly good performance. It is not suitable for swampy soils. In the presence of bulk soils, they must be replaced with medium-sized sand with layer-by-layer vibration compaction. If the soil has high strength, some types of strip foundations can even be used for the construction of multi-storey buildings. On a solid foundation, buildings of 9-12 floors can be erected without problems. When using prefabricated blocks, a monolithic reinforced concrete stiffening belt will be required.
Types of strip foundations
There are several options for the design of the strip foundation, each of which is used for certain cases and has its own bearing capacity. As a general classification, the following division can be given:
- shallow foundations;
- shallow strip foundation;
- buried foundations.
These types apply depending on certain circumstances. When choosing, you need to pay attention to:
- load from the building on the tape;
- groundwater level;
- soil freezing depth;
- required plinth height.
Unburied belt

Scheme of an unburied strip foundation.
It is used for small buildings made of light materials. For stone buildings (made of brick, aerated concrete, reinforced concrete) cannot be used. There are two types:
- reinforced concrete belt;
- reinforced concrete rib.
These types can only be built using monolithic technology. When using concrete blocks (FBS blocks), the destruction of the structure is possible with minor soil movements. Concrete in this case perceives compressive loads. To perceive the bend, reinforcing bars are laid in the structure. Be sure to device under the pillow tape of medium-sized sand or sand-gravel mixture.
The reinforced concrete belt has a height less than the width, and the rib is vice versa. The use of a rib as a strip base allows you to raise the plinth and ensure greater reliability. With the same cross-sectional area, the rib will withstand greater bending loads compared to the chord.
This can be explained by the fact that the belt is calculated as a beam on an elastic foundation. To determine the deflection, it is necessary to calculate the moment of inertia, which is found by the formula:
where b is the section width and h is its height. It can be seen from the formula that the height of the section most strongly influences the moment of inertia. The larger the value obtained from the formula, the greater the bending the structure will withstand.
This type of foundation is used at a high level of groundwater (water is at a distance of less than 1 meter from the surface of the earth). Suitable for the construction of frame outbuildings, verandas, terraces and the like.
Important! For any type of strip foundation, it is necessary to provide a support pad. It is made of sand (coarse or medium) or sand and gravel mixture. The thickness of the pillow is taken depending on the characteristics of the soil (most often 30-50 cm).
Shallow-depth tape

Diagram of a shallow strip foundation.
Unlike the previous one, this type of foundation has a slight penetration into the ground. The support depth is within 0.5-0.6 m from the surface. It can be of two types:
- rectangular section;
- t-shaped section.
The second option has a greater bearing capacity, but requires an increase in the consumption of materials and increases labor intensity. The T-shaped section combines the belt and the rib placed on it. The lower broadened part perceives the bend and increases the area of support, i.e. distributes the load, and the top vertical load from the building.

Scheme of a T-shaped shallow strip foundation.
Both of these types can be erected in a monolithic or prefabricated way. When choosing a t-shaped section from prefabricated elements, special factory-made pillows (PL slabs) are placed under concrete blocks.
Important! When supporting foundations above the depth of soil freezing (accepted according to the joint venture “construction climatology”), it is necessary to provide for their insulation and replacement of heaving soil with sand of medium size. Otherwise, the structure will crack.
Shallow types are used when the groundwater level is located at a distance of 1 meter or more from the surface of the earth. On such bases, you can put frame or wooden houses (timber, logs). Stone houses can only be placed on a T-shaped tape, since with a rectangular section and small movements of the soil along the walls, cracks can occur.
More details: .
Recessed tape

Scheme of a buried strip foundation.
This type is the most reliable. It allows you to design a basement in the building. The depth of laying is determined based on:
- basement height;
- depth of soil freezing;
- location of soil layers and their bearing capacity;
- groundwater level.
It is necessary to support the structure on a layer of soil with a normal bearing capacity, this can only be found out by conducting geology on the building site. The groundwater level should be 50 cm below the sole. If there is a basement, the lower edge of the concrete wall is lowered by 200-300 mm from the level of the basement floor.
Deep foundations, as well as shallow foundations, can be of two types: rectangular and t-shaped. For the construction of multi-storey buildings, T-shaped ones are used; for private housing construction, it is possible to use rectangular ones. For the manufacture of monolithic and prefabricated reinforced concrete.
When using prefabricated elements, a monolithic belt is made along the edge of the tape, which will connect the individual blocks into a single whole and evenly distribute the load from the walls. Blocks must be mounted with a ligation of at least 250 mm. The thickness is selected depending on the thickness of the walls of the building box. When installing T-shaped foundations, prefabricated pillows for blocks are selected by calculation. With the help of calculations, the required area of \u200b\u200bthe sole of support is found.
Recessed tapes may be suitable for building houses made of concrete, brick, aerated concrete or other materials. With a high level of groundwater, their use is possible, but it is necessary to provide a reliable waterproofing and drainage system.
You can summarize the material of the article in the table.
| foundation type | Section views | Application area |
| Unburied (on the surface of the earth) |
Belt | Small lightweight buildings, frame one-story buildings with a high groundwater level (GWL) on solid foundations |
| Edge | ||
| Shallow (sole support at a depth of 50-60 cm from the surface) |
Rectangular | Frame and wooden buildings in 1-2 floors with groundwater level below 1 m from the ground |
| T-shaped | Frame, wooden, aerated concrete houses up to three floors with a groundwater level below 1 m from the ground | |
| buried | Rectangular | Frame, wooden, aerated concrete houses over 2 floors, brick and concrete buildings up to 3 floors |
| T-shaped | Brick and concrete buildings of 3 floors or more |
With the right choice of foundation for the building box, it will not cause problems during operation and will not require serious repairs to the supporting structures, therefore, the choice of the type of strip foundation must be approached with all responsibility.
The requirements for the foundation are very high.
The strength and reliability of the foundation are among the main, but not the only tasks assigned to the supporting structures.
- Unburied. It is created on absolutely immovable soils - rocks, strong stable soils. It is extremely rare.
- Shallow. It is used for construction on solid soils that are not subject to frost heaving. The depth of laying is less than the level of winter freezing of the soil.
- Buried. The depth of such a tape is slightly below the level of soil freezing. It is used for the most massive and heavy buildings, suitable for most types of soil and hydrogeological conditions.
The choice of a suitable type is determined by the analysis of all the conditions of the site - the composition of the soil, the number and properties of layers, the depth of soil water, etc.

What building is it suitable for?
Tape bases are a reliable support for buildings made of various materials:
- Tree.
- Foam and aerated concrete.
- Brick.
- Concrete plates.
The material and the number of floors determine the weight of the building, on which the design parameters of the tape depend - the degree of penetration and thickness. Along with the characteristics of the soil, the parameters of the building are the main material for performing engineering calculations in the design.
How to calculate depth
strip foundation depends on the type of foundation. E if construction is planned option, it is necessary to rely on the tabular data of SNiP, showing the depth of soil freezing in a given region.During the construction of a shallow type of tape, the composition of the soil, the presence and depth of groundwater are taken into account. It is customary to refer to the optimal depth of 0.75-1 m, but on stable and dry soils, the depth can be slightly reduced.
NOTE!
The most common immersion depth for shallow tape is considered to be 0.7 m.

How does a shallow strip foundation work
almost completely repeats the in-depth version, only with a lower level of immersion.There is a trench in which a drainage layer of backfill is created and a concrete tape is poured.
The design of the base has fewer possibilities than a full-fledged tape, but, for relatively small low-rise buildings, its bearing capacity is quite enough.

Do-it-yourself step-by-step installation instructions
Consider the procedure for creating a strip foundation:
- Preparation.
- Site marking.
- Digging a trench.
- Laying and arrangement of the drainage system.
- Creation of sandy.
- Formwork manufacturing.
- Reinforcing cage installation.
- Pouring concrete.
- Exposure for hardening.
- Stripping.
- Waterproofing and insulation tape.
- Further work.
The order of actions does not change under almost any circumstances, since all stages are the result of previous operations.

Surface marking
The beginning of work consists in removing the top layer of soil and marking the site. For this, wooden stakes are used, which are installed at the intersection points or corner points of the future trench.
The width is selected based on the design parameters of the base, but not less than 20 cm more than that of the tape. This is important, since it will be necessary to install the formwork inside the trench, and subsequently to ensure a sufficient thickness of the backfill layer of the sinuses.

trench preparation
Digging a trench is done with an excavator or manually. The second option is difficult, but if there are difficulties with the delivery or approach of construction equipment to the site, it is quite possible. Excavated soil is stored on the sides of the trench or immediately removed from the site.
It is necessary to ensure the same depth, but there is no need to try too hard and level the bottom to centimeters. Trench corners are manually leveled regardless of digging method.

Drainage device
The drainage system makes it possible to remove groundwater from the sand cushion layer, eliminating the possibility of heaving loads in winter.
There are different types of systems:
- Open. It is created on the day surface and is designed to drain rain or melt water. Used on dry soils with deep groundwater.
- Closed. Consists of a system of pipelines placed in a trench near the tape. It serves to remove groundwater from a layer of sandy backfill (cushion), it is used on soils with the presence or seasonal change in the level of groundwater.
In practice, the closed type is most often used, since there is a danger of water in most cases. A system of pipelines for special purposes is installed, receiving and discharging moisture into the drainage well.
For high-quality drainage, the installation of a filtration piping and a slope for the natural movement of water are required. The filtration layer cuts off small organic particles, preventing the inner surface of the drainage pipes from silting up.
This contributes to extending the life of the system and reduces the risk of failures.
Pillow
The sand cushion is an important and indispensable element of the foundation design. Its thickness is different, on average it is 20 cm.. Usually clean river sand is used or alternately a layer of sand 10 cm, fine gravel 10 cm and again a 5 cm leveling sand layer.
After backfilling of each layer, a thorough compaction is carried out using construction vibrators or hand tools. It is recommended to shed the layers with water, this contributes to a better sealing of the pillow.
NOTE!
Experts recommend to be guided by the following quality criteria for the compaction of the backfill layer: there should be no footprints on the surface when walking. This is important as cushion settlement is not acceptable as it will cause the belt to deform with unpredictable consequences.

Formwork installation
To create the formwork, edged boards with a thickness of 25-40 mm are used (depending on the size of the tape). First, next to the trench, shields are assembled with a width slightly greater than the height of the tape.. As the assembly progresses, the shields are lowered into the trench and fixed outside with inclined stops and vertical support bars.
From the inside, crossbars are installed that determine the distance between the shields, equal to the width of the tape. The formwork must be strong, ready to receive loads during pouring and solidification of concrete. There should not be any gaps, all gaps over 3 mm must be filled with tow or clogged with slats.
This will eliminate the unproductive consumption of concrete when flowing into the cracks.

Reinforcement
The reinforcement is designed to compensate for tensile axial loads that concrete cannot withstand. It freely accepts a lot of pressure, but the tape is unstable in bending and immediately breaks.
For reinforcement, a reinforcing belt is created, the main element of which is horizontal working rods made of metal or fiberglass ribbed reinforcement.
To support the rods in the required position, smooth rods of smaller diameter are used, from which vertical elements (clamps) are made, which, in combination with the working rods, form a spatial lattice.
Its dimensions are such that the horizontal rods are immersed in concrete to a depth of 2-5 cm.
Working rods are selected based on the width of the tape. Their diameter for a shallow base is in the range of 12-14 mm (with a width of 30-40 cm) or 16 mm with a larger width.

Rebar knitting
The reinforcement cage elements are connected in two ways:
- Electric welding.
- Knitting with soft steel annealed wire.
The first option is used for thick rods and is practically not used in the construction of shallow foundations. The assembly of the armored belt most often occurs by knitting.
A soft wire is used, which quite reliably holds the elements of the frame, but has a certain degree of freedom, which makes it possible to maintain the integrity of the frame when loads occur during pouring.
For knitting, a special tool in the form of a hook is used. A piece of wire about 25-30 cm long is folded in half. The resulting half-loop wraps around both connected rods in a diagonal direction, the ends rise up.
Then they grab the fold loop with a hook and, leaning on the second free end, make 3-5 rotational movements, due to which both rods are tightly and firmly connected to each other.
The operation is simple, usually the skill is developed on the first day.

The choice of concrete for pouring
There are quite a few grades of concrete designed for different conditions and loads. Since a shallow strip foundation is mainly used in low-rise private construction, concrete grade M200 will be the best choice.
It is able to provide the necessary strength and load-bearing capacity of the tape with a relatively low dead weight.
For those who wish to approach the issue more carefully, we can recommend using an online calculator to calculate the grade and amount of concrete. The result obtained should be duplicated on another resource in order to protect yourself from possible errors.

fill
Filling must be done as quickly as possible, ideally at once. Breaks in pouring for more than a day are unacceptable, in such cases it is necessary to withstand concrete until it is completely hardened and only then continue work. The quality and degree of strength of such a tape is much lower than that of a simultaneous casting.
This condition is most easily met using ready-mixed concrete, which is delivered directly to the site in a mixer. It turns out significant time savings, and the quality of concrete in any case will be better than that of a home-made solution.
It is necessary to pour from several points, trying to distribute them as evenly as possible along the length of the tape. This will allow you to get a casting with the same parameters around the entire perimeter, which will ensure high strength of the base.

Features of waterproofing
The effect of moisture is extremely detrimental to a shallow tape. Penetrating into concrete, water sooner or later freezes and breaks the material from the inside. Under no circumstances should this be allowed.
There are two types of waterproofing that you can do:
- Horizontal. Protects the lower and upper plane of the tape against the penetration of moisture from the lower layers of the soil and from rain or melt water flowing from the walls. The lower waterproofing is laid before the installation of the formwork and the reinforcing belt, and the upper one is made after the concrete has completely hardened in parallel with the vertical waterproofing. Both layers consist of roofing material, laid in two layers with bituminous mastic.
- vertical. It is applied to the outer and inner surface of the tape after stripping and complete drying. Materials of different types of action are used - impregnation, coating or pasting. Impregnations are the most effective, but they appeared relatively recently and are little known to builders.

Warming issues
Tape insulation prevents the formation of condensate. There are two options - external and internal insulation. In the first case, the insulation is mounted outside, in the second - from the inside.
Experts recommend performing both types of insulation at the same time, since it is not possible to achieve the expected result separately. Considering the specifics of placement, it is necessary to use moisture-proof types of heat insulators - foundation foam, liquid polyurethane foam, polyethylene foam, etc.
Mineral wool should not be used in this case, since it is able to absorb water with a complete loss of performance.

Proper care of concrete after pouring
After pouring for 10 days, it is necessary to regularly water the surface of the tape with water.:
- The first 3 days - every 4 hours.
- The next 7 days - 3 times a day.
The tape must be hidden from the scorching rays of the sun under a layer of polyethylene. Sprinkling with water makes it possible to somewhat equalize the moisture content of the outer and inner layers of the tape, reducing loads and the risk of cracks.
The final hardening of concrete takes a very long time, but you can continue working with the tape after 28 days.
Stripping
Demoulding is the process of dismantling the formwork. It can be produced no earlier than 10 days after pouring.
You should not try to speed up the process, the foundation is too important an element of the building to take risks and rely on chance.
Basic Mistakes
Most often, a sediment of a sand cushion occurs due to poor-quality compaction of the backfill layer. In addition, the use of unsuitable materials is often encountered, in particular, concrete of the wrong grade.
Some unscrupulous suppliers ship low quality material to save money. Experienced experts recommend ordering heavier concrete - instead of M200, take M250. The difference in cost and weight is small, but there is hope that the material will be more durable.
In addition, they often try to reduce the cost of money and labor by refusing and. These procedures require some time, but compared to the service life of the base, they are carried out very quickly and cannot be neglected.
Useful video
In this video you will learn how to install a strip foundation:
Conclusion
Creating a strip foundation is not so much a difficult task as it requires a complete understanding of the meaning of all stages and the high-quality implementation of the necessary actions.
For an unprepared person with no experience, it is recommended not to deviate from the technology and strictly comply with the requirements of SNiP.
This will help build a solid and high-quality shallow strip foundation.
In contact with
An excellent option for the supporting part for a residential building will be a strip foundation with your own hands, step-by-step instructions will help you complete the work without errors. The result of the work will be a reliable foundation that even a brick building can withstand.
Types of strip foundation
Before you make a strip foundation with your own hands, it is worth studying its design features. Depending on the technology used, the tape is of two types:
- monolithic;
- team.
A - monolithic; b - prefabricated
A monolithic strip foundation will be a more profitable option for frequent construction. Prefabricated technology is more often used for mass development. This is due to the fact that concrete blocks and prefabricated reinforced concrete foundation slabs are used for installation. Such structures have an average length of 1-2 meters and weigh from a couple of hundred kilograms to a couple of tons.
The device of the strip foundation from the blocks becomes impossible without the rental of lifting equipment: tower or truck crane. This significantly increases the cost of construction. In addition, in a small area there is a problem of placing mechanisms.
Filling the strip foundation avoids additional costs. This option is rational when building a house with your own hands. A few people will be enough to complete the work.
By design, the tape is of three types:
- deep-seated strip foundation;
- shallow;
- not buried.


The first option is suitable for the construction of buildings on any grounds. In this case, it is possible to make a basement or a technical underground for utilities. The device of a strip foundation of a shallow type is considered for small buildings and in the case of non-rocky soils with good strength (coarse-grained, medium or coarse sands) on the site.
Unburied tape is used only for auxiliary buildings. You can put a gazebo or a canopy on it. Properly selected type of foundation will be the key to the success of all work.
To choose materials for the strip foundation, you need to decide on the technology. When using prefabricated elements, you will need to purchase:
- concrete blocks brand FBS;
- concrete slabs brand FL;
- brick and concrete for sealing holes;
- waterproofing materials;
- thermal insulation materials if necessary.
The sealing of holes made of brick or concrete is used because it is almost impossible to completely lay out an underground wall from standard blocks. Also, concrete and reinforcement will come in handy to make a tape concrete belt along the edge of the supporting part. A reinforced concrete element is necessary to bind the entire structure into a single whole. It allows you to evenly transfer the load from the walls to the underlying parts. If necessary, read the detailed article about foundations from FBS.
The technology of pouring a strip foundation involves the use of:
- liquid concrete of classes B15-B20;
- fittings: working, vertical, transverse;
- boards or polystyrene foam for the manufacture of formwork;
- waterproofing materials;
- thermal insulation if necessary.
Before you properly fill the strip foundation under the house, you will also need to prepare bulk material. Use sand of medium or large fraction, crushed stone, gravel or sand and gravel mixture. Such a pillow simultaneously performs several functions at once:
- aligns the base under the tape;
- performs the function of a drainage layer;
- prevents the negative effect of the forces of frost heaving.
Advantages and disadvantages
Before making the final decision to go deep with the help of the type of structures in question, it is worth studying the pros and cons of the types of strip foundation. The foundation tape deep laying has the following advantages:
- the possibility of building a basement;
- simplicity of technology;
- high reliability;
- application for heaving soils.
The recessed strip foundation also has disadvantages:
- large volumes of earthworks;
- high cost and labor intensity;
- the need for a drainage device;
- the complexity of the application at a high level of groundwater.
In some cases, a reasonable solution would be the installation of a shallow strip foundation. The option has the following advantages:
- reduced cost;
- there is no need for large volumes of earthworks;
- the ability to use when the GWL is located longer than 1.5 m from the surface of the earth.
But the construction of a strip foundation of this type is not available in all cases. This reinforced concrete option has several disadvantages:
- not recommended for heaving soils (if there is no other choice, they make reliable waterproofing, drainage, storm sewers and insulation);
- not suitable for buildings with a basement;
- cannot be used when the groundwater level is located above 1.5 m from the surface.
Strip foundation for the house: laying depth
This question should be the most important when designing a structure. The deepened strip foundation is supported so that its sole is 20-30 cm below the freezing mark. This is the only way to protect the building from uneven deformations during frost heaving.
The height of the strip foundation in this case depends on the climatic features of the area. The freezing depth is determined by the formulas. But with a simplified calculation of the dimensions of the supporting part, you can use ready-made tables developed for different cities of the country.
 Depth of soil freezing by cities
The shallow-depth design of the strip foundation assumes its laying at a distance of 70-100 cm from the surface level. It is important to remember that this option has a lower bearing capacity and is not resistant to the forces of frost heaving.
Before you start concreting under your house, you need to carefully select the depth of support of the sole. At the same time, not only freezing, but also GWL is controlled. General rule: water should not be closer than 20 cm to the base of the building.

The foundations of low-rise buildings usually do not need a detailed calculation. All values are assigned by eye. In this case, there is a high probability of overspending. But if possible, it is better to turn to specialists who will accurately select the laying, width and reinforcement. If this is not possible, use the minimum values:
- height depending on soil freezing;
- width, depending on the width of the wall (the value for the foundation is taken not less, but better a couple of centimeters more);
- working reinforcement with a diameter of 12 mm;
- clamps with a diameter of 6-8 mm.
How to do it right: step by step instructions
Making strip foundations is not such a difficult task. But you will need to carefully study all the nuances and nodes for private houses.
 Strip foundation: device diagram
First of all, a strip foundation scheme should be prepared. It lists all sizes. Such a drawing will not only make it easy to make a recessed strip foundation, but also calculate the required amount of materials in advance.
 Example of a working drawing with dimensions
There is a certain order of work, according to which the strip foundation is poured, the technology is as follows:
- preparation and marking of the site;
- excavation;
- installation of formwork and its waterproofing;
- installation of a metal frame;
- do the pouring of the strip foundation with their own hands;
- set of strength and care of concrete;
- stripping works;
- waterproofing, insulation.
Preparation
How to make a strip foundation? - Answer: make geology and calculation. You will also need to clear the area and remove debris.
Geological surveys are carried out by specialists. In a simplified version, you can make them yourself. In this case, holes are torn off or wells are drilled to a depth that is 50 cm higher than the laying of the tape. The main task at this stage is to determine:
- type of soil at the level of the base of the underground wall;
- groundwater level.


After testing, they finally take the mark of occurrence, and also assign a cross section depending on the strength characteristics of the soil. With high accuracy, only an engineer will perform such work.
Plot marking
For marking use a wooden cast-off and a cord. Another option is to draw lines across the ground using lime mortar. How to pour the foundation under the house with high accuracy? You need to try at the markup stage. In advance, it is worth preparing a strip foundation scheme, which subsequently needs to be taken out to the area. The drawing made is needed so that all dimensions are at hand.
To markup, first mark the first corner. After that, a side is built from this point. It is easier if this side is parallel to the fence or road. The next step is to build a right angle. In such a situation, you need to use the Egyptian triangle method.


Cast-off stakes should be placed at a small distance from the outer walls of the building. This will prevent the cord from sagging when developing a trench or pit. After the markup for a square or rectangular building is prepared, it is worth checking the dimensions of the diagonals. They must match. Deviation up to 20 mm is allowed. A house that is complex in plan can be broken down into simple shapes.
To prepare the base for heavy equipment, you will need to mark out separate foundations. The expansion joint between them and the main tape is assumed to be at least 10 cm. After pouring the structures, this space is filled with loose non-combustible material.
Soil development
Technology involves a large amount of work. Most likely, it will be necessary to attract additional equipment: an excavator, dump trucks to transport the soil outside the site. The scope of work depends on whether the building will have a basement:
- if available, dig a pit;
- in the absence - trenches.
When performing earthworks, it is imperative to remember safety precautions. The width of the trench must be such that formwork can be installed in it. The walls are made with a slight slope. To prevent shedding of the soil, temporary supports are installed. Do not work in the trench alone. There should always be another person on the surface who will help in case of danger.


The dimensions of the trench or pit should provide unhindered access for workers to the side surface of the underground wall. This is necessary in order to make future insulation and waterproofing of the basement. The width on each side of the tape increases by about 80 cm.
sand cushion
A sand (crushed stone or gravel cushion) is laid at the bottom of the pit or trench. Its thickness is assigned depending on the strength of the soil from 20 to 50 cm. The weaker the soil, the thicker the backfill is needed. The same rule applies to heaving.
 Sand cushion - the lowest layer of the base
The cushion must be level throughout. When laying it, it is compacted in layers (the thickness of the layer for compaction is taken to be no more than 15-20 cm. Compaction can be done by vibrating or pouring water. The method of pouring is not recommended for use for clay soils, since they have a low filtration coefficient.
On top of the pillow, a concrete preparation is made of lean concrete B 7.5 with a thickness of 5-10 cm.
drainage system
Drainage at the level of the sole of the tape is used not only at high GWL. For the device, drainage pipes with a diameter of 110 to 200 mm are used. The choice of diameter is carried out depending on the geological conditions of the site. Pipes are laid with a slope of 0.003-0.01.
Drainage is mounted in a layer of crushed stone with a fraction size of 20-40 mm. It performs a filtering function and prevents clogging of pipes. To prevent crushed stone from spreading, it is wrapped with geotextile.
 Drainage device at high GWL
When installing a drainage system, several rules are taken into account:
- pipes should be 30 cm or more below the foundation foot mark;
- the maximum distance from the outer edge of the house to the drain is 1 m.
The output of the system is carried out in an open area, in a septic tank or sewer.
Formwork
Formwork for reinforced concrete foundations is of two types:
- removable (from wooden boards);
- fixed (from expanded polystyrene).
The second option also performs the function of thermal insulation and additional waterproofing. The formwork is set strictly according to the markup. Its height is assigned 10 cm higher than the foundation. Supports are mounted on the outside for stability. Jumpers can also be provided inside the structure. The first mounted node is a corner one. A plastic film or roofing material is placed in a wooden formwork, which prevents the flow of cement laitance.


The upper edge of the formwork is placed 2-5 cm above the concrete mark. This will allow the mixture to be compacted without problems. She won't splash. The fill mark is drawn on the inner surface of the formwork with a marker.
Reinforcement installation
Reinforcing cages consist of three types of rods:
- working longitudinal diameters from 12 mm;
- horizontal clamps with a diameter of 6 mm;
- vertical clamps with a diameter of 8 mm.
All connections are recommended to be made on a knitting wire. Welding weakens the reinforcement and does not give a high guarantee. Even if the rods are connected along the main length with a welding machine, wire is used at the corners. To reduce labor intensity, a knitting gun is used.
 Reinforcing cage placement pattern
in strip foundation
The pitch of the clamps is prescribed on average 20-30 cm. In the places where the walls adjoin each other, the pitch is halved. Before performing work, it is worthwhile to carefully study the methods of reinforcing the foundation at the nodes. Read the rest of the rules and recommendations in the article about the reinforcement of the strip foundation.
Pouring concrete
Before pouring the strip foundation under the house, it is recommended to order the mixture at the factory. This allows you to work without interruption. Also, in the factory, it is easier to observe the proportions of the components, which are very important. By adding a little more crushed stone or sand, you can get weaker concrete than required.
 Pouring concrete
It is recommended to use material of classes from B15 to B20 for pouring. The heavier the house (from frame to brick), the more durable concrete will be required. Filling is desirable to perform in one day (without stops). This is the only way to prevent the appearance of concrete joints that weaken the structure.
When performing work, you should follow the basic rules:
- pouring is done in one day with maximum breaks of 1-2 hours;
- the mixer moves along the perimeter of the building, dispersing the mixture from one point reduces the quality of the material;
- the maximum height from which the solution can be dropped is 2 m;
- concrete must be compacted after laying with a vibrator or bayonet.


Concrete care and stripping
Before you build a house, you need to study the weather forecast. Filling is recommended at an average daily temperature of +20 degrees Celsius. In hotter weather, the quality of the material decreases, in colder weather, the hardening rate. In total, it takes 28 days to set strength.
Immediately after pouring, the structure is covered with polyethylene, tarpaulin or burlap. This will prevent moisture loss too quickly. The formwork can be removed upon reaching 70% of the branded value. With an average daily temperature of + 20 °, this will take one or two weeks.
 The film maintains the required humidity conditions during curing
During the first week after laying the mixture, you need to water it with water at intervals of a couple of hours. This will avoid the appearance of cracks on the surface of the structure. One way to wetting the surface is to spread sand or sawdust over the concrete; these materials are already wetted during care. They will gradually release moisture to the concrete.
Warming and waterproofing
Moisture isolation is a must. It includes:
Insulation is performed if necessary (if a warm basement is planned). For these works it is not allowed to use mineral wool. The best option would be extruded polystyrene foam ("Penoplex").
Do-it-yourself strip foundation: step-by-step instructions with a photo
All about how to properly fill a monolithic strip foundation: the pros and cons of technology, instructions for pouring, installing and building a foundation strip