The principle of the device of sliding gates. Free drawings of sliding gates. Sliding gates with their own hands. Automatic system in sliding gates
Cantilever sliding gates are a rather complex structure. However, they are convenient and practical, therefore they are widely used in private households and in industrial facilities. To date, there are many manufacturers who supply the market with ready-made gates and accessories for them. Enlisting qualified help, you can quite competently and quickly carry out the installation. However, if you want to save money and put creative energy into action, then it is better to deal with the installation of sliding gates yourself.
Description of cantilever gate
Console retractable gate have no restrictions of dimensions from above. In addition, they do not have contact with ground rails. This gate design is one of the most difficult, but such “sacrifices” are justified. The door leaf does not come into contact with the surface, it is suspended on roller blocks using a guide beam. Roller blocks and a beam are usually located at the bottom of the gate. Sometimes the guide beam and blocks are located in the center or on top of the canvas. This approach is justified when cantilever nodes can be suspended from the main wall of an adjacent building.
A similar technology is also used when there are building structures or structures nearby that can withstand loads from the web. Otherwise, a power structure is being built, which is not always beneficial. In most cases, for this reason, sliding cantilever doors with a carrier beam located below are used.
Design features of cantilever gates

If you decide to make console ones, then you should familiarize yourself with the concept of this design. The cloth is established on a frame which is made of a metal profile pipe. A load-bearing beam is fixed to the frame, which has a special profile. Roller carriages are inserted inside the latter. The beam moves with the gate left and right along the carriages, the gate closes and opens.
The roller carriages and the beam are subjected to the greatest load, especially when the gate is fully opened or closed. To unload these units, an end unloading roller is used, which enters and rests against the catcher located below. In another part, an end limiting roller with a catcher can be used to secure the web when fully opened.
Cantilever system for sliding gates can have an upper catcher and guide with rollers, which exclude side rolling. At the same time, the catcher will fix the canvas in the closed state. In order to prevent foreign objects and dirt from getting inside the beam, plugs are used. The design is installed on power elements, among them:
- return post;
- support post;
- foundation for roller carriages.
If the site has strong supports that are made of metal, concrete or brick, then they can be used as a response or support pillars. If there are none, then they will have to be built from metal. The foundation for the console must be built separately. If you decide to make sliding gates of the cantilever type, then they can be supplemented with an electric drive, which is installed between the roller carriages. In order for the blade to be set in motion, a gear rack must be fixed to its side surface. The control unit is installed on the drive.
Can sliding gates be installed?

Even if you do not have financial restrictions and you have a great desire, it is not always possible to install cantilever gates on the site with your own hands. If space is rather limited, then the console structure will have to be replaced with another one. After all, a place should be left along the fence at least 1.5 times the width of the gate opening. This requirement is due to the fact that there is also a technological part on the canvas, the length of which will take half the width of the opening. This will evenly distribute the load on the console unit.
Due to the fact that such gates move in a straight line, the area left for them must be straight. In the place where the gate will move, there should be no uneven terrain that could interfere with the movement of the gate. If you decide to create a cantilever gate, it is recommended to consider the photo in advance. From them you can understand that there should be no gates in the way of the movement of the structure. They are usually installed on the opposite side.
If you order such a gate with a built-in gate, then it will have high thresholds, which is not very convenient for the elderly and children. Some owners, as a gate, leave a distance that will be enough for a person to pass. This is not recommended, because any mechanism is designed for a certain number of cycles, and frequent use of the design can reduce the resource. If the entrance to the territory occurs from a narrow lane, then it is necessary to increase the opening to facilitate maneuvering, which will negatively affect the dimensions of the canvas. If there are no listed situations on the site, then you can proceed to the manufacture of cantilever gates.
Preparatory work

Cantilever gates begin to suit with preparation. To do this, evaluate the place of work. If the structure will be installed to replace the old one, then the condition of the supporting pillars should be assessed. If they are made of reinforced concrete or brick, then their cross section should be 20x20 cm or more. When it comes to a metal profile pipe, the cross section is usually 60x40 cm. These supports must be installed strictly vertically and well fixed in the ground. These elements will act as a response and support pillars. If there are none, then the poles will need to be installed.
When installing cantilever gates with a middle beam, you must dig a hole for the foundation near. It is placed close to the support, it should run parallel to the fence, and its dimensions will be 500x2000 mm. If it is planned to build a new fence on the territory, then all the work on its construction and the construction of the gate must be combined, which is preferable.
Quite often, brick pillars are erected at the entrance, which is not only beautiful, but also practical. If you also decide to follow this experience, then it will be necessary to form embedded elements, they will look like steel plates 300x100 mm. Their thickness should be 5 mm. The top plate is located on the inside of the post, which is closer to the opening. The step from the top of the post to the plate should be 200 mm. Departing from the zero mark of 200 mm, install the lower embedded plate, while doing so, it is necessary to act in the same way.
The zero level will be the entrance through the gate. The central plate is located in the middle, between the lower and upper. Gate nodes will be fixed to these elements. When making cantilever sliding gates with your own hands, you should take into account that the passage width is usually 4 m. This standard has been adopted in Europe. Manufacturers of fittings and components offer sets of elements for a given gate size. To facilitate the work, it is better to use a ready-made solution.
When choosing a canvas, you must decide how it will be lined. Each of the options has its own advantages and disadvantages. The final decision can influence the choice of force elements. The most commonly used corrugated board, however, you can find lining options from lining or forged decorative elements. An alternative solution is a lattice structure formed from steel pipes.
Carrying out markup

When do-it-yourself cantilever gates with an average beam are made, the next step is to start marking. In this case, it does not matter whether a fence has been erected on the territory. Marking is carried out after the installation of the pillars. To do this, it will be necessary to determine the level of the zero mark, as it is the level of entry into the garage opening. You need to mark the level on one pillar, from which the mark is transferred to another using a laser or water level. At zero marks, a cord is pulled, which must be brought close to the inner surface of the supports. The rope should be further than the support post.
Foundation device

The foundation will take on the load from the weight of the gate. Channel No. 20 will act as the upper part, the length of which will be 2000 mm. Roller assemblies and a drive will be installed on this assembly. A pit is being prepared for the foundation, which should be adjacent to the support pillar. Its width will be 500 mm, while the valley will be 2100 mm. The depth should be determined by the level of soil freezing in winter. In most regions, this parameter is 1500 mm.
If you install a cantilever gate kit, the technology will remain the same. It provides for the reinforcement of the foundation. In order to connect the base with the channel, you need to prepare 3 frames. For this, reinforcement No. 16 should be used. For cross-links, reinforcement No. 10 is used, while the pitch should be equal to the limit from 300 to 400 mm.
The frame is attached to the bottom surface of the channel. The axial lines of the frames should be 400 mm away from the edges of the channel. After that, sand or a sand-gravel mixture is added, which is compacted. A channel with reinforcing cages is installed on the surface. For pouring the foundation, concrete grade M-250 or M-300 should be used. For cooking, stock up:
- bucket;
- rubble;
- sand.
The amount of liquid will depend on the moisture content of the cement and sand. If you want to reduce the volume of water and increase the mobility of the composition, then you should use a plasticizer. The supply of the concrete mixture should be carried out gradually, only then the leveled structure will not be shifted. As soon as the next portion of concrete is laid, it is pierced in several places with reinforcement, which will remove air bubbles.
After laying the top layer, wipe the channel surface so that it remains clean for subsequent manipulations. Concrete maturation will occur within 28 days, but after a week the solution will gain strength, which will make it possible to install the gate. At this time, you can do other operations.
Fabric making

If you wondered how to make a cantilever gate, then you should become more familiar with the fabric manufacturing technology. The main frame will consist of a profile pipe with a section of 60x40 mm. The internal filling and stiffening ribs are made of pipes with a cross section of 20x40 mm. The carrier beam will be located below, its length will be 6 m. It is welded to the gate.
When buying accessories, it is necessary to take into account the weight of the canvas and the size of the opening. The size of the opening will be 4000 mm, while the weight of the sheet with corrugated boarding can reach 400 kg. The standard set of accessories includes:
- guide beam;
- end roller;
- two roller bearings;
- bottom catcher of the end roller;
- guide device;
- top catcher;
- two plugs per beam.
Work methodology
For the main frame, it is necessary to cut profile pipes, the cross section of which will be 60x40 mm. To exclude access to the internal cavity of the pipe during welding, the seams should be made as tight as possible. Marking is carried out with a square and a tape measure. You can cut the blanks using an angle grinder with a cutting disc. It is better to use a cutting machine, which will ensure the accuracy of observing the angles.
Pipes are laid out on the mounting surface, and then all seams are tacked. After checking the dimensions, all joints are welded with a continuous seam. The remaining open ends are sealed with plugs. For this, profile pipes should be prepared, which are applied to the inner surface of the frame and tightened with clamps. After that, they can be grabbed by welding. Guide beams are fixed to the lower surface of the gate. For priming and painting, the gate is installed in a position that is close to vertical. For work, it is better to use an anti-corrosion automotive primer, which is applied in two layers.
If you want to speed up the priming process, then you should use a spray gun and a compressor. A brush is also suitable for this, but the work will stretch for a longer time, and the quality of the coating seems worse. Particular attention must be paid to ensure that the primer is in the gap between the turns and the beam. The gap is also closed with an acrylic sealant laid with sausages. The gate at the next stage is painted entirely in 2 layers. The surface of the bearing beam is not covered.
Once the paint has dried, the gate can be revetted. The most preferred material for this is corrugated board, because it combines a beautiful appearance, strength, light weight and reasonable cost.
Gate installation
Cantilever gates at the next stage can be installed on the channel. These manipulations are carried out not earlier than a week after the completion of concreting. To mount roller carriages, a mounting plate with studs must be purchased. With its help, you can adjust the position of the gate horizontally and height. In addition, the gate can be removed to replace roller blocks or repair individual components.
When it's time to install the cantilever gate, the roller carriages are seated on the mounting plate. The top nuts do not need to be overtightened. The position of the plates is marked on the foundation. Measure 150 mm from the edge of the channel and draw a perpendicular line. With a good bearing capacity of the pillars, anchor bolts will be well attached to them. The use of metal additional pillars is not required. If they are not there, then a profile pipe is installed vertically according to the prepared mortgages. On the supporting post, it can be welded to the edge, on the return post - from the edge of the post with a deviation ranging from 20 to 50 mm.
When the cantilever gate is mounted, the next step is to place the roller carriages in the carrier beam and move towards the central part of the structure. Enlisting the help of another person, the canvas will need to be moved vertically above the channel. Roller carriages are bred in different lines, and the stretched rope must touch the guide beam. This position is fixed with the help of stands made of planks.
The operation of the gate must be checked, this applies to their horizontal and vertical, which are analyzed in the closed position. If it is necessary to adjust the structure, then stud nuts should be used. The gate must move along the guide. The gaps between the counter and support posts should be the same, while about 100 mm or slightly less should remain from the zero mark to the bottom edge. If the cantilever gate moves correctly, then the carriage nuts can be tightened, while the landings are scalded around the perimeter.
Conclusion
If you decide to make and install sliding cantilever gates on your own, you must insert the carriages with your own hands into the carrier beam. In general, carriages are needed to move the beam along them, which will ensure the closing and opening of the gate.
Sliding gates are just the perfect option for a country house or cottage. They are comfortable, durable and reliable in operation. Now on the building materials market there is a very large assortment that is required for accessories for gates, so you can easily make sliding gates with your own hands. To do this, you only need a drawing, and in order to fully understand the principle of operation and take into account all the features of a sliding gate, you can watch a video clip or photo, which shows in detail how to make a sliding gate.
Description and principle of operation
Still relatively not so long ago, sliding gates were very rarely set up and the most common fence was simple swing gates. This explained by the high cost accessories for sliding gates. To date, a set of accessories for automatic gates has become much more affordable, and more and more homeowners are interested in how to install this design with their own hands.
Sliding gates for a private house can be of two types:
- Console;
- Rail.
The last option is an outdated variety; such gates can often be seen in factories. The most popular is the first option, which is now ubiquitous. These gates are equipped with an additional console, which is a continuation of the leaf. The console is located behind the fence adjacent to the gate and is hidden behind it.
The principle of operation of sliding gates of the cantilever type is as follows. A guide (aka a console) is rigidly welded to the frame of the sliding gate, due to which the leaf moves. The guide moves on retractable trolleys attached to the foundation.
Each cart equipped with 8 bearings with pressed metal or polymer rollers. Retractable trolleys are located inside the guides, which additionally protects them from atmospheric influences and prolongs the operating time.
Under normal conditions, the operation of the sliding gate system must withstand at least 60 thousand cycles - this is approximately 20 years of average use.
The main advantages of sliding sliding gates include:
- can be controlled mechanically or using automation;
- the possibility of passage of cars of any height (there are no guides at the bottom and top of the opening);
- ease of installation (you can mount sliding gates with your own hands);
- do not require additional maintenance.
The main disadvantage of installing sliding gates is the use of a rather large area for opening them. Often, due to lack of space, people refuse sliding in favor of swing structures.
Accessories
To install sliding gates with your own hands, you need to buy special accessories for mounting a sliding system.
Accessories for cantilever gates must include the following elements:
If automation is planned, then you need additionally purchase this kit, it consists of the following elements:
- Gear rack (it is desirable to choose a galvanized rack). For large (more than 5 m) and heavy gates, a toothed rack with a thickness of at least 9 mm is required.
- Reducer.
- Remote control.
- Photo sensors or light elements - they synchronize the arrival of the IF beam between the receiver and transmitter, prevent closing when an object is located in the opening.
- Base for mounting.
- Signal lamp.
Automation, installed from components of Italian and German manufacturers, is the most reliable and suitable for operation in various climatic regions.
When installing sliding gates with your own hands, you need to make provision for opening in the event of an automatic failure.
Sliding gate manufacturing
Let's consider in more detail how to install cantilever sliding gates with corrugated board sheathing.
Materials and tools
Of the tools you will need:

The most expensive tools (grinder, welding machine) do not have to be purchased, they can be rented - it will be more cost-effective.
For the construction of sliding gates, it is necessary prepare the following materials:
- profile sheets for cladding;
- profile pipe for assembling the frame (65x44x2-3) and lintels (45x25x1-2);
- sealant;
- primer and paint;
- console equipment;
- channel 15-25 mm;
- reinforcement with a diameter of 12-16 mm;
- wires for automation (cable size - distance from the foundation to the electrical panel);
- cladding fasteners (tacks and self-tapping screws).
Getting started: site preparation and drawing development
 One of the most important steps in installing a sliding gate with your own hands is drawing up a drawing with a description of all dimensions (length, width, height, rollback space and clearances). The weight of the gate and the further choice of the console set will depend on the size of the structure and the material of the frame.
The width of the opening must be sufficient for the normal arrival of vehicles. In addition, it is necessary to take into account the width of the street - in narrow lanes it is better to build wide gates for the normal passage of the car.
To determine if the opening is convenient, you can insert a few pegs into the ground along the width of the gate and try to enter the yard by car.
The size of the opening determines the space required for rolling back the canvas. As a rule, the height of the gate is taken into account 10 cm less than the fence itself.
After creating the drawing, you can begin preparing the site for mounting the sliding gate. The opening must be leveled and cleaned of dirt and debris.
Separately, it is necessary to prepare a place for cutting, welding and painting the canvas and metal pipes. For this work, you can collect and put a few "goats".
Foundation laying and construction of supporting pillars
Installation of sliding gates must begin with the installation of support pillars. As this material, you can choose: concrete or brick pillar, steel pipe, oak beam, channel. It is necessary to install a support column to a depth of at least a meter.
Post installation steps:
- Make a hole more than a meter deep.
- Level it up.
- Fill the hole with concrete.
It will take about a week for the concrete to completely harden. Therefore, in order not to waste time, you must first take care of the construction of support pillars.
Foundation laying is done like this:

The top of the channel must be located on the same level with the ground, forming a flat platform for the passage of the car. We leave the foundation to dry for another week, and during this time we are still making the frame of the gate and lining it with profile sheets.
Frame construction
According to the developed drawing, we cut pipes for jumpers and for the main structure. It is necessary to cut and measure the metal very carefully, controlling the accuracy of the inclination of the angles of the jumpers.
Before welding, all parts of the frame must be cleaned with a metal brush (scale removed from them), treated with an anti-corrosion agent for metal and degreased with a solvent.
Stages of welding the crate and frame:
- To simplify the work, you can build a stand for welding: hammer stakes into the ground and lay out jumpers.
- Pipes (transverse and longitudinal frames of the gate) are laid on the stand, they are seized with points, the diagonal of the frame is checked, and the joints are welded.
- We lay the crate of the gate, grab it and determine its evenness. We weld the crate with small seams (one centimeter every 0.5 cm).
- We clean the welding joints, degrease and paint the entire frame.
Frame installation and cladding
It is done in the following sequence:

After installation, you can begin the installation of automation. First you need to get acquainted with the instructions for the electric drive, watch the video and photo of the installation, since various automatic systems have certain differences and nuances of installation. But there are rules that apply without exception to all models:

DIY sliding gates will be much cheaper rather than ordering them from a specialized company. But still, to install them, you will have to purchase components and an automatic system. In addition, you need to be prepared that installing sliding gates with your own hands is a rather laborious process that requires accurate calculation, some skills and knowledge in construction.
The versatility of sliding gates allows them to be used not only in industrial buildings, but also in residential buildings. If desired, they can be made by hand. After reading this article, you will receive recommendations on the preparation of the opening, the construction of the foundation, the frame, the drawings of the main structural elements are attached.
First you need to find out what resources will be needed to make the gate. It may be cheaper to order a ready-made design than to buy numerous tools. Although most of them are still useful in the economy. So, you need to prepare:
- shovel;
- welding machine;
- grinder;
- axe;
- building level;
- roulette;
- screwdriver;
- hammer.
Note! Almost all the tools from the list should be available in any home. The only exception is a welding machine, but you can take it from your neighbors or, in extreme cases, buy it - such a thing will certainly not be superfluous.

Having dealt with the equipment, you can begin to calculate the cost of building materials. In this case, we will talk about gates of standard sizes with an opening of 4 m. Everything you need can be bought at hardware stores and metal depots, and if you wish, you can replace it with something that is cheaper, more expedient, more durable, etc.

- The concrete mortar for fixing the "mortgage" is mixed from cement, crushed stone and sand in a ratio of 1: 3: 3.
- Roller carriages will be installed on the "mortgage" (channel ½ of the gate width). For greater strength, reinforcement no more than 1 m long is welded to the lower part of the channel. In total, seven to eight meter sections and three at an angle (17-18 m in total) are needed.
- The door leaf measuring 2x4 m on one side will be sheathed with corrugated board. For its manufacture, you need: 180-200 self-tapping screws, 10 m² of corrugated board, a package of electrodes, 5 m of 6x6 cm pipes, 20 m of 4x2 and 6x3 cm pipes, a can of primer, a can of paint, a solvent.
Note! If a gate of a different size is planned, then all calculations must be carried out independently. You can use the online calculators that are on the websites of many hardware stores.

The basis for the "mortgage"

The construction of sliding gates begins with the creation of the foundation for the "mortgage". As already mentioned, the length of the "mortgage" should be equal to ½ the width of the gate, in this case it is 2 m. 9-10 meter pieces of reinforcement ø1-1.4 cm are welded to this element and a hole is pulled out 1 m deep and 30 cm wide ( approximately the width of the shovel bayonet + 30 cm for the channel).
- cement, 100 kg;
- fine crushed stone, 300 kg;
- sand, 300 kg.
Ready concrete is poured in such a way that one level with the “mortgage” comes out, otherwise water will accumulate there. While the solution dries (this takes at least 7 days), all the necessary fittings are selected.

Mounting profile pipe
The upper rollers, as well as the catchers located above and below, are conveniently mounted using a 3x6 cm profile pipe. It is installed along the entire height of the column, as well as in the places where the fittings are attached. There are two ways to fix this pipe.

Fasteners are often additionally reinforced with anchors. At the same time, it is worth noting that over time, the anchors installed in the brick loosen.
Pipe concreting is more reliable, but this requires a lot of labor, which is not always advisable. The mount will look something like this: the lower rollers are installed, then the door leaf, and the upper rollers are welded on top. With regards to the lower catcher, it is already welded in fact, focusing on the line along which the canvas approaches the pole at the opposite end.
"Embedded" are welded to the pipe, while using small corner profiles. In the future, "mortgages" are painted in the color of the door leaf.
Note! Without assembling the "mortgages", extremely accurate removal of the reinforcing bars to the catcher and rollers will be required, which in itself is quite difficult. Or you will have to fix it with anchors, which, as mentioned earlier, is very unreliable.
Hardware selection
After preparing the foundation and the "mortgage", all the necessary components are selected. Accessories include:
- guide rail 5-7 m long;
- plugs;
- a pair of roller carriages;
- grips;
- end and top rollers.
Note! It is better to buy all these components, because for their independent production, special equipment and considerable knowledge in the field of technology are required. As a result, home-made fittings will cost more than store-bought.

First you need to determine the length of the rail. It should be 1.5 times the width of the opening. A product of 1.3 widths is taken in two cases:
- if the weight of the gate is insignificant (less than 250 kg);
- if there is not enough space to open.
All fittings are usually designed for a specific weight - approximately 500-800 kg. If the canvas is sheathed with corrugated board, then fittings should be selected for a weight of 350-400 kg. But if the material used for sheathing weighs a lot, then it is better to opt for 800 kg.
The canvas will "ride" on rollers, metal or plastic. With proper operation, both options will last a long time, but it is still preferable to choose plastic ones - they make less noise when opening / closing the gate.

When buying, you should pay attention to the presence of the upper grip and rubber plugs.
Note! If all the components are made carefully and are sold in original packaging, then the manufacturer is serious and uses only high-quality equipment. You should not buy parts that are sold in plastic bags or have uneven edges - this is a clear sign of "handicraft" production, and in case of any problems, there will simply be no one to make a claim.
Frame construction
Step 1. First you need to prepare a place for assembly. Its dimensions should be larger than the dimensions of the future design.
Step 2. Pipes are prepared (for the frame you need to take 5x5x0.2 cm), cleaned of scale or rust, after which they are treated with gasoline and coated with a primer. For priming, you can use a spray gun (the work will be done faster) or a regular brush (the primer layer will be thicker).
Step 3. After the pipes have dried, the frame is welded. It is important that there are no holes left at the joints where water could penetrate.

Step 4. An internal frame is being prepared, which is necessary for fixing the corrugated board. A smaller pipe 4x2x0.2 cm is placed on a larger one - 5x5x0.2 cm:
- in the middle, if two-sided sheathing is planned;
- closer to the edge, if only one surface is sheathed, there will be room for corrugated board.
Pipes are welded in a checkerboard pattern with a step of 40 cm - so they will not “lead” at high temperatures.

Step 5 Welding points are processed with a grinder and covered with a primer layer.


Step 7. After the paint has completely dried, the frame is sheathed. The corrugated board is fixed with self-tapping screws on the inner frame.

Video - Gate installation
Step 1. Roller carriages are installed on the "mortgage", and gates are already placed on them (the rollers are threaded into the guide). Further, using the building level, the verticality of the structure is checked and, if everything is fine, the carriages are welded to the channel.

Many use bolts for such fastening, since there are suitable holes in the carriages. But you don’t need to do this, because measuring and making holes in the “mortgage” will take a lot of time and effort. Moreover, if even a millimeter error is found, then you will have to cut off the bolts and repeat the procedure again.
Welding is more suitable, because it provides a field for maneuvers - if necessary, you can always cut it off and move the carriage. Welding is no less reliable than bolts - with it, the gate will stand for decades.
Step 2. Mortgages for other components are prepared from 6x3 cm pipes. In appropriate places, reinforcing bars are removed from the pillars, to which catchers with rollers must be fixed.
Step 3. The end of the guide is equipped with a roller with special clamps, after which it is closed on both sides with rubber plugs. The location of all elements is carefully measured, then roller carriages are welded.


Video - Sliding gates
Automation
Note! Automation can only be installed if the gate moves easily and without any jumps.

The installation technology for gate automation is described on the example of the Chinese model PS-IZ, which has proven itself very positively. The automation kit will consist of:
- electric drive;
- signal light;
- gear rack;
- remote control;
- photocells.
For installation you will need the following equipment:
- welding;
- drill;
- drills for metal.
The drive will be powered by a cable 0.2x0.2 cm, and for photocells 0.4x0.07 cm and 0.2x0.05 cm will be required. A cable with a cross section of 0.2x0.07 cm is connected to the signal light. The electric drive will be fixed on the same channel, as carriages.

Step 1. First, the installation location of the drive is selected. For this, a base is taken (it should be included), the drive itself is placed on it. The base is placed between the carriages and the working position is recreated - a gear rack is installed on the gear of the electric drive. The location of the channel is adjusted so that the rack is in the center of the gear and is fixed on the outer frame (but only on the profile pipe).

Step 2. The installation site is marked, after which the base is placed and scalded there.
Note! Quite often, the drive has to be raised by two to three centimeters. In this case, the remains of the profile pipe are welded to the "mortgage", and the base is already attached to them.
After that, the actuator is screwed to the base.

Step 4. Limit switches are screwed to the rail. They are mechanical and magnetic (the latter are more reliable).
Step 5. The drive is connected according to the manufacturer's instructions, after which it is tested. If everything is normal, the Photo-GND jumper is removed and photocells are installed.
Note! One element gives a light signal, and the other receives it. In the presence of a signal, the system functions normally, but if any obstacle arises in the path of the beam (a car, an animal, a child, etc.), then the canvas immediately begins to move back.
Step 6. A signal lamp is attached to the left side of the structure with self-tapping screws. This is optional, but for safety reasons, it is still better to put a lamp. To do this, you need a cable with a cross section of 0.2x0.07 cm. The cable is soldered to the Light and AC-N contacts on the board.

Actually, after thisdo-it-yourself sliding gate drawingsand instructions for the manufacture of which are given in this article, you can already use. For a more detailed acquaintance with the nuances of installation, watch the thematic video.
Video - Homemade sliding gates
Sliding gates, which until recently were a luxury item and cost a lot of money, are gradually entering the market for the average consumer. Ease of use and space saving fully justify the investment. There are a huge number of offers of finished structures from various domestic and foreign manufacturers. Many companies provide services for the manufacture and installation of such gates.
But if you have even a little experience with a welding machine and minimal skills in construction, then it will not be difficult to make such a structure with your own hands, thereby saving a decent amount of money.


Peculiarities
Sliding gates began to be actively used more than 50 years ago. At first, they could be seen mainly at the entrance to large industrial and storage areas. Over time, the design and fittings improved and became more accessible and easier to install. Gradually, various options for sliding gates began to be installed in private areas, and today they are not uncommon for a summer cottage.


Sliding gates have many more advantages than lift and swing gates:
- Compactness. This is especially true in cases where travel between neighboring plots and space in the yard are limited. Also, sliding gates practically exclude the possibility of damage to the car by the wings.
- Wear resistance. The main disadvantage of swing gates is the presence of hinges that are prone to sagging under the weight of the wings. Sliding gates do not have such problems due to the uniform distribution of the weight of the structure over the roller bearings.
- Burglary resistance. A properly designed and built system can withstand a heavy traffic ram.


- Sail protection. Even heavy gusts of wind do not cause damage to such structures.
- Availability of automatic drives. The motor and components of automatic sliding gates are cheaper than equipment that is installed on swing and lifting structures.
- In winter, snow removal is not required before opening the sash.

Despite all these advantages, before proceeding with the manufacture and installation of gates, many other factors must be taken into account.
First you need to calculate the width of the span for the entry of the car. Usually, for the private sector, an opening equal to 4 meters is recommended: both cars and trucks can freely enter it. If necessary, the width of the entrance can be reduced to 3 or increased to 6 meters or more.


The free space along the fence on the rollback side of the sash must correspond to:
- for suspended and wheeled types of structures - the width of the web,
- for cantilever gates - 40-50% more than the leaf width.
Deep into the site at a distance of 40-50 cm from the fence, the space must be left free. The relief of the soil should be as even as possible, without strong drops, so that there are no obstacles along the way of the lower beam.


If you study the instructions in detail, prepare high-quality materials and tools, you can make strong and beautiful gates with an individual design in a short time.
Construction types
The main difference between the types of sliding structures lies in the way the rollers move when opening and closing the gate. Each of the varieties uses special roller mechanisms, but they are installed in different ways.


Suspended construction type
The gate leaf moves on roller trolleys located on a support beam, which is mounted on poles in the upper part of the passage. This is the most durable and wear-resistant option. The beam can withstand quite a lot of weight, so any materials can be used for facing the gate, and the width of the leaf is practically unlimited. The disadvantage is that the passage of a tall vehicle can be limited by a carrier beam.

Suspended structures are most often installed in production areas. To increase the space for passage, the beam is mounted on high support pillars. This greatly increases the metal consumption and cost of the entire structure, so this option is rarely considered for the private sector.

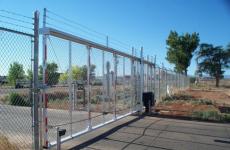
The photo shows an example of hanging sliding gates at the entrance to the production.


But if the height of the entrance to the territory of a private house is initially limited by decorative or other structural elements, hanging gates will do just fine.
Rail type construction
This type of sliding gate is the easiest to manufacture and install. The supporting part is the so-called rail, along which the sash moves on a special roller. A rail is installed along the gate movement line at the same level with the roadway so as not to interfere with the passage of vehicles. The maximum span between the fence posts can be 6 meters.

Snow can clog into the rail and ice can form, preventing the entire structure from working properly. In addition, it requires constant cleaning from sand and dirt.


The foundation holding the main rail must be stable, without chips and cracks, otherwise the gate can be deformed and quickly become unusable. The rail type of gate is usually used in cottages and houses that are visited only in the summer.


Cantilever type of construction
This type is the most common version of sliding gates, which is a leaf with a counterweight mounted on cantilever blocks. The absence of contact of the lower bearing beam with the roadway is the main advantage of this design. Thanks to this, problems due to bad weather are almost completely eliminated.

Among the shortcomings, one can single out the long process of pouring the foundation for the mortgage and the complexity of installing the console. The total length of the structure is 50% longer than the gate leaf, which makes it impossible to install it with a large opening and insufficient width of the site.


Such gates can be made with a built-in gate, but this is not always convenient. Since the canvas is raised from the ground by about 8-10 cm, the threshold of such a gate can be difficult for small children and the elderly to pass.

It is more convenient to use and more aesthetically pleasing in appearance will be a separate gate, which is arranged close to the gate - in a place where the sash rollback is not provided.
All three types of roll-out structures can be made mechanical or automatic. Mechanical gates open and close manually, while automatic gates are controlled by a remote control and set in motion with the help of a special motor. If desired, automation can be installed a little later, during the operation period, using the services of specialists.


The main labor costs fall on the manufacture and installation of the door leaf. Sheathing is one-sided and two-sided. The view from the entrance is no different.
Principle of operation
Cantilever doors are best suited for regions with changing weather conditions. Their production, installation and maintenance do not require excessive financial costs. For self-production of the structure, first of all, you need to figure out on what principle it works.

The device of cantilever retractable gates is quite simple:
- Gate cloth. The main frame with the internal frame welded to it and the counterweight are mounted on the lower carrier beam. Fence cladding, which is most often done using corrugated sheets, is fixed to the frame on one or both sides.
- Mortgage. Channel, firmly welded to the reinforcing cage and poured with a foundation at ground level. This is one of the most important parts of the structure, on which console units and automation are installed. The durability of the entire fence structure depends on the quality of the foundation.
- console blocks. Special roller support mechanisms, which are welded to the channel and installed in the lower load-bearing beam. The cantilever part is the main component of the entire structure, which bears all the loads. It depends on it how smoothly and freely the canvas will move, so you need to approach the setting of the console blocks very carefully.


- Catchers. The lower and upper catchers are mounted on a support post located opposite the foundation for the roller bearings. When the gate is closed, the end roller, which is located at the end of the carrier beam, drives into the lower catcher. The canvas is raised by 5 mm, due to this, the load on the console blocks is removed. The upper catcher is needed in order to tightly fix the gate and prevent windage - swinging of the gate in strong winds.
- Upper fixing holder with rollers. Mounted on a support post above the cantilever blocks and prevents swinging and distortion of the gate during movement.
- Automatic drive. The choice of drive mainly depends on the weight of the structure and the weather conditions in the region. Installation is carried out according to the instructions that come with the equipment.


Automation
The retractable design is already convenient in itself, but if it is equipped with an electric drive, there is no need to get out of the car each time to open or close the gate. Experts advise installing special drives, but at your own peril and risk, you can make such a mechanism yourself.

To do this, use a suitable power motor and gearbox. There are precedents when a screwdriver was used as an engine. Also, if the leaf weight is small, it is possible to install a cheaper drive for garage doors.


Special drives must be selected based primarily on the weight of the structure:
- For gates weighing 250-300 kg, a drive with a power of 200-250 watts is suitable.
- For a weight of 500-600 kg, a suitable power is 350-400 watts.
- For 800-1000 kg - 500-600 W.
When choosing automation, you should always take a small margin of power. And in regions with severe winters, it needs to be increased by at least 20-30% so that the motor runs without interruption during sudden temperature changes. You can install the drive only when all the work on the manufacture and installation of the structure has been completed. The gate leaf should move easily, without jumps and swaying. An incorrectly installed blade can damage and ruin the automation.


Automatic drives can be selected from a variety of proposals from domestic and foreign manufacturers. You need to pay attention to such details as gears in the gearbox.
They can be plastic or metal. Metal gears are more expensive but much more durable, so it's best to prefer them.
You should also carefully consider the selection of the limit switch. Its magnetic version costs a little more, but unlike the metal one, it does not jam in winter and works smoothly. For ease of use, there are various additional functions: temperature control of the electric drive, adjustment of the speed of movement of the leaf, backup power, photocells for entry and exit, gate mode.


Among the manufacturers of drives for withdrawable structures, the following can be noted: Russian Doorhan, Belarusian An-Motors, Italian BFT, Faac and Nice, French Came, Chinese PS-IZ and Miller, as well as other manufacturers. Their range of offers is quite large, it remains only to choose the right equipment and you can proceed with the installation.
Consider the automation kit using the example of the diagram above:
- drive unit;
- photocells for departure;
- photocells at the entrance;
- signal lamp;
- radio control antenna;
- key-button;
- rail;
- limit switch plates;
- remote control.


For work, you will need an inverter welding machine with electrodes and a drill with metal drills. Initially, on the channel between the carriages, it is necessary to prepare and mark the area for mounting the electric drive. The equipment is attached to the base, which comes with the automation, and a gear rack is installed in the center of the motor gear.
After the working position has been recreated, it is necessary to weld the base to the channel. If the actuator needs to be raised, then a profile pipe of a suitable size can be additionally welded between the base and the channel.


After the drive is bolted to the base, you need to re-install the gear rack on the motor gear, mark its correct position on the profile or beam with a marker and carefully grab it by welding. Before fully welding the seam between the rail and the beam, you need to check once again that it is installed correctly.
The gate must be fully open while working on the welding machine. At the end of all actions, limit switches are screwed to the rail with the help of bolts and nuts with flanges. Further, according to the instructions, the installation of photocells, a signal lamp, an antenna and a key-button is carried out.
The electric drive can be installed not only in the lower, but also in the middle or upper parts of the gate.
This method of summing up the automation is somewhat more complicated, but in cases of heavy snowfalls, it will not be necessary to clear the foundation site from precipitation daily.
In this case, it will be necessary to adjust the drawing to the desired design.


The profile to which the toothed rack will be attached will be located on the middle or upper level of the sliding gate, respectively. To mount the automation, it will be necessary to build on an additional structure made of a metal profile of a rectangular section 60x40 mm.
Instead of a special electric drive, you can install a home-made drive from improvised materials. Taking into account the mains voltage, a three-phase or single-phase motor is installed on the site. The three-phase drive is more powerful and virtually eliminates problems when starting the movement. Depending on the weight of the door leaf, a motor with a power of 1.5 to 2.5 kW is required. At the same time, a low engine speed gives less load on the drive shaft.
It is better to choose a drive with 12 poles and 500 rpm or 6 poles and 1000 rpm. The drive can be purchased at specialized stores, or you can use spare parts from an old car or washing machine.

The input torque of the gearbox must match the speed of the drive. The output torque frequency of the drive wheel should be between 80-100 rpm. It will be more convenient to use a single-stage gearbox. Its connection to the motor shaft is made using a rigid or semi-rigid coupling.

Features of calculations
Before proceeding with the design of the drawing, you need to make all the necessary calculations. First of all, the height and width of the gate are calculated. If the height of the fence on the site is known, then the height of the future canvas can be determined as follows: the upper part should be on the same level as the fence, and the lower part should be 8-10 cm higher than the roadway. The width of the gate is equal to the distance between the support beams, the recommended value is 4 meters.
Calculating the counterweight is also quite simple - its length should be equal to 50% of the length of the opening. This value can be reduced to 40% only in cases where there is not enough space for the fence to fully open the sash and the canvas is sheathed with lightweight materials.

The length of the counterweight profile connecting the top of the web and the edge of the bottom profile should be enough to form a triangle.
The value is calculated according to the dimensions using the following formula:
sqrt( func a^(2) + func b^(2) )
Or in a more familiar form, familiar from school
Where a is the length of the counterweight, b is the height of the web, c is the required length.

The calculation of the weight of the structure is necessary for the correct selection of the guide beam, fittings and automation. Basically, the weight depends on the material with which the sheathing will be made, on the weight of the frame, frame and supporting beam, and on the wind load.

If 1 sq. m profile sheet weighs 4 kg, then a steel sheet 2 mm thick weighs 17 kg. The weight of forged, wooden and other skins is calculated individually. On average, a gate with a 4x2 m leaf, sheathed with a profile, will weigh about 200 kg.
For gates weighing up to 300 kg, a supporting beam with dimensions of 9x5 cm and a metal thickness of 3.5 mm is suitable. The hardware must be able to support the full weight of the structure. It can be purchased as a complete set or purchased separately. When buying, it is advisable to have a drawing with all the calculations so that you can consult with a specialist.


Drawing design
A diagram or drawing of a sliding gate is made after all measurements have been taken. A drawing with all calculations is ordered from specialized companies. You can find ready-made sketches on the Internet, make them yourself or use the ones below. For structures with a span of 4 meters, you can choose one of the two drawings presented.

In the first case, the power frame is 10% larger than the opening, which increases the consumption of facing material. At the same time, the cost of the entire structure does not increase much, however, it is most often not expedient in such an increase in spending. Therefore, consider the second drawing, all calculations will be made on the basis of it.


The drawing must clearly indicate all dimensions, places of welding and fastenings. Fastening of the toothed rack is possible both to the bearing beam and to the bottom profile of the frame.
For light gates sheathed with a profile 4 meters wide and 2 meters high, you will need:
- Bearing beam, which is a rail, the upper part of which is solid, and in the lower part there is a longitudinal cut. It is better to choose a design made of cold rolled steel. The beam is mounted on cantilever blocks and moves on bearing rollers. The size of the rail in this case is 60x70 mm, the required length is 6 meters.
- For the power frame, you need a rectangular profile of 60x40 mm and a metal thickness of 2 mm in segments:

- 1 piece 4 meters long;
- 1 segment - 6 meters;
- 2 segments - approximately 2 meters each;
- 1 piece - about 2.8 meters.
In total, almost 17 meters of such a profile will be needed.

- For the frame, a rectangular profile of 20x20 mm or 30x20 mm with a metal thickness of 2 mm is suitable. In total, about 24 meters of profile are needed.


- For a mortgage, you will need a channel 20-40 cm wide and a length equal to ½ of the gate opening: in this case, 2 meters. The thickness of the metal must be at least 3 mm. Cantilever blocks, an electric drive mechanism will be installed on the channel, fastened by welding.

- For the foundation frame, at least 15-20 meters of reinforcement with a cross section of 12-16 mm are required.
The thickness and dimensions of each part of the drawing directly depend on the material that will be used to sheath the sash.
If the cladding is made with a profiled sheet or polycarbonate, the accessories indicated above are sufficient.
If it is planned to be sheathed with steel sheets or forging, then stronger elements will be needed. After preparing the drawing and calculating the exact dimensions of all its components, you can proceed to the purchase of materials and the manufacture of the gate.


materials
To make a simple gate measuring 4x2 meters with corrugated board cladding, you need to purchase the following materials:
- rectangular profile 60x40 mm for the power frame and 20x20 or 30x20 mm for the frame;
- guide beam 60x70 mm;
- corrugated board 8-10 sq. m;


- rivets or self-tapping screws for fastening the skin in an amount of about 200 pieces;
- channel 40x200 cm;
- reinforcing bars 15 meters.


Forged elements themselves represent the inner frame of the gate and are attached to the power frame by welding. Such gates do not require additional sheathing, except perhaps as a design solution.


Accessories can be purchased separately or as a special ready-made kit. Well-established manufacturers of fittings for sliding gates, such as:
- Italian - Combi Arialdo and Flatelli Comunello;
- Russian - Rolltek and Doorhan;
- Belarusian Alutech.


Self-manufacturing of roller components is impractical, as it requires special skills and tools. To mount a cantilever gate, you will need the following fittings:

- Roller bearings - 2 pcs. They are also called cantilever blocks or carriages. It is recommended to use designs with bearings.
- Upper catcher - 1 pc. It is better to use catchers with guide wheels. It is possible to manufacture homemade catchers.
- Lower catcher - 1 pc.
- Upper retainer - 1-2 pcs.
- End roller - 1 pc.
- Caps for the carrier beam - 2 pcs.

The wheels in the support and end rollers can be either metal or plastic. At the same time, the metal parts are more durable, but they make noise when the door leaf moves. Plastic will last a little less, and with proper operation the same amount, but such gates will move quietly.
For fastening the catchers and the upper latch, metal poles from a rectangular section profile 60x40 mm are needed. They are installed on a foundation reinforced with reinforcement to a depth greater than the freezing of the soil.
If the fastening is made on brick or reinforced concrete supports, then their size must be at least 20x20 cm.


Metal mortgages are attached to the pillars with anchor bolts, to which the upper retainer and the counter post from a profile pipe with a section of 30x20 mm will be welded. Instead of anchors, reinforcing bars can be removed from the pillars and mortgages can be attached to them.
Mounting of photocells at the entrance is carried out on pipes of rectangular or round section with a diameter of at least 30 mm. The height of the pipes should not exceed 1 meter. Their installation must also be carried out on the foundation, but without reinforcing with reinforcement. The exit photocells are mounted on support poles.

Manufacturing
In order to make your own sliding gates the following tools are required:
- inverter welding machine and electrodes;
- riveter or screwdriver;
- grinder with interchangeable discs for cutting and grinding;
- concrete mixer, shovel or rod for piercing concrete;
- marker, tape measure, hammer, pliers, drill, building or laser level;
- spray gun or air compressor for applying primer and paint. You can use brushes and rollers, but then the layer will turn out to be thicker and more heterogeneous;
- protective equipment for eyes, respiratory tract and hands.
You will also need an anti-corrosion primer, acetone or other solvent, alkyd or acrylic paint for outdoor use.


The step-by-step instructions for the manufacture and installation of retractable gates provide information on how to do all the work yourself:
At the initial stage, a foundation should be made for the mortgage and, if necessary, for supporting pillars. Under the mortgage, a hole is marked and dug to the depth of soil freezing. Depending on the region, it can be - from 1 to 2 m. The length of the foundation is ½ of the width of the opening, in this case - 2 meters. The width of the pit is 40-50 cm. Depending on the depth of the pit, crushed stone and sand must be covered in layers of 10-30 cm and each layer carefully compacted.

The reinforcement frame is made by welding the rods together, and then the channel is welded to the finished frame. The resulting structure is installed in the pit exactly along the ground line close to the fence post. Horizontalness must be checked with a laser or building level. If you plan to install automatic gates, before pouring the foundation, it is necessary to conduct wiring to the channel in a plastic or metal pipe with a diameter of at least 2.5 cm.

Concrete for the foundation is mixed in a concrete mixer in the ratio:
- 1 part of cement M400 or M500;
- 3 parts sand;
- 3 pieces of gravel.
For a pit 1 meter high, 2 meters long and 50 cm wide, you will need about 1 cubic meter. m of concrete. During the pouring process, the solution must be periodically pierced with a shovel or reinforcement bar to release excess air.

The first 3-7 days, the flooded foundation must be watered with water to prevent the formation of cracks and chips.
Under the foundation for the support post, you need a hole measuring 50x50 cm. It is better to install the support post on the inside of the site so as not to reduce the gate opening. The preparation of the pit, mortar and reinforcing cage is carried out according to the example of a mortgage. The counter post and channel can also be installed on screw piles, but this design, depending on the soil, may be less durable.


The next stage is the manufacture of the door leaf. The metal profile for the frame and frame is cut with a grinder according to the dimensions indicated in the drawing. On a special stand, which should be larger than the finished structure, the components of the power frame are laid out and, if necessary, adjusted in size.
The joints must first be spot-welded, and then all seams must be completely welded. To exclude the possibility of water or snow entering the web structure, all holes must be welded.
The seams are carefully polished with a grinder or sandpaper to an acceptable appearance. The inside of the frame, which will be in contact with the frame, must be degreased with a solvent and coated with two layers of anti-corrosion primer.


The second primer coat can be applied only after the first has completely dried. The primer coating of the inside of the frame at this stage is carried out because after the connection with the frame, processing of the closed surface will no longer be possible.
After the power frame is ready, it is necessary to weld the frame in the same way. The processing of seams and priming of the surface is carried out according to the same principle, but the outer side of the frame is primed, which will be in contact with the power frame. After the coating has dried, the frame is installed inside the frame.


The centering of the inner frame relative to the frame is made depending on the method of door plating. If the cladding is carried out only from the outside, then the frame is welded close to the outer part of the frame. With double-sided cladding, the frame is installed exactly in the middle.
The welding of the frame with the frame is carried out very carefully so that the structure does not skew due to overheating of the metal.
First, fastening is done with small welding points at a distance of 50 cm from each other. Then the joints are welded in small segments of 1-2 cm from different sides, and only the remaining segments of 5-10 cm can be boiled immediately. Work must be performed on both sides of the canvas. The carrier beam is welded to the frame according to the same principle.

At the final stage of manufacturing the canvas, the welds are polished, the surface is degreased with a solvent, primed and painted. Priming and painting is best done in two or three layers, while the second layer is applied only after the first has completely dried. Coatings must be applied evenly so that there are no streaks and bumps. To do this, it is better to use a special compressor.
The corrugated board is attached to the frame with self-tapping screws using a screwdriver or rivets using a special riveter. The first fastenings are made at the corners of the canvas, and then around the entire perimeter at a distance of 15-20 cm from each other. If one profiled sheet is not enough, then each next sheet is overlapped on the previous one.

Installation
The installation of the door leaf occurs only after the foundation has completely solidified, which is possible 10-28 days after pouring. The drying rate depends on the composition of the solution, temperature and humidity of the environment.
First, with the help of a laser level or a lace, the trajectory of the movement of the gate leaf is outlined. At the maximum distance from each other, roller bearings are installed on the channel.

Sliding gates are placed on carriages with a guide rail so that the rollers are inside the carrier beam. During installation, you need to constantly maintain the fabric of the structure vertically, for this you will need the help of one or two people.
It is important to correctly adjust the position of the cantilever blocks and check the horizontalness of the lower beam with a building level.
The block, which is closer to the opening, is located so that in the open state of the gate the distance from the span to the roller is 15-20 cm. The second carriage with the gate closed should be at a distance of 5-10 cm from the end of the rail. In this position, the roller mechanisms are slightly welded to the channel, the whole structure is once again checked for ease of walking on the rollers.

If all the mechanisms are working correctly, the canvas must be removed from the console blocks, the carriages from the lower platforms, and the platforms themselves must be completely welded to the channel.
It is not necessary to fasten the platforms to the channel using the bolts that come with the kit. If it turns out that even a small error occurred during installation, it will no longer be possible to unscrew such bolts. To reinstall, you will have to cut them off and do all the steps again.
Roller trolleys are again fixed on the platforms, the canvas is put on them and, with the gate closed, the final adjustment is made with a wrench. The upper fixing roller is attached by welding to a metal pole or a mortgage in a brick pole, which is located above the foundation.

The reciprocal pole must be installed on the foundation or fixed by welding on mortgages on a brick pole. The length of the post should be equal to the height of the gate leaf or slightly higher. The lower and upper catchers are welded to the counter post. The lower one is fixed by 5 mm. above the run-in level of the end roller: this reduces the load on the supporting cantilever blocks when the gate is closed. The top catcher must be fixed 5 cm below the top of the gate leaf.
The end roller must be installed inside the guide beam and clamped with bolts. For greater strength, the roller can be welded into the guide rail. And finally, plugs are attached to the carrier beam on both sides, which are necessary so that snow and dirt do not get into the rail, which impede the operation of the structure. Rubber plugs are simply inserted into the rail, while metal plugs are attached by welding.


Decor
Decorating sliding gates is possible in a variety of ways. The sheathing of the gate itself can serve as a decoration, which can be made from a variety of materials.
Additional cladding with metal strips makes the gate more strict and massive in appearance.


Quite often, forged elements are attached to wooden and metal gates.
Installing a lock on automatic gates is usually not required, as they are driven by a remote control or a button. It is simply impossible to open such gates by hand. But for mechanical structures, locking elements and locks are required without fail. Most often, simple constipation is installed, which can hardly be called decorative.

Beautiful examples
The vertical crate on the fence looks concise and strict.
It is possible to combine corrugated board with crate.
Combined cladding with forging elements will always look expensive and presentable.


Gates made of wood or sandwich panels are also often decorated with wrought iron.
Forged structures without additional cladding are often used.
Forged gates with additional sheathing in transparent polycarbonate look very good.
For cladding, you can use tempered glass, which can be left transparent, darkened with tinting, or tried in combination with metal.


How to make a sliding gate with your own hands, see the following video.
There is a lot of incomplete information on the Internet on the installation of sliding gates with your own hands, after reading it, the progress of work or the installation of sliding gates is not particularly clear.
In this manual, we will try to visually demonstrate the installation of cantilever sliding gates from and to, and help you calculate the height and width of the gate for you.
To proceed with the installation, you need drawings, there is no one drawing for all gates, it all depends on the width and height of the opening in the fence.
Sliding gate fittings
The first thing you can start assembling the gate with is the fittings, but only after calculating the weight and dimensions of the gate, the fittings can be purchased separately or made with your own hands from bearings, the fittings kit includes:
- guide rail is usually 6 m long;
- 2 roller bearings
- 1 top roller bracket to avoid the swing of the gate;
- 1 end roller;
- 1 end roller catcher, so that the gate docks correctly during the wind and does not break the automation.


Additional accessories for fittings:
- Mounting and adjusting support for roller bearings.
- Mechanical lock.
- Rack toothed.
- Fastening element for toothed rack.
Now about the load. Kits are different, for different weights of the gate, see the table, it shows the dependence of the weight and width of the gate.
| Opening width no more | Gate weight |
| 4 m | 300 kg. |
| 4 m | 400 kg. |
| 4.5 m | 500 kg. |
| 6 m | 600 kg. |
| 10 m | 1000 kg. |
| 12 m | 1200 kg. |
These data will be useful to you when choosing accessories, but most craftsmen try to make all the details with their own hands, since the kit is not cheap.
To make the hardware yourself, you need to know where and why it is attached, read about it below.
How to choose quality fittings
The main part, the guide rail, the best choice would be the rail of the European manufacturer. A good quality item has a mirror-smooth surface and clear geometric shapes. The part must be galvanized, free of scale and rust on its surface. A quality guide has a metal thickness of 3.5 mm to 5 mm.
When choosing roller bearings, pay attention that they are made entirely of metal, plastic or rubberized ones will not last long. All geometric shapes of the metal must be correct, the slightest deviation indicates a poor-quality assembly.
As for the rest of the metal parts, they must be coated with zinc, the zinc shade must be uniform, the minimum thickness of the metal is 3-4 mm.
Sliding gate dimensions
The cost of fittings will depend on the size and weight of the sliding gate. The width is calculated in this way, another 50% of the width is added to the width of the opening in the fence. For example, you have an opening width of 4 meters, divide by 2, we get 2 meters + 4 meters opening width, the total length of the guide rail will be 6 meters.
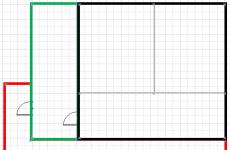
To make it easier to understand and remember, I propose a formula and a diagram:
- B - opening width;
- A - counterweight length;
- L is the length of the guide rail.

After you have decided on the size of the frame, you can begin to manufacture it, the frame is made of a profiled metal pipe 40x40x2 mm and 40x20x2 mm for the inner crate. For aluminum frames, a profile from 60 mm is used.
It is better to make the height of the gate frame equal to the length of the corrugated board. Decking is better to choose tougher. Before fixing the corrugated board to the frame, drill holes in the frame half the diameter of the roofing screw, since the self-tapping screw may not drill the profiled pipe of the frame, blind rivets can be used instead of self-tapping screws.
The width of the lower profiled tube must match the width of the guide rail.
If you have a gate width of more than 4 meters, then it is better to use rectangular pipes to assemble the base of the frame!


The photo below shows how to properly make a frame for different widths of the opening.


Gate foundation
It is quite easy to determine the size of the foundation, since it has a length equal to 1/2 of the width of the opening, according to the formula:
- B - opening width;
- L is the length of the foundation;

If everything is simple with the length of the foundation, then with the installation we have many options.
The foundation can be made of the following materials:
- Monolithic U-shaped.
- Monolithic solid.
- From screw piles.
There are also small features in the installation of a monolithic foundation, you can use reinforcement welded to the channel, anchor bolts or long threaded studs.


Consider the option with a channel (power frame), it can be with one or two supporting pillars or without them, in both cases, the power frame is attached flush to the existing fence posts. The height of the supporting posts corresponds to the height of the gate itself + the height of the roller bearings. The use of two supporting pillars near the power frame is advisable for wide gates that are strongly swayed by the wind. If support pillars are not provided, then metal mortgages are made into the stone fence instead.


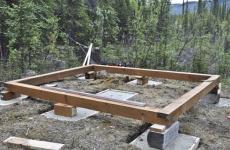
In the photo, laying the foundation.


Scheme without metal racks.


Location of carrier rollers


In order to evenly set the power frame on the opposite side, where the support post with the end roller catcher is located, retreat 10 cm (post thickness) from the fence and pull the cord to the last corner of the channel, along its entire length, the edge of the channel should repeat the line of the cord.
Gate installation and adjustment
After the load frame is ready for use, level the roller bearings, install the upper roller bracket, the installation depends on the design of the bracket.


To determine in advance where to mount the lower trap, a guide rail without a gate is put on the roller bearings. The lower trap is designed not only to hold the gate horizontally, but also to remove the load from the roller bearings; for this, the end roller must roll into the trap so that the gate rises 3-5 mm.


If, after installing the frame, the end roller sags a lot, adjust the roller bearings.
If everything is done correctly, but you have not achieved the correct operation of the sliding gate, then most likely you do not have a high-quality set of fittings, it is designed for a different weight, or the frame is assembled incorrectly, because of this, the gate sags heavily and cannot fall into the lower trap.
After all the above mechanisms are adjusted, you can proceed with the installation of automation. The video below shows how you can make an electric drive with your own hands.


Let's start with the gear rack, they are metal and nylon, metal is naturally better and more reliable. Their thickness varies from 8 to 30 mm. The standard rail size is 1 meter. For fastening, use the number of rails equal to the width of the opening + 1 rail for automatic limit switches. The gap between the teeth of the drive gear and the rack should be 1-2 mm. The rack is attached to the bottom tube of the door frame using a fastener for the toothed rack. Holes in the rail allow it to be adjusted in height.

There are two options for fastening the toothed rack in the picture, we do not recommend attaching the rack to the guide rail, during welding, the guide may bend, if bolts are screwed into the guide, this can also cause difficulties during installation and during operation of the gate.
Fasteners are often welded, although there is a special C-profile for the rack for their fastening. Pictured below are both options.


If you buy an electric drive, then 4 meters of gear rack are included in the kit.
For those who do not want to spend money on a gear rack, it can be replaced with a bicycle chain or, as shown in one of the videos, a Zhiguli chain.
Gate automation
Both retractable and swing can open automatically. Their operation is controlled by a remote control and switches installed in the house, and possibly at the gate. One remote control can start not only the gate, but also the garage door, and even lighting. Automatic drives consist of an electric motor, a moving rack and a control device. They can be purchased as a separate device, although it is better to order them immediately with the gate. Then you will be sure that the drive was correctly selected and there will be no surprises during assembly.
Sliding gates require one motor to move the toothed rack attached to the bottom edge of the leaf. And for sliding gates, two cylinders are required, one is attached to each of the wings. The drive has a mechanism that allows you to open the gate in the event of a power failure. Modern drives can be powered by a battery charged from the mains or solar panels. The gates open automatically and require the installation of devices that ensure the safety of their use. Photocells are needed, thanks to which the leaves do not move when an obstacle appears in their path. A signal lamp installed in a conspicuous place will inform you that the gate is opening or closing.
Drive selection
When choosing a drive, it is important that the gears of the gearbox are made of steel or brass, but not plastic or silumin. The second important element is the limit switch, it controls the points to which the gate can be opened and closed, the limit switch can be mechanical and reed switch (magnetic), as practice has shown, the mechanical one can freeze in winter. As a rule, the quality of drive parts depends on its power, the higher the power of the drive, the better its assembly. As for the carrying capacity, it is indicated in the documentation.
Basic equipment of the drive:
- 4 meters of gear rack;
- photocells;
- signal lamp;
- remote control and receiver;
- mounting plate.
For those who do not know what photocells are for, they are 2 sensors that are mounted along the edges of the gate. When an obstacle appears between the photocells, the gate opens or closes, depending on how you program the automation.
Installation of automation


The first step is to weld or screw on the mounting plate for mounting the drive, it is supplied with the drive, it can be used to adjust the height and angle of the drive.


After mounting the drive, magnetic sensors, photocells and a signal lamp are mounted. As a rule, drives are connected to the network 220 and after software configuration they are immediately ready for operation.