We build an energy-efficient and beautiful fireplace in the house with our own hands. How to build a wood-burning fireplace in the country Do-it-yourself wood-burning fireplaces
Real wood burning fireplaces are not going to go out of fashion, despite the fact that in almost every home there are efficient modern heating systems. This fact can rather be explained by a person’s desire to create a special comfort, rather than a lack of heat, although even a small, properly built fireplace is quite capable of quickly warming up a room of 16 ÷ 20 square meters.
Wood-burning fireplaces for home - how to choose and? This question arises among the owners of country houses, who have long dreamed of and finally got the opportunity to create a comfortable relaxation area, the center of which will be this particular device with live fire.
Wood burning fireplaces
Fireplaces are a stove equipped with a large open firebox and a fairly simple system for removing combustion products from it.
Brick structures are the traditional version of the fireplace, and in order for such a heating device, you need to know at least a little the art of a stove-maker or a bricklayer. However, in our time, it simplifies the task that some of the details necessary to build this appliance, which is desirable for many owners of private houses, can be purchased ready-made, or you can try to combine brickwork with other materials.
So, recently, metal combustion chambers have been on sale, which are built into the brick structure of the fireplace. Such fireboxes, as a rule, have doors with double glazing made of heat-resistant glass. Therefore, you can enjoy real fire from the fireplace, either by opening the doors wide open, or contemplating it through the glass.
Despite the very massive and overall design, brick fireplaces are usually not used as the main source of heat. Rather, they serve as a central interior detail that creates an atmosphere of comfort, which is especially necessary in chilly autumn or spring weather.
Wood-burning fireplaces are also made of metal - they can be purchased ready-made or built independently, if, of course, there are good and appropriate equipment.
Metal fireplaces, unlike brick options, are quite often installed in country houses specifically for heating on cold days, and are also used for cooking, as many industrially produced models of fireplace stoves are equipped with a hob.
How to choose the best fireplace model?
The main evaluation criteria for choosing a fireplace
When choosing a model, it is necessary to rely on a whole list of initial evaluation criteria.
- The proposed location of the fireplace is determined, taking into account the area that can be allocated for its installation.
- The heated area is estimated, if necessary.
- The desired size of the firebox is outlined.
- The material for the manufacture of the fireplace is selected.
- Requests for desired functionality are evaluated.
- The intended external design and design are taken into account to create a unified interior style in the room.
Let's go through the main points of this list in more detail.
Types of fireplace by location in the room
According to this criterion, fireplaces are divided into corner, wall, island, wall-mounted and even suspended. All of them, in turn, may have differences in shapes and designs.
corner fireplace
Corner fireplaces can be put in second place in popularity after wall ones, and this fact is explained by the fact that they are compact and fit perfectly into a room of any size - the main thing is to choose the right size for the structure.
Corner fireplaces, in turn, can be divided into three subspecies:

- Fireplace located on the outer corner of the room. In this case, the chimney must be built into the wall of the house or attached to it from the outside. Both in the first and in the second case, the construction of this option will require large expenditures. However, a chimney built outside can be an excellent addition to the design of the facade of the building.

- The second option is a fireplace, which has a rectangular or square shape, installed in the corner of the room with a chimney also passing inside the room. This fireplace design can be played up in different ways, for example, by attaching a decorative or functional niche to it along the entire height, as shown in the photo, to equip a wide pre-fireplace podium with a built-in chamber for storing and drying firewood. A similar version of the fireplace will perfectly fit into the interior of a fairly large room.

- The third traditional version of the fireplace is a design that fits into a corner and crosses it diagonally from wall to wall. Such a model occupies a minimum area, therefore it is ideal for installation in a small room, but it can also be installed in a large hall. The fireplace can be equipped with a mantel and a podium with a niche for firewood.
Compact and efficient - corner fireplace
If the corner in the suburban room is still empty, then a fireplace asks for it there. Detailed information about the design, recommendations for the preparation and construction of such a structure, the ordering schemes for the two original models can be found in a special publication of our portal.

Corner metal fireplaces are very compact along with an enviable heat dissipation, so they are often used in country houses or private houses as the main source of heat for a separate room. Modern versions of these devices have an elegant appearance and will fit well into the interiors of different styles.
Prices for corner fireplaces
corner fireplace
Wall fireplaces
The design of a wall fireplace is the most popular option. The structure is adjacent to the wall with its back side and does not take up much space in the room, since the approximate average size of its base is 750 × 1250 mm.

Wall fireplaces look very elegant and can be made in different styles. In addition, there are designs of this type of fireplaces that are adjacent to the wall not with the back, but with the side. In construction, such a design is more complex, however, it also has its advantages.

A fireplace installed in this way will divide the room into different zones, and when a finished metal firebox, glazed on three or two sides, is installed in it, the play of the flame can be observed from anywhere in the room.

Metal versions of fireplaces can also be wall-mounted, and different models of these devices are produced, which can be equipped with one or more functions. The design of such stoves-fireplaces is diverse, so it is quite possible to choose an option that not only does not spoil the interior, but also becomes that “highlight” for it that will attract attention.
Fireplaces built into the wall
Fireplaces built into the wall differ from all other types in that its chimney is attached to the wall from the side of the street, the structure itself is in the wall, and only the fireplace portal protrudes into the room.

The advantage of such a fireplace is that it practically does not take up space in the room, that is, its area remains original, and also that two fireplaces built into one wall on different floors of a two-story house can be connected to one chimney. The “cons” of this design are the complexity and laboriousness of its arrangement, as well as the rapid cooling of the fireplace, since the chimney will pass along the street, which will lead to high fuel consumption. To increase the heat transfer from the fireplace, and to avoid its rapid cooling, it is necessary to insulate the chimney well.

Built-in fireplaces can be built entirely of brick, or a metal firebox is built into the wall, which is then framed with a decorative portal, matched to the overall style of the room.
It will be quite difficult to integrate this type of fireplace into the built walls, usually its planning and installation is carried out at the design stage and during the construction of the house.
If you plan to install this type of fireplace in an inner wall, then it will have to be completely or partially dismantled and then rebuilt - this process will not be easy if the wall is load-bearing, and the floor beams and truss system rely on it.
In the same case, if the fireplace is built into the inner wall at the stage of building the house, then the design can be calculated so that the fireboxes will be turned into rooms separated by this wall and connected to one chimney.
In addition, if a stove has already been built in the house, then it is quite possible to attach a fireplace to it. This is acceptable if the size of the channel allows, or if the heaters are not planned to be used at the same time.
island fireplaces
Island fireplaces are called fireplaces that are not connected to any of the walls and are built or installed on a separate foundation. This option is only suitable for a large room that needs to be divided into zones or create a more comfortable environment in it.

For example, if a country house is not divided into separate rooms, but has one room with a relatively large area, an island fireplace will fit into it very well.

An island fireplace can be made of metal or brick, the main thing is that a reliable and solid foundation is equipped under it.
Suspended versions of fireplaces can be attributed to a similar type of heating devices, which do not require pouring the foundation, but for them it is necessary to fix reliable floor beams, since they will rest on them.

Hanging fireplaces are used quite rarely, as they are impractical. If they are used, then more as a decorative element of a modern interior. The price for them is quite high, and the function is only a slight heating of the surrounding air. Of course, such a fireplace looks very impressive and is an excellent addition to the style solution of the interior.
The advantages of such a device include the fact that it can be installed in a room even with a small area, as it has a compact size.
The nuances of the location of fireplaces
In addition to choosing the type of fireplace according to its location, you need to correctly designate the specific location for its installation. This issue has its own nuances that must be taken into account.

- First of all, when choosing a place to install a fireplace in a room, it is necessary to make sure that the chimney pipe does not stumble on the floor beam. It should run exactly in the middle part of the space between the two beams, so that a distance of at least 120 ÷ 150 mm remains between the pipe and the wooden structural elements.
- A fireplace with an open firebox should not be located in the area of the passage of air flows, for example, opposite the front door, since the cold entering the room from the outside will disrupt the natural circulation of heated air. In this regard, a decrease in the efficiency of space heating can be expected.
- A good place to install a corner fireplace would be one of the corners near the door. The heat emanating from it will create a kind of thermal curtain for cold air.
- It is best not to install a wall fireplace near an outside wall, as the cold surface will draw heat. However, if there was no other place to install the heater, then before installing it, the wall must be insulated by fixing aluminum-coated mineral wool on it with foil towards the room.
- The fireplace must be installed on a solid surface, so if the room has wooden floors, then you will have to build a concrete foundation under the brick structure.

If the floors are mounted from thick boards, and a metal fireplace is chosen, which does not have too much mass, then it will be necessary to lay an asbestos plate on the surface for installing the device, and then cover it with a steel sheet or lay it with ceramic tiles.
Functionality of the fireplace
Having chosen the installation site and the approximate size of the fireplace, you need to decide what functions it should perform, since there are different design options for such structures. So, fireplaces can:
- Heating, that is, used only to heat the room.
- Heating and cooking option - is used not only for heating, but also for cooking. This fireplace has a cast iron hob.
- The heating and decorative fireplace is intended not only to heat the room, but, to a greater extent, to maintain its style.
- Heating fireplace with water circuit. In this case, the fireplace is an element of the heating system, that is, water, heated by the heat of burnt wood, enters the heating radiators, and then, having passed the entire circuit, returns again for heating. Thanks to the circulation of the coolant from the fireplace, one or two rooms of the house can be heated with high quality.

Brick fireplaces can be heating, decorative, and also have a design with a built-in water circuit. However, if a model with a hob is chosen, it will no longer be a fireplace, but. This version of the heater has a more complex internal structure, and without proper experience in the construction of furnaces, it is very difficult to perform such work on your own.

Metal fireplaces can perform all the functions listed above or only heat the room. If a ready-made version of such a device is purchased, it remains to equip a place for it, and if the design provides for a water circuit, connect it to the local heating system.

If a fireplace is purchased for a country house in which it is planned to live in the spring and autumn, as well as most of the summer, then it is best to purchase or build a fireplace with a cooking function. Such a device will not only heat the premises of the house, but also will not let you down if you need to cook food or warm water.
Calculating the size of the fireplace
In order for the heater to function effectively, when drawing up its project, it is very important to calculate the parameters of all elements that depend on the area of \u200b\u200bthe heated room. Calculations can be made based on this table:
| Parameters of fireplace elements, mm | Heated area, m² | |||||
|---|---|---|---|---|---|---|
| 40 | 30 | 25 | 20 | 15 | 12 | |
| Combustion chamber width | 900 | 800 | 700 | 600 | 500 | 400 |
| Combustion chamber height | 770 | 700 | 630 | 560 | 490 | 420 |
| Depth of combustion chamber | 420 | 400 | 380 | 350 | 320 | 300 |
| Back wall height | At least 360 | |||||
| Back wall width | 700 | 600 | 500 | 450 | 400 | 300 |
| Smoke box height | 800 | 700 | 660 | 630 | 600 | 570 |
| Cross section of a chimney with a rough inner surface | 270×400 | 270×400 | 270×270 | 270×270 | 140×270 | 140×270 |
| Cross section of a chimney with a smooth inner surface | 270×270 | 270×270 | 270×270 | 140×270 | 140×270 | 140×140 |
If the room has a different area, then the dimensions of the fireplace can be calculated independently using simple formulas. For example, to determine the linear size of the combustion chamber window, you need to divide the area of the room by 50. So, if the area is 18 m², then 18: 50 \u003d 0.36 m or 360 mm, that is, the normal size of the furnace window will be 360 × 360 mm.
Knowing the width and height of the firebox, you need to determine its depth. According to standard proportions, this value is equal to ⅔ of the found height. For this, the height of the firebox is 360: 3 × 2 = 240 mm. Thus, the size of the combustion chamber will be 360×360×240 mm.
It should be noted that if these parameters are increased in favor of the design solution, then this will negatively affect the heat transfer of the heater, since most of the thermal energy received from the combustion of firewood will simply go into the pipe. In addition, fuel costs will be significantly increased.
If, on the contrary, the parameters are reduced, that is, the depth of the firebox does not correspond to its height, then the fireplace may begin to smoke, since the conditions for the formation of the draft necessary for normal combustion will not be created.
In addition to the size of the firebox, the parameters of the chimney directly affect the creation of normal draft in the fireplace. By the way, the fire safety of the device also depends on them. Therefore, you need to correctly select the size of the inner diameter or perimeter of a rectangular chimney, as well as its height.
The requirements of SNiP establish that the diameter of the chimney must be at least 150 mm. If a rectangular brick pipe is selected, then the cross-sectional area will be equal to at least 1/10 of the size of the combustion chamber window.
In accordance with established standards, the height of the chimney must be at least 5000 mm. However, sometimes the chimney has to be raised higher, focusing on the height of the roof ridge and the place where the pipe passes through it. Permissible positions of the chimney relative to the ridge and roofing are shown in the diagram.

Firebox type
All wood-burning fireplaces are divided into devices with an open and closed type.

Fireplaces with an open type of combustion chamber are selected if:
- The structure is installed to heat the room on rainy days and create a cozy atmosphere.
- The fireplace is part of the interior style solution and is also designed for periodic heating.
- There is a desire to cook dishes on a spit, which require an open firebox.
Fireplaces with a closed chamber are chosen by practical owners of private houses who want to not only transform the interior of their home, but also have a functional device in it that can heat one or even two rooms.
Wall fireplace prices
wall fireplace

- The presence of glass doors on the combustion chamber can significantly save fuel, since the draft inside the furnace can be adjusted.
- A fireplace with this design can be used as an alternative heating or in addition to the main one, as some models have an efficiency of 75÷80%.
- When burning firewood, the door can remain open, if you wish, to admire the live flame, or closed, if necessary, quickly heat the room.
- The presence of doors on the combustion chamber makes the fireplace as safe as possible, since when burning firewood, coals from them or sparks will not be able to get on the floor.
fuel chamber material
In brick fireplaces, the firebox can be made entirely of brick, combined with a metal sheet, which is fixed on the back wall of the fuel chamber, and serves as a screen that redirects the heat flow. In addition, a steel or cast-iron firebox, which is lined with bricks, can be installed in a brick structure.

- The complexity of building a firebox made of bricks lies in the removal of the masonry of the back wall at an angle, since it must not only be tilted towards the portal, but also be quite smooth. Therefore, many novice craftsmen prefer a metal sheet fixed at the same angle.

- The cast-iron combustion chamber has a number of advantages, which include its durability and high heat transfer, which are the main positive qualities of this material. In addition, such a firebox looks quite respectable, which is important for some interior styles.

- Steel fuel chambers, unlike cast iron ones, are not as durable, since steel burns out rather quickly. Therefore, if such a variant of the firebox is purchased, then it is recommended to line the chamber from the inside with fireclay plates. You can also purchase a finished steel chamber, which has a lining with a layer of fireclay.
fireplace portal
The portal of a brick fireplace can be made in two versions - it is arched and straight. When performing the arched version, it is necessary to observe its proportions, that is, the radius of the arc must have a certain size.
The arched ceiling is a more durable option, as it better distributes the load on the lower rows of the upper masonry of the fireplace. In turn, the arched ceiling of the portal is divided into two types - these are arched and semicircular.

Semi-circular ceilings of the portal are called arches that make up half a circle - this is the most reliable and aesthetic option of all that exists, as well as easy to perform. Everything is simple here with the radius - it is equal to half the width of the furnace window.

The arched arched ceiling has a flatter shape, in contrast to the semicircular one, and it is used most often to form wide portal windows or if there is a need to limit the height of the portal. There may be some difficulty here - it is sometimes necessary to find the radius of the circle R, which forms this arc - it will be required to create a template and preliminary "outlines" for hewing bricks of this curvilinear masonry. And besides, during the laying of a thread stretched from the center of the circle, it is convenient to align the correct direction of the seams between the bricks of the vault.
There is a special formula for calculating this radius - it is included in the calculator below.
Equipping country houses and summer cottages, people dream of a special atmosphere of silence and comfort. This is the best way to contribute to wood-burning fireplaces, which not only effectively heat the room, but also deliver purely aesthetic pleasure from contemplating the fire. In this article we will tell you how to fold wood-burning corner fireplaces for a home, about their features and specifications. And our step-by-step instructions and ordering the laying of a corner fireplace will help even a beginner to cope with this difficult job.
The fireplace stove has a number of undeniable advantages for owners of country houses. Most importantly, they can be equipped in homes where gasification is not provided or there are problems with electricity.
It is enough to quickly melt the fireplace, which allows you to provide warmth to the family even on a cool spring or autumn evening. And even where fireplaces are an additional source of heat, they will be a great solution in the off-season or during power / gas outages.
No matter how intricate the corner fireplace is, the following elements will always be present in it:
- firebox;
- ash pan;
- grate;
- portal (body);
- chimney.
Firebox
It in the fireplace can be closed or open. This does not affect the efficiency of heat transfer. When making a fireplace with a closed firebox, you will need the following elements: a damper, transparent doors made of heat-resistant glass.

A large role in the duration of the fireplace and its damper, transparent doors made of heat-resistant glass.
Provide the materials from which it will be made. The outer part of the fireplace can be made of ordinary brick, but the firebox must be made of fireclay (heat-resistant) without fail.
The finished cast-iron firebox will significantly reduce the time of laying the fireplace and simplify the task. To give the structure a stylish authentic look, it will be enough to overlay the cast-iron firebox with red brick and build a massive chimney.
Some stove-makers lay out the inside of the finished cast-iron firebox with fireclay bricks in order to minimize metal contact with fire. This point is especially important in the case of using a steel firebox.
There is also such an element in the design of the fireplace as a chimney tooth. This is a small chamber located on the back of the firebox at a slope of 20 0 .

Between the ledge and the lining is a loaded platform, which has a size of 12.15 or 18 cm (depending on the overall size of the combustion chamber). The fireplace tooth passes a mixture of flue gases with cold air, which move at high speed.
In contact with the walls of the smoke box, the hot gas gradually cools, and it begins to fall down. Thus, turbulence of the gas flow is created in the pipe.

If the combustion process in the furnace is not intense, then smoke may “hang”. The purpose of the chimney tooth is to prevent this.
Another problem for good traction can be an oversized fireplace portal. But this can be avoided by increasing the speed of the hot gas in the upper part of the furnace. Thus, air will be sucked from the room into the upper part of the portal.
This problem can be solved with the help of a chimney tooth - a small ledge that will allow you to compress the gas flow in the upper part of the furnace.
Ash pan (or blower)
Given the intensive process of burning logs in the fireplace, a large amount of ash is formed, which falls into a special ash chamber located under the firebox. In order for the fire in the fireplace to flare up well and give off heat, you need excellent traction.

When the combustion chamber is clogged with ash, it prevents the flow of air to the fire.
This point is especially important if you are going to use firewood from softwoods, as they form the most ash.
The blower is a small chamber located under the grate of the firebox.
This chamber may be equipped with a drawer-like retractable device, or it may have a simple design with a door.
But not only the role of cleaning from combustion products is played by the ash chamber. Through the blower, oxygen is supplied to the fire, which ensures intense combustion.
The blower door helps regulate draft and control the intensity of the fire. When opened, the flame intensifies. Accordingly, the closed door will block access to the fire, and the firewood will slowly smolder in the fireplace.
If the design of the fireplace does not imply the presence of a door on the ash chamber, then the base of the combustion chamber must be made with a slight slope to prevent ash from spilling out.
But not all fireplaces have an ash pan. If the chimney pipe is high and provides good draft, then the firewood will burn to the ground. In this case, the fireplace will be cleaned directly from the combustion chamber.
If under the combustion chamber it is located very low, near the floor itself and there is no way to make the ash chamber in the basement, then the stove-makers also omit this element.
The working processes in the fireplace are as follows:
- logs and firewood are stacked on a metal grate and set on fire.
- The intensity of combustion is controlled by a slide gate, which opens or closes the access to oxygen. With an open type of firebox, the intensity of combustion can only be regulated by the amount of firewood.
- As the firewood is burned, the ash is collected under the grate, in a special ash pan, which must be cleaned regularly.
- The products of combustion are removed through the chimney.
Through this structural element, combustion products are removed. It can be made of brick or steel. In stores, you can also find ready-made ceramic structures that are assembled from separate parts.

When building a wood-burning fireplace chimney, it is very important to adhere to elementary fire safety measures and to insulate well the places where the pipe passes through the wall and roof.
Furnaces classify chimneys into three types:
- wall;
- indigenous;
- mounted.
If the chimney is laid inside the main wall or structure, it is called a wall. It is, as it were, one with the wall covering.
But the root chimney is a separate element that is separate from the fireplace (stove). It is connected to the main structure with the help of a reversible sleeve. Depending on the number of stoves and fireplaces connected in the root chimney, there may be several such sleeves.

Thus, the root (remote) pipe is the core for the removal of combustion products and such a system is often used in large houses with many rooms. This allows you to implement several fireplaces in the house and not violate the aesthetics of the exterior of the house. Indeed, in this case, there will be only one exit of the chimney through the roof.
The reversible sleeve connected to the remote pipe is made of red brick, on which a steel case is put on. The length of one sleeve should not exceed 2 meters, otherwise draft problems may occur and the efficiency of the fireplace will decrease.
To clean the sleeve from soot, a special cleaning door is performed. And in order to maximize the thrust in the changeover sleeve, it is raised by 10 0 in the direction of the movement of gases.
The same moment must be taken into account when constructing pipes for the passage of the chimney through the wall.
If the fireplace is located in a place where it is not possible to bring a vertical chimney, then the only right decision would be to build a chimney with access through the wall to the street.
At the same time, horizontal sections should be minimal, and in order to maintain good traction, they are also raised at an angle of 10 0.
But it is impossible to lay a branch pipe in the attic, since condensation may occur due to a large difference in temperature, which will increase the fire hazard.
The extension pipe is most often used by stove-makers in the construction of fireplaces. She rests on an array of fireplace. But in order for the stove (fireplace) to withstand the load of the chimney, the wall thickness of the stove must be at least ½ brick or more.

The minimum section of the pipe is ½ * ½ brick.
Another key element of the chimney is fluff. This is an extension of the chimney at the point where it passes through the attic floor.
Why is it necessary to expand the pipe in this place?
This will protect the wooden ceilings from overheating. To do this, the fluff is laid out in the thickness of one brick (it is also possible in 1.5 bricks) and is additionally insulated with asbestos felt or a sheet impregnated with clay mortar.
The entire space between the attic floor and the cutting must be filled with fireproof material (concrete).
The pipe that runs through the attic floor is called the riser.
There is another important element in the design of the chimney, which is called the "otter". This is a small expansion of the pipe when exiting through the roof. The purpose of the otter is to protect the attic from precipitation.
Fire safety measures when laying a corner fireplace

Basic rules for laying a corner wood-burning fireplace

As for fire safety during the operation of the fireplace, here you also need to follow certain rules:
- Do not bring the fireplace insert to the maximum temperature.
- Ensure a safe distance between the fireplace and objects that are easily flammable (at least 65-70 cm).
- Carry out a systematic cleaning of the fireplace from ash and soot.
In order for the fireplace to warm the room well, it is necessary to correctly calculate its dimensions before the construction stage.
Its dimensions are affected by:
- total area of the room;
- feature of the installation site;
- chimney outlet (through the wall or through the roof).
Features of corner fireplaces
Among the many types of fireplace designs, the corner fireplace has taken one of the first positions. Such a fireplace looks very stylish in the interior and at the same time saves space.
A corner fireplace allows you to create a unique warm atmosphere in your home and emphasize your individual style.

They are distinguished by compactness, thermal efficiency and neat appearance.
Often this form of fireplace is used for zoning a room, especially if it has a large area.
Due to its shape, the corner fireplace will fit perfectly into the design of absolutely any interior. The undoubted advantage of the corner design is ease of installation and originality.
In order for a corner wood-burning fireplace to be as efficient as possible, it is necessary to take into account the following features during construction.

- It should be shallow and at the same time wide. Then the heat transfer area will be maximum.
- To increase thermal efficiency, various elements are added to the design of wood-burning fireplaces: heat shields, air casing, etc. When heated, they provide additional heat.
- The laying of the fireplace does not have to be even. Some bricks can protrude - this does not affect heat transfer in any way.
- To increase the efficiency of heat transfer, it is not recommended to perform too massive facing layer.
But no matter how large, massive and stylish a corner wood-burning fireplace turns out, do not forget that it, first of all, performs a decorative function. Therefore, it cannot be used as the main heat source.

If the cottage or house is located in the northern or eastern part of the country, then a good heating system is indispensable.
According to the design decision, corner fireplaces can be decorated in:
- modern style;
- country;
- classic.
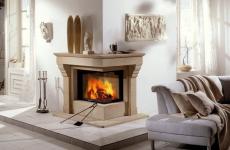
The classic corner fireplace in the English style is made in the shape of the letter "P". For cladding, ceramic tiles or red brick are usually used.
But for country music, as a rule, they choose the shape of the letter "D". At the top of the structure is a wooden beam.
Art Nouveau style is distinguished by smoother forms. This option will fit perfectly into any room.
We draw the project of a corner fireplace
Before proceeding with the construction of a corner fireplace in the house, it is necessary to draw up a detailed project and complete a drawing. The drawing should reflect all structural elements, dimensions.
If you want to increase the dimensions of the fireplace, immediately calculate how much additional material it will take and how much power the fireplace will get.
Below we give a masonry scheme, where the warping of the combustion chamber will begin from the sixth row. You can change this design somewhat, depending on the purpose of the fireplace and personal preferences.
If the main task of the corner fireplace is to heat the room, then the firebox must be made low so that the floor warms up well, taking cold air from below.
If the main purpose of the fireplace is a decorative function, then you can raise the firebox above the floor
We calculate the size of the combustion chamber
The dimensions of the fireplace will depend on the size of the room, so below we provide a table that will tell you how to correctly calculate the dimensions of the structure.
The area of the room must be divided by 50.

This value will tell you what area the opening of the combustion chamber should be.
For example, for a medium-sized room (20-25 square meters), you need to make a fireplace with a firebox 0.5 m 2 wide.
As for the overall dimensions of the structure, the ideal is the ratio of width and height of 3: 2.
As mentioned above, the depth of the firebox is of great importance. The efficiency of heating will directly depend on it. Follow approximately the following proportions: the depth of the firebox = ½ or 2/3 of the height of the firebox.

If you decide to increase the volume and depth of the combustion chamber for decorative purposes, then keep in mind that this will significantly reduce the efficiency of heating the room.
We calculate the size of the chimney
The optimal ratio is the pipe section in the amount of 1/10 of the combustion chamber inlet area.
If the chimney has a circular section (for example, if you are using a sandwich pipe to build a chimney), then take a diameter of at least 150 mm.

With a smaller diameter, thrust will be significantly reduced.
The height of the chimney must be at least 5 meters. But if the house is 2-3 floors, then it will, of course, have to be raised. Here it will be necessary to focus on the position of the roof ridge.
Below are certain patterns of chimney outlet, which are focused on the position of the roof ridge.
What materials are best used for laying a fireplace?
For laying a fireplace, you will need 2 types of bricks: fireclay and red full-bodied.
It will be necessary to make a combustion chamber from heat-resistant fireclay bricks, and the red brick will go to the outer part of the structure.

In addition, you will need a special masonry mortar, which is made from river fine sand and clay.
You can, of course, buy a ready-made dry mix for laying a stove in a hardware store. Then you just need to dilute it according to the instructions with the right amount of water and stir.
Another option For this you need sand and red river clay. The quality of the clay used will directly affect the quality of the solution and the strength of the entire structure of the fireplace.
That is why many experienced stove-makers prefer the option of making the solution on their own. So you can choose the clay that meets the technical standards as much as possible.
Due to its unique properties, soft and plastic red clay turns into a durable stone when heated. One of the main indicators of the quality of clay is the percentage of its fat content. If you take "skinny" clay, then when heated, it can crack.

After firing, good oily it acquires the strength of a brick and can endure very high temperatures. However, in order for it to really be strong and securely fasten the masonry, it is necessary to observe the correct proportion of all ingredients.
For strength, Portland cement grade M300 can be added to the masonry mortar.
Depending on the quality and fat content of the clay, the solution is made "by eye", that is, there are no ideal proportions.
Here you will need to focus on the appearance and how it is typed on a trowel.

The solution should have the consistency of thick homemade sour cream, do not drip from the trowel. It should be homogeneous, without grains. Mix the solution thoroughly.
Attention. Clay mortar is only suitable for laying a fireplace. For the construction of the foundation and chimney, use cement mortar.
Fireplace masonry: scheme
When determining the optimal dimensions of the fireplace structure, be guided by the typical ratio of the fuel chamber inlet: 3: 2.

If the fuel chamber is made very deep, then a strong loss of heat will be observed, since it, accumulating in the furnace, will leave through the chimney.
At the same time, the depth of the fuel chamber must not be made too small, otherwise there is a danger of smoke in the room.
In previous articles, we have already considered. Today we offer a detailed scheme for the construction of the corner fireplace "Annushka" for a red brick house "for jointing".
Fireplace size:
Base size - 89 * 89 cm
Height - 161 cm (excluding chimney).
From the materials you need to purchase:
- Fireclay refractory bricks for the combustion chamber (not lower than M200) - 55 pieces.
- Red ceramic brick for whole fireplace. - 356 pcs (excluding pipes). You can additionally take 10% of the total, taking into account defects and errors.
- Mortar for laying the foundation (cement, fine sand, gravel and water).
- Mortar for laying bricks.
- Roofing material for foundation waterproofing.
- Boards for the construction of formwork.
- Smoke damper 250 x 130 - 1 pc.
- Steel corner 50 x 50 x 5 x 600 - 1 pc.
- Steel corner 50 x 50 x 5 x 800 - 2 pcs.
- Steel sheet 3 x 400 x 600 mm - 1 pc.
- Metal rods and wire for reinforcement.
- Metal wire 0.8 mm for dressing.
From the tools prepare:

- Trowel for laying bricks.
- Roulette and marker.
- Rule.
- Construction mixer or drill with a nozzle.
- Rubber mallet for laying bricks.
- Bulgarian for turning bricks.
- Threads for pulling plumb lines.
- Building level, protractor and plumb.
- stapler.
- Shovel and bayonet shovel.
- Solution bucket.
- Construction hammer for the construction of formwork.
Foundation construction
Given the massiveness of the corner structure, it is necessary to make a separate foundation for the fireplace.

The order of work is as follows:

Wall protection from heat
Given the angled design of the fireplace and the close fit to the wall, a number of fire prevention measures must be taken to protect the walls from overheating.

This can be done in two ways:
- Attach the reflective foil screen to the wall with self-tapping screws. The size of such a screen is 1 * 2 meters. When doing this, consider the size of your fireplace, the top of the screen should extend beyond the highest point of the fireplace by 30 cm.
- Using ceramic tiles, you can create a beautiful protective screen that will perfectly fit into the overall interior of the room and emphasize the beauty of the fireplace.
If the clean floor comes close to the fireplace, then it is recommended to lay 15-20 cm of a protective coating in the form of ceramic tiles in front of the base of the firebox.
Preparation of materials for masonry
Given the complex corner design of the fireplace, you will need a large number of hewn and divided bricks into ½ or ¼ parts.
How to do it right?
It is better to separate the bricks immediately, according to the order. Before separating the necessary part of the brick, mark with a marker on its front side and make a groove.

At the same time, one longitudinal groove is enough for ½ brick. In order to chip off 1/6 or 1/8 of the brick, we draw a groove on all sides of the brick.
Before starting laying, lower, select all the brick with which you will work at this stage and lower it into the water so that it absorbs moisture as much as possible.

If you put a dry brick, then it will begin to gain moisture from the masonry mortar, which can adversely affect the strength of the masonry.
Advice. Do not rush to clean the fireplace right away. First, sort out the order and lay out each row “dry”. Number the brick of each row and arrange it in groups on the floor. So you can see all the difficult places that you have to face, and avoid serious mistakes that will be hard to fix later.
Fireplace masonry
Before laying the base, measure a sheet of roofing material and lay it on the floor. It will perform the function of waterproofing.
Advice! To make perfectly even seams, take wooden slats equal in thickness to the thickness of the seam. Lay a brick and a rail on top. Apply the solution and lay the second row. When it dries, remove the rail. Prepare the number of slats so that they are enough for 2 rows. By the time you finish the third row, you will be able to remove the wooden fixture from the first row and use it further.

Advice! To prevent the stove from being pulled to the side during laying, pull 4 sheer threads, which are fixed to the ceiling. They will serve as a kind of beacons for the furnace.
Pay attention to the shape of the bricks, they are all different shapes. At the preparatory stage, you should have already divided them into appropriate fragments, laid them “dry” and numbered each.
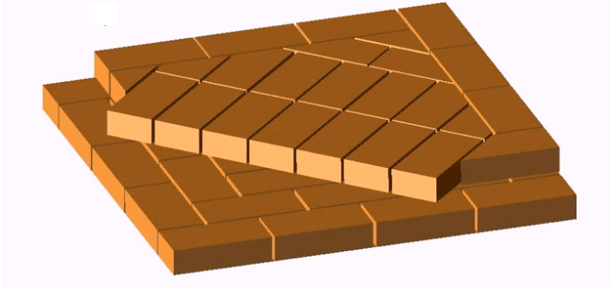
- 3 row we begin to form a niche for firewood, located under the hearth of the fireplace.

- 4 row repeats the previous one. We're just going up in height. We will need to cover the niche here with a metal corner and a 3 mm thick iron sheet.

4 row with corner
- The 5th row is continuous and the masonry is the same as the 1st row, but there is one feature. When laying bricks, they must be moved 30 mm to the outside, thus increasing the size of the fireplace. On the frontal part, the overlap protrudes 20 mm forward.

- 6 row is laid out in the form of the 5th, but with a slight change. The core is laid out with fireclay bricks, forming a fireplace. Like the previous row, it also extends 20-30 mm along the perimeter, but already relative to the 5th row.

 Please note that in this row, fireclay bricks are also not completely whole. It will first need to be prepared.
 - 7 row begins to form a firebox. The walls of the firebox are laid out with fireclay bricks. Do not forget that between ordinary and heat-resistant bricks you need to leave a gap of 3-4 mm.

- 8-10 rows are laid out similarly to the 7th row. Please note that all these rows are laid out exactly, without offset, of the same size. They are the same size as rows 2-4.

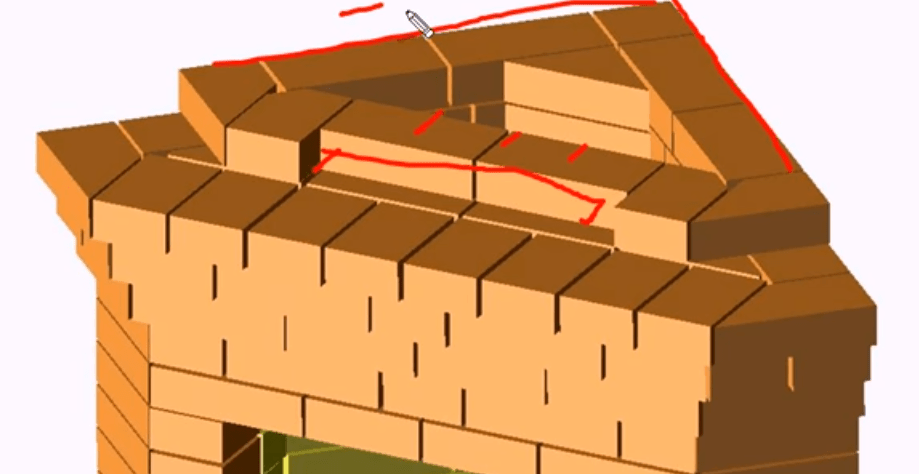
- 11 row. We begin to form a fireplace tooth (mouth).

11 row tooth formation
We grind the central corner brick, as shown in the figure. He stitches inward.

- 12.13 row. We continue to carry out the tooth of the fireplace, grinding bricks at an angle inward. Here, in the 13th row, we lay two metal corners along which the fuel chamber will be covered.

- 14 row overlapping of the fuel chamber.

- 15 row - here we finish forming the chimney tooth.

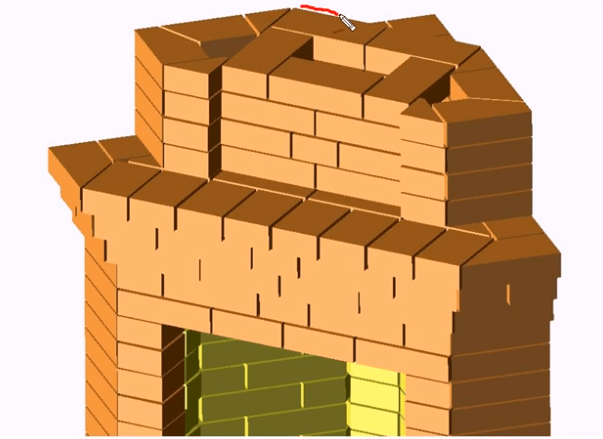
- 16 row forms a platform. Here we again release a row by 30 mm and move the brick along the facade by 2 mm. Here we start to increase the size

- 17 row. We increase the size of the side walls by another 30 mm. We release fireclay bricks in front of the firebox by another 45 mm and cut them with a grinder from below.

Bricks will go to this row - 11 and 1⁄2 (red), 5 (fireclay).
- 18 row. Again we increase the size of the side walls by 30 mm, and cut the front part, as in the previous row, from below.

- 19 row. We reduce the side walls of the structure to 760 mm. This is where the formation of the mantelpiece begins. Bricks above the front of the fireplace are released inward and cut from below with a grinder, as in the previous rows.
- 20 row begins to form a chimney. From the side of the back of the fireplace, it gradually narrows, as can be seen in the figure.

To do this, the bricks forming the back wall are released inward by 60 mm and cut obliquely from below at an angle of 450
- 21 row. The size of the chimney is brought up to 130 mm. The back wall brick is pushed forward to get this distance and cut from below to the size of the previous row.

- 22 row. Here we have already clearly indicated where the pipe will be located. Its size is 26 * 13 cm. Please note that we only carry a pipe. For each row of pipe will go 10 red bricks.
- 23 row is placed similarly to the previous one.

- 29-30 we lead the chimney similarly to the previous scheme.

Facing works
The final stage in the form of cladding has not only a decorative function. The cladding layer facilitates the maintenance of the fireplace, there is no need for constant painting of the plaster, etc.
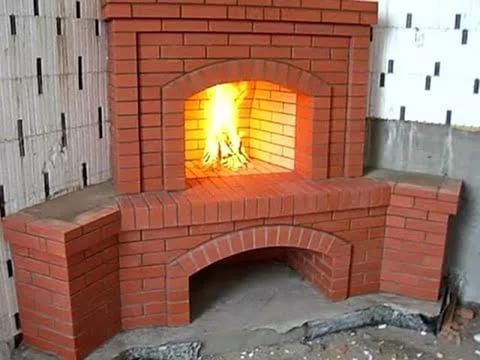
If you bought a beautiful red brick, then initially the fireplace can be made “for jointing”. A classic-style fireplace will become a very beautiful decorative element in the living room, in a wooden house.
High-quality cladding will perform a protective function, increasing the strength of the entire structure. As a facing layer, you can use artificial stone, ceramic tiles - it all depends on personal preferences and the style of the interior.
If you chose artificial stone as a cladding, then you will need a special adhesive mixture designed for high temperatures.
You can use the same mortar that you used when laying the fireplace. Remove excess mortar immediately, otherwise it will be difficult to clean the surface of the stone later.
Plastering with subsequent painting is a very economical and uncomplicated option that will allow you to realize beautiful decorative elements. The advantage of this option will be ease of operation, and the paint, if desired, can always be refreshed or changed.
The only drawback of this option will be the sensitivity of the plaster surface to shock, so it is better to lay out the corners of the fireplace with brick or artificial stone.
To increase safety measures during operation, you can install a protective screen on the fireplace.

You can buy such a screen already in finished form in the store, or you can make it yourself.
The decorative protective grille will protect the floor covering from sparks. The easiest way is to make a steel frame from two pieces of steel pipe, which are connected to each other in the form of the letter "T".
Such a screen should cover about 60-70% of the focus. The location of the screen at such a height will perform a protective function, but at the same time it will not interfere with the tossing of logs into the furnace.
The lower part of the screen is fixed on a stand, which prevents falling and swaying.
Heat-resistant glass or non-combustible material can be used as the screen itself.
Kindling a fireplace
When all facing work is completed, and the chimney system is fully completed, we proceed to the first kindling of the fireplace. It is better to wait a few days until all adhesive and cement mortars dry well.
- Take a small amount of small firewood or brushwood and put it in the combustion chamber.
- Do not immediately give a strong heat to the oven, warm up gradually.
If you clearly follow the above step-by-step instructions and do not violate the order, then you will have a wonderful corner fireplace.

You will literally become the creator of the hearth. Places where the whole family will gather for a cup of aromatic tea, share news and relax. A flickering flame in an open fireplace and measured crackling of firewood will create a unique atmosphere of home comfort.
Video. Do-it-yourself corner fireplace
In order to feel a truly cozy atmosphere in the house, you need to install fireplaces. Fireplaces are heating systems, like stoves, consisting of a firebox, chimney and lining. There is a wide variety of fireplaces, but this article will focus on wood burning. Wood heating systems have been produced for a long time, but today it is done with the help of modern technologies, which ensures a long service life and guarantees safety.
In general, wood stoves can be divided into 2 types: heating systems with an open firebox, and those with a closed firebox. Furnaces with a closed firebox have a special device made of heat-resistant glass, which covers an open fire. Such stoves are recommended to be installed if there are small children or pets in the house.
Kinds
wall
This type of stove is located right next to the wall, which is called the leaning wall. The chimney for such stoves can be erected by leaning it against the wall, or simply connected to the chimney of another stove, if there is one in the room.
When installing a wall-mounted fireplace, you should be aware that this type of stove should take place right in the middle of the wall, while on both sides there should be a space of more than 2 meters. This is done for reasons of fire safety, as well as to make it convenient for guests to be located near the stove.
If the wall against which the future heating system will lean is built of wood, then a number of measures must be observed here to avoid fire hazards:
- The part of the wall to which the fireplace will lean must be sheathed with a steel sheet.
- Next, you need to build a brick wall.
- Then they take felt, moisten it in a solution of clay, and put it on the wall.
- After that, you can proceed to the construction of the fireplace itself.
Angular
Today, this species is considered one of the most common. It is located in the corner of the room. This type of stove has gained such wide popularity due to the fact that it organically fits into the interior of the room, and the heat emanating from the fire is evenly distributed throughout the room.

Armchairs with this arrangement of the furnace are usually arranged in a semicircle. The chimney is usually sent to one of the load-bearing walls. The following characteristics can be noted as the positive aspects of such a fireplace:
- Small area. This type of stove takes up little space in the room.
- Implementation of design ideas. Indeed, on the market there are many options for fireboxes designed specifically for corner stoves.
Of the shortcomings, only one can be distinguished:
- This type of stove is adjacent to two walls at the same time, so you have to insulate two walls at once, and this, in turn, entails additional costs.
By the way, speaking of corner fireplaces, you should list the options for fireboxes that are designed specifically for this type:
- Flap with partition. This type is a glass consisting of two parts. One of them is fixed, and the second can be opened and closed.
- Semicircular flap. This type is considered a classic option and is ideally combined with corner stoves.
- Firebox with two glasses.
Island
Representatives of this group are also called central ovens. They are usually located in large rooms right in the center of the room. The smoke box for such stoves is located directly above the firebox, that is, on the ceiling. Such furnaces can be fenced on all sides, or not fenced at all.

It is necessary to plan such a fireplace at the construction stage, since it is necessary to decide exactly where the chimney will be located. This type also has its pros and cons, which will be discussed later.
So the pros:
- Openness. You can look at the flame and admire it from all sides.
- Heat dissipation. The distribution of heat is the same in all directions.
- Lack of a strong foundation. Unlike other types of stoves, when building island stoves, there is no need to build a strong foundation.
- Original appearance. Indeed, the fireplace, located right in the center of the room, is an original sight for guests.
And now for the disadvantages:
- Lots of space. Unlike corner stoves, this type takes up a lot of space, so such stoves cannot be built in small rooms.
- Complexity. As already mentioned, the construction of island furnaces should be designed even at the construction stage. But not every area of \u200b\u200bthe ceiling can be equipped with a smoke box, so in any case it is recommended to consult a specialist.
- Purpose. The main function of such stoves is not space heating, but decoration. Therefore, even if the room has this type of heating system, you will have to heat the room in an additional way.
built-in
Another name for fireplaces of this type is through. Representatives of this group are built into the wall during the construction of load-bearing walls.

The benefits are:
- Space saving. These heating systems are built into one of the load-bearing walls, as a result of which a lot of space is saved.
- High rate of efficiency. The heat dissipation of these furnaces is quite high.
- Fire safety.
Well, as for the minuses, only one can be distinguished - the design must be carried out even in the process of erecting load-bearing walls.
Advantages and disadvantages
Like any other device, a wood-burning fireplace also has its positive and negative sides.
The advantages will be considered first:
- Heating. Wood-burning heating systems can heat a large room in a fairly short time.
- Cheap fuel. A wood-burning fireplace runs on wood, which is a relatively inexpensive type of fuel today.
- Convection. Wood heating systems perfectly carry out the process of convection in the room.
- Flame. In a quiet, peaceful environment, you can sit near the fireplace and admire the beauty of the flame. Thanks to this quality, wood-burning stoves have gained such wide popularity.
And now for the disadvantages:
- Additional place. When operating wood-burning fireplaces, you need to allocate space for firewood.
- Trouble. You will have to constantly take care of cleanliness - remove ashes, etc.
- Restrictions. Wood stoves can only be installed in private or country houses. It is impossible to have a wood-burning fireplace in the apartment.
Temperature
The combustion temperature in the firebox of wood stoves is 800-900 degrees Celsius. The temperature of the outgoing smoke should not exceed 350 degrees Celsius.
Sometimes it is observed that the exiting smoke has a temperature of the order of 1000 degrees. This is a wake up call. This means that during the construction of the fireplace, some norms were not observed, or the fireplace is operated incorrectly. This happens because part of the flame enters the chimney, as a result of which soot begins to burn.
Styles of wood burning fireplaces
There is a wide variety of styles of wood stoves, the main ones will be discussed below:

- Gothic style. Representatives of this style have a rather massive base and a narrow chimney pointing straight up. The chimney can be built into the wall completely or partially.
- Renaissance style. The Renaissance or Renaissance involves a return to ancient Roman architecture. Heating systems built in this style have various patterns, drawings, and graffiti on the walls. The smoke box is massive.
- Style Classicism. Heating systems built according to this style have clear geometric shapes on the surface, such as a square, circle, rectangle, etc. Such heating systems are made of high-quality materials. It is not allowed to apply various patterns and patterns.
- Eclectic style. Heating systems built according to this style also have various artistic elements. But these elements are chosen so that completely opposite and incompatible patterns can be combined into a single whole.
- Rustic style. These heating systems are shaped like a large letter “D”. Firewood is located under the firebox. Above the firebox on a wooden shelf are clocks, candles and other decor items.
Fireplace construction technology - step by step instructions
The construction of a wood-burning fireplace is a very time-consuming and responsible process, which must be approached very carefully. Next, step-by-step instructions will be given for those who decide to build a wood-burning fireplace with their own hands.

- Layout. This stage involves planning for the following items:
- Location.
- Dimensions.
- Chimney shape.
- Construction material.
- Height.
- Decoration Materials.
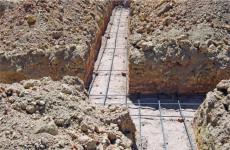
- Foundation construction. This stage includes several steps:
- First of all, you need to dig a pit. The dimensions of the pit should be slightly larger than the size of the fireplace by about 10 cm. The depth should be about 40 cm.
- Then the bottom of the pit is insulated. To do this, a layer of rubble is placed on the bottom and rammed.
- Now they are constructing a formwork, the height of which should be slightly higher than the floor level.
- Stones are placed in the formed dimple and poured on top with cement mortar.
- All this is poured with ordinary plastic wrap and left for a period of 1 week, during which the foundation will get stronger.
- Construction of a cast iron furnace. The fireplace is generally made of bricks, but it is recommended that the firebox be made of cast iron, since in this way it is possible to extend the service life and avoid complex arched brickwork. The outer walls are made of bricks, but the inside is covered with cast-iron sheets. It should be noted that there should be a small space between the brick walls and the cast-iron sheets. This is done on the basis that when heated, the cast iron expands, as a result of which it can simply break the walls.
- Construction of a chimney. First, a hole of a certain diameter must be made in the ceiling. The chimney can be built of brick, but you can also buy it ready-made. Finished chimneys have a special damper. Its main function is to prevent heat from escaping through the chimney when the fireplace is not in use. If the chimney is built of brick, then the damper is mounted independently.
- The final stage. On this, the construction of the fireplace can be considered completed. It remains only to plaster and decorate the surface. But this is already decided by everyone, based on their fantasies and capabilities.
Necessary tools and materials
Before proceeding with the construction of the furnace, you should make sure that the following tools and materials are available:
- Trowel. This tool resembles a miniature spatula, used to apply the solution.
- Pickhammer. It is needed for cutting bricks.
- Level. This device is necessary to check the horizontal masonry.
- Plumb. This tool allows you to make corners strictly vertical.
- Ruler. This tool is needed to check the straightness of the masonry.
- cement mortar. The solution can be prepared by yourself.
- First you need to mix ordinary building cement with sand in a ratio of 1:8.
- Then a clay solution is added to the resulting mass.
- Now all this mass is thoroughly mixed.
Important: in no case should you use the solution that contains lumps. If this is observed, then the mass was not mixed enough.
Price
If you look at the cost of wood-burning stoves, it should be noted that wall and corner heating systems are cheaper. Their cost varies from 50,000 rubles to 110,000 rubles.
Island heating systems have a very high price, the average price of which is 170,000 rubles. But the cost depends not only on the type of fireplace, but also on the type of cladding, and on what materials were used in the manufacture.
A wood-burning brick fireplace is the perfect combination of functionality, aesthetics and comfort. Judge for yourself: it perfectly heats the house, decorates the interior and creates a unique atmosphere of comfort. Therefore, it is not surprising that many are wondering: how to make a brick fireplace on your own and without extra spending? Of course, building a home with your own hands is not an easy task. But this is not a reason to immediately abandon such a bold idea - if you follow proven technology, use high-quality materials and be meticulous in every step of implementing the planned project, you will definitely achieve your goal. And our detailed step-by-step instructions and photos will help you get closer to it even faster.
Fireplace project: calculations, diagrams and drawings
The construction of any fireplace begins with a detailed project development - it will help to get a general idea of \u200b\u200bthe future design.
The first step is to choose the location of the fireplace. The best options are a load-bearing facade or interior wall, or the angle between two load-bearing walls. And the most inappropriate places are in the area of the flight of stairs and between windows.
Important! The dimensions of the opening of the firebox and the dimensions of the room should be related as 1:50, the width and height of the opening - as 2:3, and its height and depth - as 1:2 or 2:3. The last indicator should be given special attention: too deep a firebox can provoke a decrease in heat transfer, and too small - smoke in the room.
Keep in mind that the area of the opening of the chimney pipe depends on the area of \u200b\u200bthe opening of the firebox: in order to guarantee high-quality traction, the area of \u200b\u200bthe first should be 8-15 times smaller than the area of \u200b\u200bthe second.
Once the dimensions are determined, proceed to the preparation of drawings of the facade and the section of the hearth. Drawings are necessary in order to obtain an accurate image of the appearance of the fireplace, which can be used as a guide during the subsequent installation.
And the last stage in the development of the project is the drawing up of a masonry scheme, which is also called ordering. Here you need to number all the rows of the structure and separately designate each of its elements.
Working materials
The durability and functionality of your fireplace will directly depend on how high-quality materials you choose. Therefore, take the process as seriously as possible.
In the first place, of course, the brick. A solid red brick is best suited for a home fireplace. Material requirements:
- perfect surface without melted areas;
- saturated color;
- corners without the slightest chips;
- homogeneous structure in a fracture.
Remember that defective bricks can cause significant heat loss, which will reduce the efficiency of the fireplace.
In addition to bricks, you will need a whole range of consumables and products. In particular:
- sand with a grain size of not more than 1.5 mm;
- cement;
- clay: brown, Cambrian or dark red;
- wooden boards;
- crushed stone 3-6 mm;
- ruberoid;
- felt;
- grate;
- protective screen;
- smoke damper.
We proceed directly to the construction of the hearth. This process consists of three stages: pouring the foundation, laying the main structure and installing the chimney.
Stage 1: Foundation construction
The standard laying of the foundation for the fireplace is as follows:
- Dig a pit 60 cm deep. Fill it with gravel and tamp it so that the base is strictly horizontal.
- Build formwork from boards. Sheathe the structure with roofing material.
- Mount the formwork and fill it with broken bricks and rubble.
- Prepare a cement mortar: mix one part of cement and three parts of sand. Thoroughly fill the pit with the resulting solution.
- Level the surface of the foundation. Its level should be no less than 5-6 cm below the floor level.
- Cover the foundation with a regular film and let it brew well - at least a week.
For the subsequent laying of bricks, you will need a clay mortar. It can be easily made by hand. First you need to soak the clay for two or three days and, after the expiration of the period, filter it through a fine metal mesh. Next, it must be mixed with sand and water. Ratio: 8 shares of sand, 1 share of water, 8 shares of lean or 4 shares of oily clay. Checking the quality of the composition is quite simple: if it keeps its shape, does not stick to your hands and resembles thick sour cream in its consistency, then you are not mistaken in proportions.
Stage 2: Laying the fireplace
First, fix two layers of roofing material on the foundation - they will be responsible for waterproofing. After that, calibrate the bricks.
Laying is recommended to start from the corners. The first row of bricks for maximum stability is best laid on a cement mortar. To give the hearth an original look, lay the bottom row on the edge, but all the rest - traditionally flat and already on the clay mortar. After each new row, refer to the ordering scheme drawn up earlier.
Important! Before laying, each individual brick must be lowered into plain water for at least a minute, so that air can escape from it. If this rule is neglected, the bricks will draw moisture out of the clay mortar, and this will provoke a low strength of the masonry.
Excess mortar when laying the outer rows can be removed with a trowel, and when laying the firebox and smoke box - manually with a damp cloth, carefully checking the composition for the presence of small pebbles.
In order for the bricks to form the necessary monolithic structure, be sure to bandage the seams for half a brick in each row. The optimal thickness of the seams is up to 5 mm.
Advice. To make the masonry of the curved arch come out as aesthetically pleasing as possible, use a temporary formwork - circled.
Stage 3: Installation of the chimney
The arrangement of the chimney is one of the most critical stages in the construction of a fireplace, since the level of draft of the hearth and, therefore, the likelihood of carbon monoxide entering the heated room will depend on the quality of this work. Thus, a good chimney is a guarantee of your safety.
Up to the roof, the chimney can be laid with clay mortar, and above - with cement. The inner walls of the structure must be treated with a liquid clay composition: take a rag, soak it in the solution and wipe all the walls - this will get rid of cracks and get a smooth surface.
It is important to protect the structure from high temperatures in the overlap zone. To do this, you can perform fluffing - a special expansion of the pipe. For maximum effect, it should be overlaid with felt, pre-moistened in a clay composition. And in order to protect the chimney from precipitation, an overflow must be made above the roof - the so-called "otter".
If you want to facilitate the installation of the chimney, use special pipes designed specifically for smoke shafts.
Finishing the fireplace
If the masonry is done with high quality, and the brick pleases with color and texture, it is absolutely not necessary to perform the finishing lining - you can limit yourself to only careful processing of the joints with grout. But if you want to make your hearth even more perfect, pay attention to the most popular options for finishing it:
- decorative plaster;
- stone;
- concrete imitating natural wood;
- tile;
- decorative brick;
- tiles.
The choice of material for cladding directly depends on what you want to get as a result. For example, if you need a solid and sophisticated fireplace for a classic interior, choose expensive natural materials: travertine or marble - this cladding will make your hearth not only attractive, but truly luxurious.
A simpler, but also stylish option is to finish the fireplace with artificial stone or tiles with partially visible brickwork.
Of course, it is not necessary to stop at one cladding - it can be supplemented with all sorts of decorative glass, wood, metal or cast iron sculptures.
We hope our instructions will help you make your dream - a wood-burning brick fireplace - a reality. By following simple recommendations, you will definitely get a high-quality home that will delight you with warmth, beauty and comfort for many years.
Do-it-yourself brick fireplace: video
Construction of a brick fireplace: photo