How is an acrylic bath assembled? Installing an acrylic bath - how to handle it yourself? Acrylic bathtub installation - fixing installation
Lightweight and keeps you warm. These are the main advantages of acrylic bathtubs. They “originate” from the 20th century, but managed to move models on the market with a centuries-old history of metal and stone. The latter "bites" the price tag.
Among metal there are available options, for example, cast iron. However, in them, the water quickly transfers heat to the environment, cooling itself. In addition, cast iron structures are heavy and limited in design refinements.
It is plastic, takes any form. With the advent of the polymer, bathrooms of bizarre outlines, multifaceted, also appeared. I am also pleased with the smoothness of acrylic, its pleasantness to the touch. It is not surprising that many people buy polymer baths. After the acquisition, the question arises of their installation. Shall we start?
Complete set of acrylic bathtubs and types of their installation
You can buy acrylic in two forms. The first one is basic. This is the washroom itself. The second type of configuration is optional. It includes legs for the bathroom, a screen covering its walls, a drain with overflow and installation kits. The main "hero" of the additional configuration is a stainless steel frame.
The disadvantages of acrylic include flexibility. Under the weight of bathers, operational loads, bathtubs sag. Internal reinforcement of the material helps to avoid deformation.
At the production stage, fiberglass is “implanted” into it. It has a mesh structure that effectively replaces metal rods. 3 reinforcing layers are ideal.

However, reducing the cost, manufacturers also lay 1-2 nets, and sometimes do without them at all. At the same time, the frame is not superfluous even with 3-layer reinforcement, and with less reinforcement, the external metal design is a vital necessity.
The structure of the factory frame can help in matters of how to choose and how to install acrylic bath. Pay attention to pivot points. At reliable washrooms, they are located only in the corners.
A larger number of support points indicates the baseness of the bath. This one needs to be handled carefully, strengthened as much as possible, giving support, for example, also to the edges. This is done by "drowning" the bath in the podium and bringing the upper contour of the wash basin onto it.
The legs included with the bathroom contribute to the optimal distribution of the load, “scattering” it, together with the intermediate stiffening ribs of the frame. In the absence of legs in the kit, they are bought in addition, or the bathtub is “sit down” on a dais. It is erected from foam blocks, or cast from concrete.

There is a complex installation option. DIY acrylic bath placed both on a dais and on legs. The method is justified when the washbasin is below the sewer. The double lift allows the pipes to be level with the height of the tub.
Acrylic bath installation tool
For self-assembly of a polymer bathroom, 8 tools are enough. This:
- Bulgarian,
- perforator,
- hammer,
- building level,
- insulation tape,
- corrugated pipe,
- wrench
- sealant.
The corrugation will be needed to connect the siphon to the sewer. A grinder and a puncher are used by drilling holes in the walls into which dowels go. The fastenings are hammered with a hammer. The level measures the evenness of the installation of the bath. The tape-insulator eliminates the flow of joints with walls and communications.

Preparing an acrylic bath for installation
Preparation begins with the installation of the legs. As a rule, these are 2 profile pipes. Technological holes are drilled in the factory. Studs are inserted into them. They are blocked by pucks. They are planted on both sides of the stud. After, they wind the adjustable heel.
Installation of legs - preparation for the installation of a siphon for draining. It is easier to install when the bath is on a support. The siphon installation scheme is included with the bathtub.
The profile pipes of the legs are fixed with self-tapping screws to the thickened sections of the bottom of the bath. The leg, perpendicular to the longitudinal axis of the washbasin, is fixed from 2 sides. Consumes at least 6 fasteners. Screw them in with screwdrivers. When working, they often push the screws too deep. This violates the integrity of acrylic, is fraught with the formation of cracks in the bath.

Correctly install an acrylic bath You can, so to speak, with additional functions. In particular, the bottom and sides of the washbasin are blown out with mounting foam. The air in its pores holds heat very well.
This is an additional guarantee that the water in the bathroom will be like in a thermos. Only the upper surface will give off heat. True, the appearance of the editing room is not respectable. Warming is appropriate only when the sides of the bathroom are closed with a screen.
Apply mounting foam to a pre-moistened surface. This provides a better grip. The foam dries for 6-8 hours, applied in a thin stream. Otherwise, you have to cut off the excess.

Deciding how to install an acrylic bathtub with legs, the insulation is moved aside for a moment after the frame and these same legs are fastened. Foam the washbasin upside down. Acrylic products are lightweight.
Gently flipping the bath is not difficult. A washbasin 2 meters long and 70 centimeters wide, for example, weighs about 30 kilograms even with 3-layer reinforcement and a wall thickness of 15 millimeters.
Installation of an acrylic bath
Support legs are first attached to the floor. Legs from profile pipes will lie on them. The supports are set according to the level. Use both conventional bubble and laser. The latter allows you to simultaneously "beat off" the level around the entire perimeter of the bath.
Having set the bathtub in level, check the absence of a slope to the drain. This descent for water is provided at the factory, it is already in the design. It makes no sense to tilt the entire bath.
If conducted wall mounted acrylic bathtub, the sides adjacent to it are fixed with brackets. The holes for them are pre-drilled. Clamp the brackets up, hiding the fasteners behind the edges of the wash basin.

Fastener hooks are called "anti-coup". Without fastening to the walls, the polymer bathtub can turn over when the swimmer leans on board. Therefore, it is not customary to install acrylic models in islands, that is, in the middle of the room. If the manufacturer makes a freestanding bathtub, then he makes it large, with thick walls, maximum reinforcement and a wide base.
All technological gaps are filled with sealant or plaster. There should be no other coating on the walls at the time of installation of the bath. Ceramic tiles and other decor are glued after the installation of the washbasin.
This installation, by the way, can be carried out by professionals. For work, on average, they take 2,000 rubles. The price is available. Therefore, bathtubs are accepted for self-installation, as a rule, out of curiosity, and not for the purpose of saving.

Installing a screen on an acrylic bath
If faucet to install on an acrylic bath necessary, the screen montage can be ignored. Damper function is decorative. covers unsightly communications under the bathroom. But, you can add flap functionality. They make, for example, screens with niches for household chemicals, towels, with drawers.
Screens are blank. These block access to the space under the bathroom. When pipes leak, for example, it is necessary to dismantle the damper. Deaf options are usually made of ceramic tiles, wood and stone. So, you have to destroy strong and expensive structures.
Movable screens on legs, with doors are considered practical. They, as a rule, are polymeric, in harmony with the style of an acrylic bath.
Any screens are installed on the frame. These can be stainless steel guides or special latches. They have locks. Screen panels snap into them. It remains to fix the polymer plinth and curb tape. They sit on silicone. The sealant used is transparent.

There are scratches on the acrylic, dents from weights falling into the bath. Problem solves bath insert. Acrylic the layer repeats the contours of the previous, native.
This not only returns the effectiveness of the washbasin, but also strengthens it, gives the walls additional thickness, and increases heat-saving properties. The liner lasts about 20 years. An additional layer of acrylic retains the aesthetics for about 7 years. The insert costs about 3,000-4,000 rubles.
Why is it needed?
Throughout its history, bathtubs have been made from stone, wood, copper, and even silver and gold. But the most popular materials today are still more prosaic: enameled steel and cast iron, and acrylic, which is gaining more and more popularity. In order for the interior of the bathroom to correspond to a certain style, and to use it comfortably, such an important element for operation, although often invisible, is needed as a frame - a structure that holds the bowl and sides. If it is durable, suitable for the selected model, the bath will be fixed securely, stably.

A frame is absolutely necessary when choosing a font of an unusual shape:
- multifaceted;
- round;
- Oval.
Typically, products of complex shape cannot be securely fixed to the walls, and a framework in the form of a platform is required. The wide sides of such bathtubs also rest on a special frame, which provides them with an even more stable position.


Is the frame for an acrylic bathtub different from the frame for a cast-iron or steel bathtub?
The principles of installing a bath are approximately the same for the most common types:
- cast iron;
- Steel;
- Acrylic.
To install a bathtub made of steel or cast iron, it is quite enough to use the legs, or attach an iron corner to the walls. A brick support will be more solid, which is then masked with a ready-made or home-made screen. Acrylic products, pleasing with the most elegant and creative forms, require a stable support that protects them from stress and deformation. With all the beauty and sophistication, the bottom of an acrylic bathtub that is elastic, but inferior in strength to other materials, can sag, or even not at all withstand too much weight. In addition, if the sides are constantly deformed, this will eventually lead to the penetration of moisture into the joints between the bathroom and the walls and the formation of mold and other troubles. Therefore, if a frame is desirable for a bathtub made of durable steel or reliable cast iron, then for the longevity of an acrylic bathtub it is vital. Moreover, for not too expensive products with a thickness not exceeding 0.5 mm.


Kinds
Typically, plumbing stores offer frames only for certain types of commercially available bathtubs. Unfortunately, not all supporting structures can bear the mass of a bathtub filled with water with people washing in it, especially if it is not a compact bowl for one person, but a luxurious font with solid dimensions and shapes. In this case, the choice of a solid support and the correct installation must be approached with all seriousness in order to avoid unpleasant surprises in the future.
Serial frames offered by sellers can be:
- national teams;
- Whole-welded.
If it is impossible to purchase the desired model in the store, it seems unreliable or does not suit its design (universal models are rarely found on sale), the frame can be made by hand from wood, galvanized profile or profile iron pipe.

Attention should be paid to the dependence of the strength and quality of the purchased bathtub on the number of support points of the frame: the thinner the bathtub, the more support it needs. All-welded construction also indicates insufficient strength. It is great if only four points are used for support. If the font has an unusual configuration, a special platform is required to support it, since a conventional frame will be unreliable.


Device
The frame-frames supplied with the bathtub are made of a square section metal profile and are protected from corrosion by a special coating.
The main elements of the frame, regardless of the configuration:
- Supports at the corners holding the bowl itself;
- Main legs, the height of which is adjustable;
- Stiffening ribs, without which an acrylic font is indispensable.

How to do it yourself?
If the offered finished products do not inspire confidence, do not fit the configuration, there is a desire to save money and apply the skills and abilities of a home master, then you can make the frame yourself.
For the construction of the frame, you need to choose a material that is strong enough and affordable. The most common types of homemade designs:
- From a wooden beam, the positive aspects of which are low cost, ease of processing and strength, and a clear disadvantage is the susceptibility to decay in the humid environment of the bathroom. Therefore, high-quality protective antiseptic surface treatment or the use of moisture-resistant wood is necessary: cedar, oak, alder, larch and others;
- From a galvanized profile used for plasterboard constructions. It does not withstand heavy loads, so it is more expedient to shift the entire weight of the bath onto legs and a wooden beam, and use the profile for an additional supporting and decorative frame;
- An iron profile pipe is the best option for a frame holding a font made of any material. The pipe is capable of becoming a support even for a non-standard cast iron bath, but manipulating the pipe requires a welding machine and some skills in handling it. Rust problems are easily solved with a primer.
- Brickwork that completely follows the contours of the bathtub is a rather difficult task that only a professional builder can do, and it will be difficult for a home master who does not have skills to cope, especially if the bathtub has an asymmetric or oval shape.


It is most accessible for a home craftsman to make a frame made of wood and moisture-resistant plywood or chipboard. The procedure is as follows:
- Build a base around the perimeter of the bath from a bar;
- Attach vertical racks to it;
- Lay boards or timber on them - they will be the top of the frame.
For a rectangular bowl, this is enough, but if it is, for example, oval, then the frame is covered with a sheet of chipboard or plywood, in which a hole of the desired shape is then cut out.

How to assemble?
Before proceeding with the installation of a wooden structure, you should determine the height of the racks, which directly depends on the preferred height of the frame. It should be as small as possible so that it would be convenient for all family members to use the bathroom in the future. It is also not difficult to calculate the number of racks: they must be in all corners and additionally fastened every half a meter along the sides.
Acrylic is a lightweight and durable polymer material that has been used for the manufacture of sanitary ware for more than 30 years. In almost every private house or city apartment you can find an acrylic bathtub, sink, washbasin.
This article will discuss the various ways to install acrylic bathtubs, their configuration and some of the nuances of finishing work.
When purchasing a bathtub in the plumbing department of a specialized store, you need to check with the consultant and the delivery set.
Photo: a schematic diagram of the device of any bath
The fact is that different manufacturers equip their products in different ways with the accessories necessary for installation and use.
For example, a Czech-made bathroom set will most likely include:
- siphon for connection to the sewer drain;
 Photo: siphon for connecting the bathroom to the sewer drain
 - mounting frame or fittings;
 Photo: frame-frame for installing a bath
 - mounting feet;
 Photo: bathroom feet
 - self-tapping screws;
- dowel;
- fastening straps;
- appropriate drill size.
 Photo: bathroom equipment
 The complete set of an acrylic bathtub, made in the great Celestial Empire, most likely, will include only the acrylic bathtub itself.
And although the frame, legs, siphon and screws can be purchased in the same plumbing department, you should carefully weigh all the advantages and disadvantages of products from a European or Chinese manufacturer.
Even with the help of an experienced consultant who knows everything, when buying the necessary accessories “in a breakdown”, there is always a chance to purchase something that is not suitable for this bathroom model.
Room preparation
All finishing work in the bathroom must be completed before the installation of the bath.

Important! It is necessary to carefully level the walls of the room, plaster them, cover them with a finishing layer of waterproof paint or fully tile them.
Wall decoration options with waterproof drywall are not suitable, due to some of the intricacies of installing acrylic bathtubs, which will be mentioned separately.
Installation of all necessary plumbing fittings, handrails and headrests must also be completed before the bathroom is installed.
 Photo: piping outlet for the faucet piping for the bathroom
 Do not forget to clean the room and thoroughly clean the floor from repair debris, plaster particles and brick fragments.
Necessary materials and tools
Before starting assembly and installation, you must stock up on the following equipment:
- hand drill(electrical or mechanical), for making holes in the body of the bath itself (for fixing the frame or fittings), and in the bathroom wall (for fixing strips);
- hand screwdriver or electric screwdriver, for fixing the frame, fittings and fixing strips;
 Photo: hand drill electric screwdriver
 - set of wrenches, to install and adjust the position of the legs;
- trowel and container for cement mortar, in case of installing a bathroom on bricks or using a combined installation method;
 Photo: set of wrenches, trowel and mortar container
 - rule and building level, to install the bathroom in a strictly horizontal position;
- a few simple pencils and a half-meter ruler, for marking both on the body of the bathroom and on the walls of the room.
 Photo: pencil and ruler building level
 As well as consumables:
- sanitary silicone and self-adhesive silicone tape, for sealing joints between the bathroom and the wall;
 Photo: silicone tape silicone sanitary adhesive
 - mounting foam, to eliminate cracks and gaps, as well as for use as a binder when installing a bath using a combined method;
- bricks and cement mortar, when installed "on bricks" or by a combined method.
 Photo: polyurethane foam
 Having stocked up with everything you need, as well as great patience and self-confidence, you can begin to assemble and install an acrylic bathtub.
Installation and assembly
Depending on the geometric dimensions of the bathroom, the design solutions and techniques used, as well as the shape of the bathroom itself, several installation methods are used.
Installation on legs
This installation method is carried out under the wall and is used in the case of a rectangular product.

To do this, you need to install the font upside down on a sheet of cardboard, cellophane or linoleum previously laid on the floor.
This precaution will help avoid scratches and chips on the sides of the bathroom.
Using a frame frame is the easiest way to install as it does not require careful measurements. The assembled frame must be carefully attached to the bottom of the bath, observing the indents indicated in the assembly instructions.
Then, using a pencil, mark the holes for the mounting screws.
 Photo: attach the frame to the bottom and mark the attachment points
 In the case of using fastening fittings, it is necessary to accurately mark the longitudinal axis of the bathroom and the fastening lines perpendicular to it.
The fittings must not be fixed closer than 170 mm from the center of the drain hole or the edge of the bathtub bottom.
 Photo: bath frame
 As a rule, manufacturers use two options for attaching the frame or supporting reinforcement to the bottom of the font. Self-tapping screws can be screwed into pre-prepared holes in the frame material, or fix the U-shaped mounting brackets responsible for holding the support reinforcement.
Holes are drilled exactly according to the marks, to a depth of about 6-10 mm and a diameter of 3 mm.
 Photo: drilling holes
 To prevent the appearance of a through hole, it is recommended to put a stopper on the drill, which can be made of cambric, or a simple insulating tape.
The next step after fixing the frame or supporting reinforcement is the installation of the legs. Adjusting and fixing nuts, as well as protective plastic plugs, are screwed onto the bearing studs.
 Photo: attaching legs
 Then the assembled legs are attached to the reinforcement and secured to it with locknuts. The legs are approximately equal in height.
 Photo: bathroom legs alignment
 The next step is to transfer the bathtub to the installation site, where it is installed on legs and moved close to the wall.
Using the building level and the rule, you should achieve a strictly horizontal location of the bath.
 Photo: installing the bathroom in place and leveling the level
 With the help of a pencil, lines are drawn at the points where the side touches the wall. Then the bath is again set aside.
 Photo: making marks on the wall
 Mounting strips are installed with an indent equal to the width of the bath rim.
 Photo: mounting brackets
 Experienced craftsmen advise installing them in such a way that there is a vertical margin of 2 - 5 mm, to compensate for the subsidence of the font under the weight of the collected water.
After all, the sides of the bathtub are not designed to carry a large load, and the fixing strips serve only to prevent tipping.
After mounting the slats, the acrylic bath is finally installed in place.
 Photo: final installation of an acrylic bath
 Connects to the water supply and sewerage system
 Photo: sewer siphon connection mixer connection
 Installation on bricks
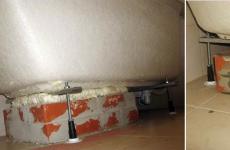
 Photo: installing an acrylic bath on bricks
 Most often it is made in the case when the delivery set does not include legs and supporting reinforcement.
The brick base is laid out in half a brick, with the expectation that a gap of 1 cm should remain between it and the bottom of the bath.
 Photo: brick base
 This gap is filled with mounting foam, ensuring a perfect fit of the bottom of the font to the base.
 Photo: filling the gap with mounting foam
 The installation of the bath on bricks can be done both with the use of fixing strips and without them.
In the second case, the base is laid out in the form of a bowl that securely keeps the font from tipping over.
 Photo: bowl-shaped base
 The complexity of this method lies in the precise calculations necessary for the most dense fit of the bath on the base and compliance with its strictly horizontal location.
Combined installation method
The combined installation method is as reliable as installation on bricks, however, at the same time, it is much simpler.
 Photo: combined method of installing an acrylic bath
 The bathtub is installed on legs above the arranged flat brick base.
A centimeter gap is provided between the bottom and the surface of the base, which is then filled with mounting foam.
The bath is filled with water, sags and presses tightly against the brick base.
The main adjustments in height and horizon are carried out using standard legs, the base acts as an additional support.
Final finishing
After a long and hard work, the acrylic bath is finally in place. It remains only to make sure that the structure assembled by one's own hands works and to bring an external gloss.
Sealing joints and seams
Joints and seams, in particular between the bath rim and the wall, are sealed with self-adhesive silicone tape or sanitary silicone.
 Photo: sealing gaps sealing bath joints
 This method of sealing guarantees complete watertightness of the connection and the absence of leaks.
tightness
To check the tightness and correct connection of the acrylic bath, it should be filled with water.
 Photo: checking the tightness of the bath
 If after an hour there are no puddles, wet spots and traces of leakage on the floor and the outer surface of the font, the tightness test has been passed.
Particular attention should be paid to the attachment points of the support fittings and the drain siphon.
The operability of the connection to the drain sewer is checked by several cycles of draining water. Water should flow evenly, without air bubbles from the drain hole.
Installing a decorative screen
 Photo: installing a decorative screen
 The installation of the decorative screen is carried out in specially provided clamps located on the shutoff valves or the frame of the font.
In the case of installation on bricks, experienced craftsmen make special protrusions on the bed, to which the screen is subsequently glued.
Installing a corner bath
 Photo: corner bath
 Corner acrylic bath is the most advantageous in terms of space saving. But the snug fit of the sides to the two walls imposes certain restrictions.

Important! The angle of convergence of the walls should be exactly 90 degrees, which is easily checked with a square.
The surface of the walls should be leveled even before the finishing stage.
Such strictness of the requirements is explained by the fact that unevenly mounted fastening strips will damage the relatively thin walls of the bath after several hundred cycles of filling and draining water.
Otherwise, the installation is carried out according to the scheme described in detail above.
Whirlpool bath
Installing a whirlpool bath is an ideal option for complete relaxation and relaxation after a long and hard day at work.

Due to the complex pumping equipment that circulates water, this type of bathtub can only be installed on the frame that comes with the kit.
Asymmetrical bath
An asymmetric bathtub is used, as a rule, in the design of a room.

Installation is also carried out on a frame or supporting reinforcement provided by the manufacturer.
Video: installing an asymmetric bath
And although almost any man can handle the installation of a regular rectangular bath, the above types of baths should be installed by professional craftsmen.
Moreover, the installation cost is not so high. In Moscow, they ask for the installation of a corner bath 3000 rubles, for a bath with hydromassage - 5000 rubles.
Video: assembly and installation
Long gone are the days when an acrylic whirlpool tub was the object of desire and envy. Today it is only an easy-to-use, fully functional household appliance.
Acrylic bathtubs today are gradually replacing other varieties of similar plumbing. They are made from lightweight, practical material. At the same time, the cost of acrylic bathtubs remains acceptable to buyers. For them to last a long time, you need to properly mount the bowl. This procedure can be performed independently. How to mount an acrylic bathtub to the wall will be discussed later.
Acrylic Features
Installation of an acrylic bathtub is quite possible to do it yourself. This is due to the characteristics of this material. It is lightweight and practical. Therefore, products from it are much easier to install in the bathroom than, for example, cast iron or steel bowls.
The advantage of acrylic bathtubs is the variety of their shapes and sizes. If desired, you can purchase a straight, angular, figured bowl. For any style of interior, you can choose the right option. Therefore, wanting to repair and replace the bath, the owners of houses and apartments most often opt for acrylic plumbing.
It is also worth noting that bathtubs of different sizes are on sale. They may be quite small. In this category, an acrylic bathtub with a 150x70 cm frame is most often purchased. However, other sizes are in demand. The choice depends on the dimensions of the bath.
Acrylic has a high ability to retain heat. The water in such a bowl will not cool quickly. At the same time, the inner surface is easy to clean and does not turn yellow during operation. This is true for products made from high quality acrylic. Baths in this case serve for several decades.
During installation, it is important to properly fix the bath in the place intended for it. If this work is done incorrectly, the bowl will be deformed. This is a shortcoming of the presented material. However, it can be easily fixed by doing the right installation.
Sustainability
Installing an acrylic bathtub does not have to be left to the professionals. This work can be done independently if desired. To do this, you need to take into account that the stability of this product in different planes is not the same. So, in the vertical direction, the structure on the legs is stable. Manufacturers create supports that can support the weight of a bowl of water. It is easy to feel if you stand inside the bath.

However, in the horizontal plane, the material cannot boast of stability. Acrylic and steel bowls get out of balance in this direction quickly. If the bathtub is left to move horizontally during installation, the sewer connection may be damaged.
It is also worth noting that an acrylic bath 170 cm long in a bathroom with dimensions, for example, 180 × 200 cm, can adjoin only one side to the wall. In this case, its side parts remain unfixed. The tightness of the joint between the wall and the bathroom will certainly be broken over time, if other fastener options are not provided.
For a bowl made of acrylic, it is important to choose one of the correct installation options. This will securely fix the bowl in a horizontal plane, avoiding trouble in the future.
Wall mount
If you need to fasten an acrylic bathtub 170, 180, 150 cm wide or another size, you can place it in one of four positions. The following options are possible:

It is believed that the most durable installation option is to install the bath in a niche. This can be done in typical Khrushchev. In such apartments, the bathroom is very small. Therefore, by purchasing an acrylic bath 150x70 with or without a frame, you can ensure that plumbing fixtures are securely fixed between three walls. If the room is spacious, such an installation will be more difficult. You will need to build another partition to create a niche of the required size.
However, there are many ways that allow you to firmly fix the bath. It may not contact the walls at all. True, it is much more convenient when the plumbing is not located in the center of the room. This option is only suitable for owners of very spacious premises.
To perform the correct installation, you need to use special clamps. The fastening material must firmly hold the bathtub in the wall. Its main element should be bent up. This will allow him to get close to the wall below. The side of the bath is put on fasteners. So he can press close to the wall from below.
In order for the latches to perform the functions assigned to them, it is necessary to perform accurate marking, as well as control the position of all components during the installation process.
Factory fasteners
How is an acrylic bath attached to the wall? There are several options for such fixation. A reinforced steel frame may be included in the scope of supply. This is a prefabricated structure, which is made of a steel profile (square section). This frame is attached to the bottom of the bath. The design assumes the weight of the bath, water and a person, evenly distributing the load on the support posts, horizontal structural elements.

Do-it-yourself installation of an acrylic bathtub on a frame is simple. The design allows you to firmly fix the bowl. It can be installed even in the center of the room. She won't wobble. However, not always in the delivery set there is a similar frame. Sometimes, in order to save money, the manufacturer replaces it with two cross bars. They have short legs. In this case, do-it-yourself installation of an acrylic bath on a frame should be done next to the wall.
It is worth noting that simply propping the bowl against a vertical surface will not be enough. Over time, it will begin to move away from the wall. There will be a gap between it and the bathroom. To prevent this from happening, fixing the acrylic bath is carried out using special brackets. They can be purchased at a specialized store.
Before fixing the bath with brackets, it is recommended to glue the side with double-sided tape or sanitary sealant. After that, the product is attached to the wall with brackets. This option is also suitable if the owners want to finish the outer side of the plumbing with tiles.
Insert into a niche
Considering the existing methods of attaching the bath to the wall, it should be noted such an option as inserting into a niche. It is suitable for a room in which there is not even a rough finish yet. To perform such an installation, a strobe is cut out in the wall. It must be created at the correct height.

For this, the structure is assembled, installed on legs. Then it is attached to the wall. The installation height of the bath is determined. A line is made according to the level of its side. Moreover, it must be taken into account that tiles can still be laid on the floor, due to which the height of the base will rise. The edge of the rim of the bath will have to enter the strobe and rest on its edge inside the wall. The depth of the cut must be at least 5 cm.
When the bath is installed in the place intended for it, the tile is installed on the wall. The joint is coated with sealant.
metal corners
If the decoration in the room has already been completed, metal corners can be used. First, the installation height of the bath is determined. At the required level, holes are created using a perforator. Dowels are inserted into them. Next, corners are applied to the wall (if necessary, holes are also made in them). The latch rod is screwed into the prepared seat.
On this corner put on the side of the bath. He will rely on her. Next, you just need to coat the joints with sealant.
Step-by-step instructions for fixing to brackets
Fastening the side of an acrylic bathtub to the wall is most often done using brackets, corners or brackets. Installation in this case occurs according to the same method. It is worth considering in more detail.
First you need to do the right markup. A line is drawn on the wall, which corresponds to the location of the edge of the bath rim. For this, the structure is assembled using a factory frame or cross bars with legs. The adjusting screws of the latter must be set to the middle position.
To mount the acrylic bathtub to the wall, the bowl is placed against a vertical surface. On the side, markings are made on the wall. It is important to find out the features of adjusting the legs horizontally. Subsequently, it will be necessary to adjust the height to the height of the fasteners. The markup is checked using a level. It must be even. Otherwise, the bath will be skewed.
Completion of installation
Next, the selected type of fixture for the bath is installed. Fasteners are embedded in the wall. For this, a puncher or a powerful electric drill is used in the work. After that, the assembled design of the bath and the frame is installed on the brackets. The side should engage with the latches.
After that, using the adjusting screws on the legs, adjust the height of the bath. Its position is checked using the building level. Only after the bowl is in the correct position, you can connect the siphon. There are also plumbing connections. After that, the room can be finished (if it has not been created earlier). The joint between the bathroom and the wall is treated with sealant.
It is worth noting that these recommendations apply to conventional acrylic bathtubs. If the design provides for hydromassage, it is better to entrust the installation to professionals. In this case, the operation of the system requires the correct connection not only to plumbing communications, but also to electronics. Therefore, it will be difficult to do such an installation with your own hands. Specialists will be able not only to correctly connect all the elements of the system, but also firmly fix the bathtub near the wall.
brick frame
In addition to attaching an acrylic bathtub to the wall with brackets, corners, you can resort to a more radical method. It allows you to firmly fix the structure, eliminating the possibility of loosening it. This method involves the construction of a frame made of bricks.

In this case, a wall of the required height is erected from blocks and cement mortar. In this case, it must be taken into account that there must be a distance between the bottom of the bath and the floor. should not be monolithic. It should have a hole that provides access to the siphon.
With the help of bricks and cement mortar, a niche is built in the bathroom. It will have a bathtub. You can start construction work only after acquiring a bath. A niche is created specifically for the specific dimensions of plumbing. This method involves inserting bolts into the wall, on which the bath will rest on the opposite side.
Between the bottom of the bath and the base of the room, it is recommended to lay a layer of mounting foam. In this case, it will be almost impossible to damage the back of the bowl. Also, a special mounting film is laid down. When installing the bath in the prepared space, water must be drawn into it. So she sits better in a niche.
The bathtub is installed in the created niche only after the mortar and mounting foam are completely dry. All seams are then treated with sanitary silicone.
Some rookie mistakes
Fixing an acrylic bathtub to the wall can be done by inexperienced craftsmen. In order for the bowl to be installed correctly, you need to consider a few simple tips. Some beginners make mistakes when fixing plumbing to the wall. As a result, the bath staggers, the joint, sealed with sealant, begins to let water through. If no action is taken, the drain system or tub body may be damaged.

To avoid problems later, you should not think that by moving the bath close to the wall and covering the joint with sealant or a special solution, you can achieve good fixation. To achieve this, you need to use brackets, brackets or other appropriate fasteners. You can also make a cut into the wall, creating a strobe. However, ordinary mortar or sealant will not be able to firmly fix the bath against the wall.
It is also worth noting that many craftsmen cover up the joints with gypsum-based solutions. Of course, such compositions are distinguished by whiteness. But gypsum mixtures are categorically not suitable for wet rooms. Therefore, when creating a finish, you need to use special sealants in white or transparent color. They should include antiseptic components. Thanks to the use of sanitary sealant, fungus and mold will not form at the joints.
Having considered how to mount an acrylic bathtub to the wall, you can do the installation yourself correctly. Plumbing in this case will last a long time, will not loosen and collapse.
The light weight of acrylic bathtubs is both an advantage and a disadvantage. The solution to the problem of how to strengthen an acrylic bath has some distinctive nuances. Unlike steel, acrylic bathtubs require careful handling. The housing can be easily damaged by careless handling. It is possible to fix the bath in five ways. This article will show you how to attach an acrylic bathtub to a wall.
Mass production of acrylic sanitary ware began in the 80s of the last century. Popularity is easily explained by the presence of advantages that distinguish it from steel baths.
- Weight. Models are considered the lightest in the segment of sanitary products. The heaviest sample weighs 25 kg. You can install an acrylic bath on your own without outside help.
- Thermal conductivity. Of course, in terms of heat retention time, acrylic cannot be compared with a cast-iron or steel bath. However, the material is able to maintain the set water temperature for at least one hour.
- Design. The plasticity of acrylic makes it possible to realize all geometric shapes. The range of models includes eight specific directions.
- Hygiene. The structure is not porous. From this fact, the conclusion easily follows about the property of the material to repel fat, mud formations. Another consequence of the density is the ease of care for the product. After the hygiene procedure, it is enough to wipe the surface dry.
- Installation. The installation of acrylic bathtubs is available even to a consumer who does not have experience and skills.
Cons of acrylic bathtubs
- Strength. As mentioned above, the weight of an acrylic bathtub is both an advantage and a disadvantage of products. Strengthening the bath so that it does not stagger is the main task during installation.
- The low level of resistance to mechanical stress requires increased precautions when using the product. A chip, crack, dent can be formed even as a result of the fall of a heavy object.
- Coating. The surface of acrylic bathtubs is vulnerable to certain chemicals. Also, acrylic should never be cleaned with abrasives.
- Sensitivity to high temperatures. The temperature limits for an acrylic bathtub at the highest point do not even reach +60 degrees. Boiling water causes deformation and cracking of the covering top layer.
Mounting methods
Unlike steel, an acrylic bathtub requires a supporting frame. There are five effective ways to secure:
- on the legs;
- on a metal frame;
- on brick supports;
- on a brick or stone podium,
- wooden box.
When choosing a method, the strength and durability of the resulting structure is the main factor. From an aesthetic point of view, each option is easily played up with the use of decorative materials.
Mounting preparation
Acrylic bath fasteners are conditionally divided into three stages:
- Preparation of the premises, including the supply of water pipes.
- Assembly or construction of a supporting structure.
- Assembly of the siphon and connection to utilities.
Before fixing plumbing, you should make sure that you have the necessary tools. We will need:
- drill,
- building level,
- roulette,
- set of wrenches and screwdrivers,
- silicone sealant,
- building mixes,
- rag.
- Fixing an acrylic bathtub to the wall, if the tile is already lying, begins immediately after cleaning the area from foreign objects. If the design - the project assumes the absence of tiles on the floor, the floor area is cleaned.
- The second preparatory component is the sealing of the room. At the joints of the walls and floor, a layer of sealing mixture with a thickness of 0.5 mm is applied. This is done to protect the bathroom from mold and mildew.
- The final stage of the preparatory actions is the installation of a water supply to the acrylic bathtub to drain water from plastic pipes with a diameter of 50 mm. At the same time, it is important to observe the slope of 30 degrees defined by building codes. This is necessary for the smooth functioning of engineering communications. Lack of tilt leads to the formation of traffic jams and the appearance of an unpleasant odor.
To prevent the silicone mixture from leaving smudges, apply a soapy solution to the tile.
Installing the bowl on legs
It should be noted right away: this option is applicable only in relation to containers with a minimum weight of a rectangular shape. Installation of an acrylic bowl on legs is carried out using a set of fasteners.
The basic kit provides for the hardware and parts necessary for assembly:
- nuts, screws, dowels;
- corners, grips, fastening hooks;
- channels, profiles;
- legs for an acrylic bathtub with threaded studs (4 pcs.).

The work is carried out in accordance with the manufacturer's instructions.
- Turn the bowl upside down.
- Mark the location of the attachment points with a marker.
- Attach the channel to the designated place and, carefully tightening the screw, fix it. Install plugs for the channel.
- Attach the second plank in the same way. In order not to swing the container, check the correctness of the set direction with the building level.
- Install the clips that secure the decorative screen.
- Assemble the plastic legs according to the attached scheme and mount them in the provided holes on the slats.
- Determine and set the desired height of the acrylic bath fixture to the wall.
This completes the second stage - the supporting structure is assembled.
Siphon assembly
The quality of the plumbing service depends on the correctness of the actions during the final stage. Models of siphons, as a rule, come to the distribution network unassembled. The manual that accompanies the product provides step-by-step instructions for assembly and connection. The consumer can only act without deviating from the proposed items.
General instructions for all types and types of siphons are as follows:
- Check with the attached list for completeness.
- Inspect parts for defects.
- Assemble, starting with the flask.
- Connect the overflow pipe.
- Put the drain grate, after removing the protective film.
- Insert the pipe into the hole.
- Install and fix the bath.
In conclusion, you need to check the correct connection. To do this, fill the bath with water to the brim and leave for a while in order to detect leaks.
Metal carcass
Installing an acrylic bathtub on a finished factory metal frame is considered the most reliable way to fix it. The options offered by the manufacturers are sold unassembled. Each form corresponds to a metal structure, taking into account the geometry and size of the bath.
The basis of the set is a supporting frame. The process goes according to the following algorithm:
- Studs are threaded into special holes in the rack. A nut is screwed on top of the stud.
- After the racks of the frame are connected in this way, the height is adjusted using the building level.
- The frame is attached with screws to the plate at the bottom of the bowl.
- The studs of the legs are screwed onto the lower bars of the supporting frame. Before attaching the legs to the acrylic bathtub, the required height is leveled with a level.
- The bath with a fixed frame is turned over and attached to the wall.
- The sides of the bath are fixed to the wall with plates.
- The joints are closed along the perimeter with a plinth.
- The screen is hung.
brick supports
Do-it-yourself installation of a bathtub on brick columns is a way to save money in the absence of the possibility of purchasing factory strapping.
First, at the selected height, metal corners are mounted in the walls. This is necessary for further fixing the acrylic bath to the wall.
The remnants of cement mortar squeezed out by weight are removed. The facade is decorated with a plastic panel or brickwork.
Pedestal installation
Mounting on a pedestal built of stone or brick is the most time-consuming option. In addition, the method requires building skills and is time consuming. The fact is that it takes at least two days for each row to dry. Considering that at least two such rows are required, it is not difficult to calculate that the construction of the pedestal will take 4-5 days.
- Clean, wash, dry the floor area.
- Put together formwork from wooden boards. Length, width, height are determined by the design and dimensions of the model.
- The finished cement mixture is poured inside the formwork.
- After 2 - 3 days, a brick base is laid out on a dried pedestal.
- After the solution has set, mounting foam is applied to the bottom and edges of the sides of the bath. The bottom of the bowl is pressed against the base.
- The installed bath is filled with water and left for a day.