Wood-burning fireplace for the home - tips for choosing. Do-it-yourself wood-burning fireplace Do-it-yourself wood-burning fireplaces with chimneys
The popularity of fireplaces is currently growing steadily. After all, wood-burning fireplaces for the home create a unique atmosphere, making the home more comfortable and original.
There is an opinion that building wood-burning fireplaces is quite difficult and the process can cause a lot of trouble, but this is not so. After all, wood-burning fireplaces are inherently a simplified version of the stove, drawings of fireplaces of different types are easy to find in the specialized literature. The difference between them is in the method of heat transfer. So, let's look at how to deal with the construction of a fireplace.
First you need to find out what types of fireplaces exist for the home.
Installation location
According to the place of installation, they distinguish:
- walls installed in the center;
- angular.
If the room in which you plan to install a fireplace is small, it is better to choose a corner option. Firstly, corner fireplaces are more compact, which is important when installed in a small private house. Secondly, corner fireplaces are a practical device. If you choose the right place, then the corner fireplace can be used to heat three rooms at once.
In addition, corner fireplaces look quite attractive, so you can install a corner fireplace not only for the purpose of heating, but also for beauty.
Purpose of installation
When planning a fireplace device, you should immediately decide on its purpose. It is possible to install a hearth for purely decorative purposes or for space heating. If you want to install a fireplace for the purpose of heating, then you should choose an installation with a water circuit. A fireplace stove with a water circuit can be used as a main or additional device for space heating.
A fireplace with a water circuit has a fairly simple device. An additional element of the furnace with a water circuit are cast-iron heat exchangers with a coil in the furnace. The fireplace operates with a water circuit simply:
- during combustion, cast-iron heat exchangers are heated, through which the coolant circulates;
- the heated coolant enters the heating system.
Note; in some cases, it is necessary to include a circulation pump in the heating system.
It is possible to use a fireplace with a water circuit as the main source of heating only in a summer cottage, since a stove with a water circuit must be constantly heated (an alternative is a long-burning stove, which will be discussed below).
In a house of permanent residence, it is more profitable to use a stove with a water circuit as an additional device for space heating, and a gas or electricity boiler is used as the main one. Since modern heating units are automatic, the main heating device will be turned off during the operation of the fireplace with a water circuit.
Furnaces-fireplaces of long burning
If wood-burning fireplaces for summer cottages are installed for the purpose of heating, it makes sense to choose a long-burning installation. These installations have closed fireboxes, there are three types of devices:
- class A - a long-burning stove capable of heating for 3 hours;
- class B - a long-burning heating device capable of holding at least 50% of the maximum power for 10 hours;
- type C - installations of long burning, capable of functioning autonomously for at least 10 hours.
However, class C long-burning installations are no longer home fireplace stoves, but gas-generating stoves that are not installed in a private house. To understand how a long-burning furnace functions, it is worth considering the drawings of this device. Long-burning installations have cast-iron currents in which solid fuel burns with limited air access. The gas formed during the smoldering process enters additional cast-iron chambers, where oxygen is supplied. It is during the combustion of gas that the heat used for space heating is released.
Please note: trying to make a fireplace with your own hands so that it functions as a long-burning device is useless, because it is impossible to achieve the desired tightness of the chambers.
What if the house is wooden?
You can install a fireplace with your own hands not only in a reinforced concrete or brick building, but also in a wooden house built of logs or timber. But which option would you prefer? Let's try to figure it out.
Judging by the reviews, one of the best hearth options for a wooden house made of timber is a brick fireplace. A brick hearth retains heat well; if desired, you can lay out a brick fireplace with your own hands. However, it must be taken into account that this brick structure has an impressive weight, so you need to make a foundation for a fireplace at the stage of building the foundation of a house from a bar.
A ready-made metal fireplace with a closed firebox is quite suitable for a wooden house. The main advantage of the option is that the metal fireplace is lighter and you can install it already in a finished house from a bar, and you don’t have to make a foundation.
In addition, a metal fireplace can be very compact in size. Therefore, you can install a metal fireplace not only in a spacious living room, but also in a relatively small room of a house made of timber. And since a metal fireplace has a closed firebox, this will reduce the risk of fire, which is very important if you plan to install a hearth in a house made of timber. A metal fireplace is also suitable for a frame house. However, you can install a fireplace in a brick frame house, but for this you will have to build a foundation for the fireplace in advance.
Foundation for a fireplace
First of all, you need to build a foundation for a fireplace, this must be done if the weight of the structure exceeds 700 kg., And any brick fireplace weighs much more. For a one-story house, the depth of the foundation must be at least 0.5 m, and for a two-story building with the expectation of a high pipe, at least 0.8–1.0 m. It is best to make it from reinforced concrete. A foundation pit must be dug around the entire perimeter of the fireplace.

- In order to make a foundation for a fireplace, it is necessary to dig a pit, the bottom of which must be level. The first row of large stones or broken bricks is laid at the bottom of the pit. We first trample and tamp this layer into the bottom, and only then pour concrete and level it. Next, we repeat the operation.
- We put the outer rows of the foundation on a thicker solution, and we fill the inner part and fill it with a liquid solution. We continue to make such layers until the surface remains about 30–35 cm. Be sure to check the fill level.
- After that, we lay two layers of bricks using clay mortar. Under the first layer we put waterproofing, consisting of two layers of roofing material. To the level of the finished floor, leave approximately 7 cm(one row of bricks), as this will already be the base of the fireplace.
Do-it-yourself foundations for wood-burning fireplaces are also made from separate blocks. It is undesirable to tie the foundation of the house to the foundation of the fireplace, since they have different drafts.
A heavy brick fireplace on the second floor is made on a separate foundation, which rests on I-beams mounted on one and a half bricks into the wall. A light fireplace can be built without beams, but for this it is necessary to strengthen the logs.
If the house stands on a pile foundation, then it is advisable to build a foundation for a furnace on screw piles. When installing the foundation on screw piles under the fireplace, additional supports are installed in the corners, after which, using a channel, these supports are combined with a common foundation. That is, if the concrete foundation for the furnace is not connected with the foundation of the house, then this is not the case when building a support on screw piles. This is quite safe, since the piles will be immersed in the ground to the same depth. In addition, the ground heaving processes do not affect the foundation on screw piles.
It should be noted that the construction of a foundation on screw piles will cost much less than the construction of a reinforced concrete support.
Chimney device
An important point is the device of the chimney. When developing a fireplace project and drawing up drawings of this design, engineering calculations are carried out, since the chimney must provide sufficient draft. The type of chimney is selected depending on the type of fireplace. If it is planned to lay out brick ovens, then the pipe is made of brick. For metal fireplaces, a stainless steel pipe is mounted.
In order to avoid this, the pipe is insulated (see). The junction of the round pipe and the brickwork of the fireplace must be well reinforced with a casting with reinforcement. Particular attention must be paid to the joints of the pipes in the couplings - they must be airtight.
Fireplace finish
When planning to build a fireplace with your own hands, it is worth considering the issue of finishing (see). After all, a do-it-yourself wood-burning fireplace is something that will later give you pleasure and aesthetic pleasure!
There are several ways of facing and finishing a fireplace.
- Plastering.
- The surface of the fireplace is pre-prepared for plastering.
- The gaps in the masonry are cleared, and a metal mesh is stretched over large and inclined surfaces. This mesh is nailed to surfaces or used to stretch "P" shaped brackets, which are laid during masonry.
- Then drying oil is applied to all metal parts to avoid corrosion.
- The first layer of plaster is applied to warm walls with a thickness of not more than 5 mm.
- After the first layer has dried, a second, but already thicker plaster is applied.
- If it is necessary to close the remaining metal parts, a third layer is applied, but the total thickness of the plaster should not exceed 15 mm.
- Coloring.
The plastered surfaces are then painted. In this case, chalk and adhesive solutions are used. To give whiteness, blue is added to the paint. - Plasterboard lining.
This is done to give the fireplace a rectangular shape. First, a frame is built, and then sheathed with drywall. - decorative design.
When facing, many types of materials are used. For example, you can lay out a portal using decorative bricks, natural stone, fire-resistant ceramic tiles, slate, etc. You need to start making ceramic lining from the opening of the firebox, it is led from the bottom up to the desired level. Marble tiles are faced with both the fireplace portal and the pre-furnace slab.
Fireplaces simultaneously heat and decorate the surrounding space. You can handle brick laying on your own. It is enough just to read the manual and do everything in accordance with the provisions of the instructions.
Remember to have an efficient and reliable chimney. The standard length of the smoke exhaust structure is 4-5 m. In some situations, this figure increases to 700 cm.


In a room with a fireplace, high-quality ventilation must be organized.
Directly erecting a fireplace is carried out on a solid platform that can withstand the weight of the finished structure.
Definition of basic dimensions

Perform the necessary preliminary calculations. Determine the volume of the room allotted for the construction of the fireplace. The opening of the firebox should be 1/50 of the volume of the room you calculated.
The height of the portal should be 2 times the depth of the firebox.
The given dimensions and ratios are very important. If the depth of the furnace is greater than the permissible value, the fireplace will significantly lose heat transfer. With a smaller size of the firebox, smoke will occur.
Select the dimensions of the smoke holes taking into account the dimensions of the furnace area. The cross-sectional area of the chimney should be 10-15 times smaller than the area of the firebox.
The optimal diameter of round chimneys is 100-150 mm. The length of the flue pipe can reach 500 cm or more.
Preparation of materials
Prepare the required amount (determine according to the planned dimensions and design of the fireplace). Also prepare fireclay bricks for arranging the firebox.


Additionally prepare the following:
- mixture for laying bricks;
- 12 mm glass-magnesium sheet;
- chimney;
- oven tape for mounting fittings;
- metal corners;
- chimney flue.
Before starting work, cover with polyethylene everything that needs to be protected from contamination.
Prices for refractory mortar for stoves and fireplaces
Refractory mortar for stoves and fireplaces
fireplace base

The foundation design will include metal corners. They will additionally increase the strength of the site and protect it from destruction during seasonal changes in the soil.
Dig a hole for arranging the foundation in accordance with the design dimensions.
Fill the bottom of the hole with sand and gravel. Seal the pillow and lay the metal corners on it. Double the corner so that during the masonry process the most reliable and durable foundation is created. It is recommended to weld the corners so that they do not move in the future.
At the same time, the corners must be mounted in such a way that the masonry elements installed later are located parallel to the interior partition mated to the fireplace (if such an arrangement option is chosen).
Lay bricks in the corners, fill the entire structure with cement mortar and carefully level it with a plaster trowel.
The density of the solution should approximately correspond to the density of sour cream. With this consistency, the solution will be able to penetrate into all the cracks of the masonry, without leaving, at the same time, from the seams.
Make sure the base is level. To eliminate surface irregularities, use the same cement mortar. Leave the design to dry for a couple of days.
masonry


Cover the dried foundation with a double layer of roofing material. This will provide the necessary protection for the base.
Prepare mortar for masonry. Traditionally, fireplaces are laid out using a mortar based on pre-soaked
Laying the first row is best done using a mortar with a small addition of cement (approximately 10-20% of the total mass of the mixture).
Calibrate the bricks in advance by selecting the most appropriate size products for the masonry of each row.
Soak the bricks in water for a while before laying. This will allow the products to be saturated with moisture. Otherwise, the bricks will take water from the clay mortar, which will lead to a significant deterioration in the quality of the masonry.
Lay out the first row of bricks edgewise. Check the correct layout of the row with a square and level. Make sure the opposite sides and diagonals of the base are the same length.
Laying is carried out in accordance with the order. The following will be the procedure that is relevant for most of the existing varieties of fireplaces. For the rest, be guided by the drawings you have.

First step
Lay out three continuous rows of the base.

Second step
Lay out 4-5 rows with the arrangement of the ash pan.


Third step
Lay out 6-7 rows with the arrangement of the bottom and brick salary.


Fourth step
Continue laying. Up to the 13th row, inclusive, form the walls of the firebox of the heating unit.
Fifth step
Lay out rows 14-19 with the arrangement of the smoke box.


sixth step
Lay out 20-25 rows of a fireplace with a chimney arrangement.
Equip the plinth and continuous rows of masonry using a trowel or trowel. and the fuel chamber are laid out manually, because. at these stages it is very important to control the quality of the solution used.
Apply the chimney mortar to the middle of the bricks. The edges of the elements must remain free.
When laying out each row, adhere to the chosen order. For greater convenience, you can number the products.
Pay special attention to the quality of the laying of the fuel compartment and smoke ducts - these elements must be laid out as evenly as possible and as tightly as possible.
Remove excess masonry mortar immediately.


Find out how to do it with step by step instructions in our new article.
To form a beautiful curved chimney vault, gradually overlap the masonry elements. It is important that the size of the overlap does not exceed 50-60 mm in each row.
The arrangement of curved lintels is carried out using temporary formwork - a circle. To fix such formwork, use supports under the equipped fireplace vault.
Start laying from the brick installed in the center, and then perform symmetrical masonry in both directions.
Periodically check the verticality of the flue pipe. Even the slightest deviation from the vertical can lead to smoke in the room.

For laying the chimney, use a mortar with the addition of cement, similar to the mixture used when laying the basement of the fireplace.
The flue pipe must be covered with a layer of refractory insulation to increase fire safety. Insulation is arranged in places where pipes pass through the structures of the house (ceilings, roofing, etc.). The most commonly used insulation materials are asbestos-based.
Refractory brick prices
Refractory brick
To give the fireplace a more attractive appearance, finish it. The most commonly used finishing methods are:

Select the finish option of your choice. If you like the fireplace even without finishing cladding, embroider the masonry seams with a special tool and thoroughly clean the surface of the structure from excess mortar.
Important: only fire-resistant paints and varnishes can be used to paint the fireplace.
The rest of the exterior depends solely on your imagination and personal preferences.
Successful work!
Video - How to build a fireplace with your own hands
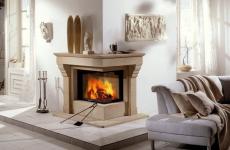
A wood-burning brick fireplace is the perfect combination of functionality, aesthetics and comfort. Judge for yourself: it perfectly heats the house, decorates the interior and creates a unique atmosphere of comfort. Therefore, it is not surprising that many are wondering: how to make a brick fireplace on your own and without extra spending? Of course, building a home with your own hands is not an easy task. But this is not a reason to immediately abandon such a bold idea - if you follow proven technology, use high-quality materials and be meticulous in every step of implementing the planned project, you will definitely achieve your goal. And our detailed step-by-step instructions and photos will help you get closer to it even faster.
Fireplace project: calculations, diagrams and drawings
The construction of any fireplace begins with a detailed project development - it will help to get a general idea of \u200b\u200bthe future design.
The first step is to choose the location of the fireplace. The best options are a load-bearing facade or interior wall, or the angle between two load-bearing walls. And the most inappropriate places are in the area of the flight of stairs and between windows.
Important! The dimensions of the opening of the firebox and the dimensions of the room should be related as 1:50, the width and height of the opening - as 2:3, and its height and depth - as 1:2 or 2:3. The last indicator should be given special attention: too deep a firebox can provoke a decrease in heat transfer, and too small - smoke in the room.
Keep in mind that the area of the opening of the chimney pipe depends on the area of \u200b\u200bthe opening of the firebox: in order to guarantee high-quality traction, the area of \u200b\u200bthe first should be 8-15 times smaller than the area of \u200b\u200bthe second.
Once the dimensions are determined, proceed to the preparation of drawings of the facade and the section of the hearth. Drawings are necessary in order to obtain an accurate image of the appearance of the fireplace, which can be used as a guide during the subsequent installation.
And the last stage in the development of the project is the drawing up of a masonry scheme, which is also called ordering. Here you need to number all the rows of the structure and separately designate each of its elements.
Working materials
The durability and functionality of your fireplace will directly depend on how high-quality materials you choose. Therefore, take the process as seriously as possible.
In the first place, of course, the brick. A solid red brick is best suited for a home fireplace. Material requirements:
- perfect surface without melted areas;
- saturated color;
- corners without the slightest chips;
- homogeneous structure in a fracture.
Remember that defective bricks can cause significant heat loss, which will reduce the efficiency of the fireplace.
In addition to bricks, you will need a whole range of consumables and products. In particular:
- sand with a grain size of not more than 1.5 mm;
- cement;
- clay: brown, Cambrian or dark red;
- wooden boards;
- crushed stone 3-6 mm;
- ruberoid;
- felt;
- grate;
- protective screen;
- smoke damper.
We proceed directly to the construction of the hearth. This process consists of three stages: pouring the foundation, laying the main structure and installing the chimney.
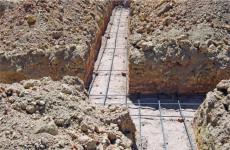
Stage 1: Foundation construction
The standard laying of the foundation for the fireplace is as follows:
- Dig a pit 60 cm deep. Fill it with gravel and tamp it so that the base is strictly horizontal.
- Build formwork from boards. Sheathe the structure with roofing material.
- Mount the formwork and fill it with broken bricks and rubble.
- Prepare a cement mortar: mix one part of cement and three parts of sand. Thoroughly fill the pit with the resulting solution.
- Level the surface of the foundation. Its level should be no less than 5-6 cm below the floor level.
- Cover the foundation with a regular film and let it brew well - at least a week.
For the subsequent laying of bricks, you will need a clay mortar. It can be easily made by hand. First you need to soak the clay for two or three days and, after the expiration of the period, filter it through a fine metal mesh. Next, it must be mixed with sand and water. Ratio: 8 shares of sand, 1 share of water, 8 shares of lean or 4 shares of oily clay. Checking the quality of the composition is quite simple: if it keeps its shape, does not stick to your hands and resembles thick sour cream in its consistency, then you are not mistaken in proportions.
Stage 2: Laying the fireplace
First, fix two layers of roofing material on the foundation - they will be responsible for waterproofing. After that, calibrate the bricks.
Laying is recommended to start from the corners. The first row of bricks for maximum stability is best laid on a cement mortar. To give the hearth an original look, lay the bottom row on the edge, but all the rest - traditionally flat and already on the clay mortar. After each new row, refer to the ordering scheme drawn up earlier.
Important! Before laying, each individual brick must be lowered into plain water for at least a minute, so that air can escape from it. If this rule is neglected, the bricks will draw moisture out of the clay mortar, and this will provoke a low strength of the masonry.
Excess mortar when laying the outer rows can be removed with a trowel, and when laying the firebox and smoke box - manually with a damp cloth, carefully checking the composition for the presence of small pebbles.
In order for the bricks to form the necessary monolithic structure, be sure to bandage the seams for half a brick in each row. The optimal thickness of the seams is up to 5 mm.
Advice. To make the masonry of the curved arch come out as aesthetically pleasing as possible, use a temporary formwork - circled.
Stage 3: Installation of the chimney
The arrangement of the chimney is one of the most critical stages in the construction of a fireplace, since the level of draft of the hearth and, therefore, the likelihood of carbon monoxide entering the heated room will depend on the quality of this work. Thus, a good chimney is a guarantee of your safety.
Up to the roof, the chimney can be laid with clay mortar, and above - with cement. The inner walls of the structure must be treated with a liquid clay composition: take a rag, soak it in the solution and wipe all the walls - this will get rid of cracks and get a smooth surface.
It is important to protect the structure from high temperatures in the overlap zone. To do this, you can perform fluffing - a special expansion of the pipe. For maximum effect, it should be overlaid with felt, pre-moistened in a clay composition. And in order to protect the chimney from precipitation, an overflow must be made above the roof - the so-called "otter".
If you want to facilitate the installation of the chimney, use special pipes designed specifically for smoke shafts.
Finishing the fireplace
If the masonry is done with high quality, and the brick pleases with color and texture, it is absolutely not necessary to perform the finishing lining - you can limit yourself to only careful processing of the joints with grout. But if you want to make your hearth even more perfect, pay attention to the most popular options for finishing it:
- decorative plaster;
- stone;
- concrete imitating natural wood;
- tile;
- decorative brick;
- tiles.
The choice of material for cladding directly depends on what you want to get as a result. For example, if you need a solid and sophisticated fireplace for a classic interior, choose expensive natural materials: travertine or marble - this cladding will make your hearth not only attractive, but truly luxurious.
A simpler, but also stylish option is to finish the fireplace with artificial stone or tiles with partially visible brickwork.
Of course, it is not necessary to stop at one cladding - it can be supplemented with all sorts of decorative glass, wood, metal or cast iron sculptures.
We hope our instructions will help you make your dream - a wood-burning brick fireplace - a reality. By following simple recommendations, you will definitely get a high-quality home that will delight you with warmth, beauty and comfort for many years.
Do-it-yourself brick fireplace: video
Construction of a brick fireplace: photo


Check out the photo gallery for this post:


Some still think that building a home fireplace is an impossible task and you need to turn exclusively to professionals. However, this is far from the case now. Fireplaces for the home, in fact, are a simplified version of stoves, the difference between them lies in the method of heat transfer. It will not only heat the room, but also bring uniqueness and sophistication to the interior. Let's figure out how to build a fireplace in the house with your own hands.

Many owners of private houses and cottages dream of a fireplace, but do not have sufficient financial resources to invite specialists. Some give up their idea, while others look for other ways. It is they who are wondering how to build a fireplace in the house with their own hands. Let's take a closer look at the intricacies of construction.
Video: fireplace in the house - pros and cons
The construction of a fireplace can be divided into several stages:
- Preparatory stage.
- Foundation laying.
- Preparation for the implementation of brickwork.
- Brickwork of the platform and portal.
- Chimney duct lining.
- Facing or finishing of a fireplace.
Read also the article about in addition to this material.
Every step is important. Let's look into the intricacies of working on them.
Preparatory stage
This stage includes:
- choosing the location of the fireplace;
- size calculation;
- calculation of the amount of material required and its purchase.
Choosing a location for the fireplace

In most cases, the fireplace is placed in the living room or bedroom near the load-bearing wall, which is located in front of the entrance to the house. But there are several more options, such as: a corner, built-in, freestanding fireplace. It is important to ensure that it does not interfere with the movement of people. The choice of the type and style of the fireplace depends on the availability of free space, as well as on the taste preferences of the owner of the room and his family members. The fireplace, truly, is the center of the family gathering and in the interior its role is similar. In front of him you need to place a recreation area.
Advice! You should not place the fireplace opposite the window, against the outer wall, as the heat will go outside. You also need to keep safety in mind. Sparks from the fireplace should not scatter around the room, and smoke should be avoided in the room.
This will require:
- availability of free time;
- a piece of paper in a cage;
- a simple pencil or pen.

Measurements are carried out in several steps:
- initially, it is necessary to determine the dimensions of the room where the fireplace will be installed for heating the house;
- you need to sketch it schematically on paper, using scaling;
- after that, it is necessary to sketch the firebox schematically;
Advice! For high-quality heating, one should be guided by the fact that the size of the firebox should be at least one fiftieth of the total volume of the room.
- next you need to decide on the depth of the portal for the fireplace to heat the house. For the correct organization of heat transfer and prevention of smoke in the room, one should be guided by the following parameters: 2 to 3 or 1 to 2;
- after this, you need to decide on the parameters of the chimney. It should be 8 times smaller than the area occupied by the firebox;
- The size of the chimney is of no small importance. Its minimum diameter should be 10 centimeters, and the average length is about five meters.
What will be required to build a fireplace?
After making calculations, building drawings, you need to prepare all the necessary material. To build a cozy, comfortable source of space heating, you will need:

- solid brick. It is expensive, and it should be purchased individually;
- river sand, ranging in size from 0.2 mm to 1.5. It must be clean;
- cement;
- crushed stone is required for the construction of the site;
- for laying the foundation - reinforcement, about 70 centimeters long, the diameter can vary from 8 - 10 millimeters. The quantity depends on the size, but on average twenty pieces are needed;
- damper for the chimney.
In addition to this article, read about and bookmark the article.
Advice! Brick can be replaced with metal - this will be an original design solution.

Let's take a closer look at how to build a fireplace in the house and where to start the bookmark.
Foundation laying

Before you start arranging the foundation, it should be borne in mind that it should not be flush with the base of the house. It should be borne in mind that the width should be displayed relative to the basement row, but allowances of five centimeters should be made on all sides.

Foundation steps:
- you need to dig a pit with a depth of at least sixty centimeters, and the width should exceed the fireplace masonry by fifteen;
- the bottom of the excavated pit should be covered with rubble and carefully compacted;
Advice! To obtain high-quality masonry, it is necessary to level the rubble using a level.
- formwork should be prepared for the foundation. Formwork boards need to be tarred and covered with roofing material, so that they will be less susceptible to corrosion. Formwork in height should be similar to the foundation;

- prepare a mixture in a ratio of 1 to z, where one unit is cement, three is sand. After that, it needs to fill the foundation;
- after pouring, it should be leveled and covered with polyethylene.

Advice! The foundation must dry completely. This will take from six to seven days, then it is guaranteed that it will withstand heavy loads: both temperature and weight.
Preparation for the implementation of brickwork
Brick and concrete are the best materials widely used for building a fireplace. Brick before laying should be prepared, namely, all rough, uneven specimens, as well as those with cracks and chips, should be rejected. They must have a perfectly flat surface.
Advice! The level of strength of the masonry can be increased by placing the brick in water for a few minutes in order for the air to escape from it.
Fireplaces for a private house are a great option for heating, this will require clay. It needs to be prepared in advance. Two days before laying, clay should be soaked in water. During this period of time, water should be added little by little and knead the solution. You should get a homogeneous mass.
Erection of brickwork of the portal and platform

When the materials are prepared, you can begin to lay bricks. Between the foundation and the brick, roofing material must be laid in several layers.
Brick laying should be carried out in even layers, located clearly one above the other. Here the main assistant will be the level. The appearance and the result obtained will depend on the accuracy of the masonry. Clay should be laid on top of the layer of bricks. The bottom bricks are placed on edge. The corners will also help in the layout. Quality should be checked on each row.
Before laying out the fireplace itself, you should lay the platform. It is carried out exclusively from non-combustible materials and cement-sand mortar. Most often, it has a height of about 40 centimeters and a width of half a meter. Fireplace fuel and accessories are usually placed under it.

Do-it-yourself fireplace site. At the bottom there is a niche for fuel - it is very convenient and looks interesting
Advice! For an aesthetic appearance and fire safety, the platform should be wider than the fireplace portal.
Lots of laying options. This is the English style, classic or other types. All of them are good in their own way. It all depends on the stylistic orientation of the interior of the room as a whole, the financial capabilities and preferences of the owner. Heating fireplaces will look original like a Russian stove. The fireplace can play not only the role of a heater, but can also serve as a place for cooking.
Advice! The simplest construction during construction is ordering. When laying out each row, be sure to mark it on the drawing so as not to get confused.
After completing three rows of brickwork, you should lay pre-prepared reinforced rods that will support the fireplace grate.
The result should be a solid and reliable monolithic structure. Laying is carried out by the method of dressing the seams: both transverse and longitudinal. For this, incomplete bricks are useful, the spoon and bonder parts of which must alternate. A special place should be given to the thickness of the seam, since the tightness and service life of the fireplace depend on this.
Advice! With high-quality masonry, the seams should not exceed five millimeters if an ordinary brick is used, and three when using a refractory one.
Chimney masonry

One of the most important elements in the fireplace is the chimney. The presence or absence of smoke in the room depends on its quality of performance. An important parameter here is the geometry of the chimney section. The draft is best in a round chimney, worse with a square one. This is explained by the accumulation of soot in the corners.
Advice! The best option would be to make a circular chimney from materials such as asbestos cement or ceramics.
The walls of the chimney should be perfectly smooth - this will prevent the formation of soot and help smoke pass through them with ease. It should be located vertically, inclined type chimneys are used in rare cases, and then the angle cannot exceed thirty degrees. The cross section of the pipe depends on the size of the outlet channel of the furnace. The smallest size when choosing a rectangular shape is 14 by 27 centimeters.

The head of the pipe is laid out in one brick. A cap should be installed on top to protect the chimney from precipitation.
Advice! Before laying the chimney duct, the solution should be checked by hand, in order to exclude the presence of any inclusions. This will make the laying will be of high quality.
Fireplace finish
Let's look at how to make a fireplace at home with your own hands more attractive and interesting. This stage allows you to show imagination. A do-it-yourself home fireplace should bring pleasure not only from bringing warmth to the room, but also amaze with its aesthetic appearance. Read also about in addition to this article.

Ready-made fireplace with brick cladding. It is painted in light and dark colors. A game of contrast - stylish and modern
There are many cladding options. For example:
- Plastering. To do this, you should first prepare the fireplace: clear the cracks, stretch the mesh. After that, apply U-shaped brackets. Then you should apply drying oil, it is she who will prevent the appearance of corrosion. One layer of plaster must be applied to warm walls. Its thickness should not exceed five millimeters, let it dry. The second is applied on top. In this case, the plaster should be much thicker than in the first layer. A third layer is placed on top of it. The total thickness should not exceed 15 millimeters.
- Coloring. After applying the plaster, the surface can be painted. The most commonly used adhesive and chalk solutions.
Read also the information on in addition to this article.

Advice! To make the color snow-white, you should add a little blue to the paint.
- The use of drywall. Sheets of this material can give a rectangular shape to the fireplace. Initially, the frame is fixed and only after that it is “sewn up” with drywall.
- Decorative design. For this, it is possible to use a mass of materials, such as decorative bricks, fire-resistant ceramic tiles, natural stone, slate and others.

These simple tips will help build a fireplace in a country house or in the country.
The Art of the Fireplace
Different types of trees are good fuel for a wood-burning fireplace. Coniferous trees such as spruce or pine should not be kindled with logs. This is due to the fact that it quickly burns out and a lot of soot forms on the walls of the chimney. The best option would be birch or oak. They are distinguished by: long burning, hot flame, good heat retention and a high level of efficiency. For kindling, use torches, paper, brushwood and wood chips. After they flare up, you need to add logs of a larger size.

Tips and instructions explain how to make a fireplace in the house on your own and save money, since the services of professionals are quite expensive, and not everyone can afford to call them. A home heating fireplace is a great alternative to stoves. It fits perfectly into the interior of the room and decorates it. Having created it, you can feel the warmth and comfort, enjoying the burning of the flame in the evening.