Bouquet for mom flat craft. Flowers for mom (75 crafts for garden and school). Simple origami for kids
For each of us, a mother is the closest, dear, dear person, ready to tirelessly help, love and care. Of course, the best gift for every mother on the holidays will be the one that the child was able to make himself, since these crafts for the mother with their own hands convey all the child's love and gratitude. Let's look at how you can make beautiful compositions yourself. Perhaps these will be original gifts made from natural raw materials or do-it-yourself crafts from scrap materials. We tried to collect different methods designed for both the smallest craftsmen and the older ones.
DIY fabric crafts for Mother's Day
Wonderful bouquets, as well as compositions, will be obtained from fabric flowers. Moreover, a little material is required, so there is no need to buy cuts - there will certainly be small flaps at home. With their help, for example, you can sew voluminous handicraft bouquets for Mother's Day with your own hands. For such work, you will additionally need a synthetic winterizer (cotton wool) filler, a bendable strong wire that will hold the stem.
There are simpler options that are suitable for children of primary school age - do-it-yourself applique crafts from the material using pieces of felt. This fabric will replace thick dishwashing napkins. Flowers are cut out of them, then glued onto cardboard. The middle is decorated with a button.


Craft for mom on Mother's Day with his own hands from napkins
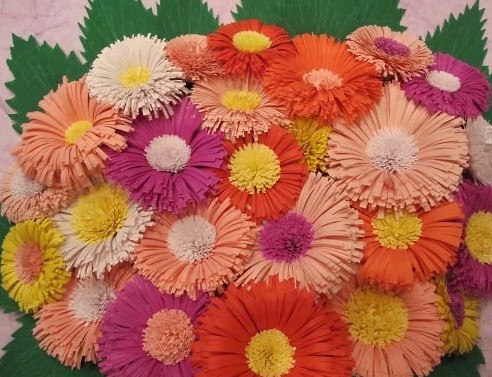
Try to make a variety of crafts for your mother with your own hands using simple multi-colored napkins. This malleable material makes it possible to craft beautiful carnations, roses and other flowers.
Mom will surely be pleased with an elegant card-heart with the palm of her child. To arrange it, you need to cut a blank heart out of cardboard, glue a loop to it. Then, roll up small balls from white and red napkins (they should be fluffy). The child's palm should be circled on cardboard, greased with glue, white lumps should be glued to it tightly (without gaps), and the rest of the postcard space should be pasted over with red. On the reverse side, you can leave congratulations and wishes.
Such a do-it-yourself mother's handicraft for Mother's Day will always remind her of what kind of baby her, already grown-up, child once was.


Children's crafts for Mother's Day from pom-poms and cotton pads
Having learned how to make pompons, according to the step-by-step instructions of the article, form a variety of lush and soft bouquets from them. At the same time, it is better to choose woolen threads for making pompons, so that they create more voluminous balls. Crafts made of artificial flowers with their own hands are often formed with the help of wire in the form of stems, which is well "masked" by winding with a green thread.
Cotton pads are a simple, convenient, affordable material, from which flowers can also be made, as shown in the photographs of our catalog. If necessary, they are painted in different colors.


Mother's Day: DIY crafts for kindergarten
Often in children's institutions various exhibitions are held, and, sometimes, matinees for the holiday of mothers. Children do various crafts for Mother's Day with their own hands under the guidance of educators or on their own. For example, a bouquet of children's hands or falling raindrops, each of which has a photograph of a child, looks very touching.
Decorating a group or a hall for a Mother's Day matinee, DIY crafts for kindergarten can be quite large, such as garlands of multi-colored paper maple leaves. Separate elements were made by all the children of the kindergarten, and the teachers assembled very beautiful "curtains" from them.


Mother's Day: DIY Paper Crafts
Colored paper, as well as cardboard, are very often used in children's art, since it is quite simple to work with them. By following the instructions in the photos of our article, you can learn yourself, and you can also show your child how beautiful flowers are made from paper using the origami method. On Mother's Day, do-it-yourself paper crafts are designed in the form of original greeting cards, and a cute composition of birds will undoubtedly touch any mother.


DIY gifts from natural material
Using natural resources, it is not difficult to create a wide variety of crafts from autumn materials with your own hands. Walking on the street with a child, pick up twigs, acorns, cones, fallen bright colorful foliage for creativity. In addition, sunflower seeds, pumpkins, and other natural raw materials are often used.
We tried to present wonderful DIY gifts in the article. For example, a basket of cones. It is quite easy to make it: you will additionally need a plastic bucket, hot melt glue, with which the cones will be attached. It is also easy to form a basket using a wire that connects the buds into one ensemble.


Do you want to learn how to make paper flowers with your own hands? You have come to the right place! 🙂 Here we have prepared for you an excellent selection of photos and master classes, including the new ones for 2019, designed for different skill levels: for beginners and for more experienced craftswomen. After all, flowers can be made from paper, both simple (children's crafts) and complex ones that cannot be distinguished from real ones.
First, of course, you need to decide what kind of paper and what techniques you plan to use for your crafts.
Let's take a closer look at all the possible homemade paper flowers. By following step-by-step photographs in master classes, as well as videos from YouTube, you will learn how to make the same beautiful 3D flowers as a gift for your birthday, March 8, teacher's day or compositions for decorating a hall, classroom, room, photo zone decor and other premises for the holiday ...
Corrugated paper flowers
Corrugated or crepe - this is the name of thin crumpled paper from which various crafts are made. It is good in that the elements of the flower can be made voluminous, slightly pushing the micro-folds of the texture with your fingers, and you get flowers with curved, convex petals.
The simplest corrugated paper flower:
Pansies, buttercups
Cute and uncomplicated buttercups and pansies: to create wildflowers, you need to cut out the same petals, which are combined and fixed with a wire or glued to a wooden skewer, the stalk is wrapped with a strip of green paper.


Rose and rose hips
The simplest craft is corrugated paper rose that even children can do.
Cut out 3 circles from red crepe paper, put them on top of each other, then fold them into a cone, fasten them with a stapler approximately in the middle. Then we turn it out halfway and straighten the petals. We fasten it on a skewer, which we wrap with green crepe paper. We glue the leaves. A simple rose is ready.


Here is such a scarlet flower:

Volumetric roses more puffy are done like this -:

Simple small roses in 10 minutes (how to make a flower out of paper -):


"Roses for Mom". Christina Matishina.
Made from corrugated paper.

And detailed instructions on how to make a basket of flowers with your own hands -
 This is such a beautiful bouquet:


Hyacinths
Spring paper flowers - hyacinths- also the simplest crafts.


"Flowers in a vase. Corrugated paper hyacinths ”. Senior group No. 5 MBDOU No. 267 in Izhevsk. Educator Kochurova G.V.

Peony

Beautiful and naturalistic peony It is obtained from tinted crepe paper: to obtain large voluminous petals, put a white blank made of corrugated paper on a cup, sprinkle with water from a spray bottle, straighten it in the shape of a bowl. We tint with yellow and pink paint, let it dry. We take a ready-made core or make it from yellow crepe paper, glue it over with our lush petals.
Application "Basket of peonies" - a very beautiful volumetric postcard -

Narcissus
Daffodils and lotus —


Please note that the technique for assembling flowers is the same, but the shape and number of petals are different for everyone, this photo shows the patterns and patterns of the petals and the shape of the core of different flowers:

These cutting stencils are easy to do with your own hands.
Such simple paper flowers were sent to us by Tatiana from St. Petersburg. The manufacturing technology is simple, but how wonderful the bouquet looks in this children's craft.

Paper carnations from Masha Shevtsova.

Large growth flowers
Large flowers made of corrugated paper are simply gorgeous, with them even an adult woman can feel like a Thumbelina. From it can be used to decorate the hall with your own hands for the holiday, photo zones for taking beautiful memorable photos, you can hang it on the wall or give it to the hero of the occasion. How to make volumetric growth peonies with your own hands is shown in this video:
Just giant roses:
There is also a faster option - huge, but simple flowers that can be hung on the wall of the photo zone:
As you can see, the size of flowers is limited only by the original size of the paper, real giants are made from huge paper.
Little flowers
You can also make miniature charming spring bouquets - apple or cherry blossoms corrugated paper:


pink buds, snowdrops, mother-and-stepmother,

crocuses and daffodils,

small poppies, cornflowers,

forget-me-nots ... It all depends on your imagination.


Making a flower with a lollipop
Using a small ball (we took a chupa-chups), you can get a fantasy flower with very lush petals that will keep their shape, only it is advisable to grease the ends with PVA glue so that they do not unwind.

We cut out 5 squares from corrugated paper and screw them onto the chupa-chups, so that the “tail” is longer on one side than on the other.


For the core, fold a strip of red crepe paper several times, cut the ends - these are "stamens".


We put the core between the long tips of the petals, we tie everything to the stick-stem. We wrap the stalk with a strip of green corrugated paper.

It turns out such an original flower with lush petals.

Snowdrops
Delicate first spring flowers of snowdrops -


Swimsuit
Delicate lights (swimwear)... For the petals, you need to cut out several identical circles, in which one edge twists into a tube, and the other expands and bends. For the core, a strip of paper is cut and rolled into a roll. By the way, see how to make a swimsuit from foamiran.

Chrysanthemums, daisies, carnations
All master classes on making these flowers from crepe paper on a separate page


Sunflower
Craft made from crepe paper and real seeds. :


Poppies
Charming flowers - crepe poppies -:

Crocuses
Crocuses are spring flowers, so very often they are made by March 8th. You can make a simple and cute bunch of flowers -.


Corrugated paper flowers with sweets
Corrugated paper produces excellent
The easiest children's option corrugated paper tulips with sweets... On March 8, we decided to make tulips for our teachers, because these are the most spring flowers. We chose truffles from sweets, and decided to try to make the stems without skewers. For this we needed:
- thick green double-sided paper,
- corrugated paper of red color,
- red threads,
- glue (stationery or PVA),
- as well as wrapping film for flowers and ribbon(the bouquet should look like a real one).
For the stalks, cut green paper into strips and twisted them into spirals.
Elongated petals were cut out of red corrugated paper, pointed on one side, six pieces for each flower. With your fingers, you gently parted the fibers in the middle of the petal so that it turned out to be slightly convex.

The candy was inserted into the spiral of the stalk, twisted tightly and glued.

Then they wrapped the candy in petals, like in a real tulip - three inside and three outside. In order not to bother with glue (such a thin paper under liquid glue, one might say, melts), they simply tied it with a red thread to match the paper.

Leaves, similar in shape to long tulip leaves, were cut out of green paper and glued to the bottom of the stem.

Two more such flowers - and the bouquet is ready. It remains only to wrap it with foil and tie it with a ribbon.

Paper tulips are ready, we got three bouquets.

You can take it to the kindergarten and hand it over.


Simple carnation
Another option to collect a flower from corrugated paper without glue is to string the edge of a long strip on a thread, like pompons, but here you need to act very carefully so that the thin paper does not break.


The result is a carnation flower - quickly and easily.
Flowers from napkins
Quite easy to do crafts - flowers from paper napkins.


Such crafts are very simple and easy for children. Photo and step-by-step description of Elena Ermasheva on how to do a bouquet of napkins do it yourself.

For such an original bouquet you will need:
- paper napkins: yellow and pink (35 pieces);
- bamboo sticks for barbecue (13 pieces);
- PVA glue;
- glitter bronze acrylic paint;
- green paint;
- brush;
- scissors;
- felt-tip pen or pencil;
- plastic jar;
- decorative shavings;
- satin ribbon;
- linen fabric;
- 0.5 liter plastic bottle;
- small pebbles.

Paint the sticks with green paint, let dry.

For a bouquet of 13 roses, you will need 117 circles of 8 cm in diameter, 9 pieces per flower. Cut out the required number of petal blanks.

For 1 flower, you need to fold 7 circles in half.

Grease the edge of the fold of each circle with glue. Put the stick on a semicircle and wind the petal on the stick.


In this way, carefully glue the rest of the petals.


Pierce two circles in the center with a stick.

Grease the upper circle with glue in three places. Glue to ready-made petals.

Glue the last circle in the same way, the flower is ready.

Let's make a vase for a bouquet.


Flowers from colored paper


For voluminous flowers, you will need special double-sided paper. Ordinary colored school paper is also suitable for appliqués.
The simplest bouquet of colored paper
Making such a bouquet of colored paper with your own hands is quite simple. Even a kid can cope with this task. That is why the craft is an excellent gift for mom.
If the child is still not doing well with scissors, parents can help him. And you should not interfere with the rest of the process. Creativity with children is an important part of parenting. It develops creative thinking, a sense of beauty. In addition, the child sees the mother's joy from the received gift and becomes happy himself.

Materials:
glue;
colored paper;
scissors;
pencil.

Colored Paper Bouquet Guide
Take a whole sheet of green colored paper. Grease the long edges with glue. Fold the sheet horizontally in half so that the edges stick together. We cut the paper from the fold to the gluing point at a width of 1 cm.
 We grease the base of the workpiece with glue.
 We roll up the paper with a tube. Fasten with paper clips until the glue dries.
 Cut out the blanks of the flowers. We use several shades. It will be more convenient to first draw a template, and then cut flowers along the contour. Several yellow circles will serve as cores for the flowers.
 We glue the middle to the flowers.

We glue each flower to a separate piece of colored paper.
 Distribute the flowers evenly over the bouquet. We straighten the leaves. The baby bouquet is ready:

Making a flower with a child
Paper flowers are a great gift option for mom. Such a craft is simple to perform and looks much better than fresh flowers. This step-by-step tutorial will walk you through the process of making a paper flower.
For a flower arrangement, you will need the following materials and tools:
1. Cardboard (yellow and green).
2. Corrugated paper of red color (can be replaced with a napkin).
3. Stationery glue, pencil, scissors.
4. A small piece of plasticine.
5. Bottle cap.

Step 1:
The flower will consist of three different sized flower blanks. Three flowers of the same shape, but different in size (from larger to smaller), need to be cut out of yellow cardboard. For convenience, you can first draw the shape of the flower with a pencil and then cut it out. Glue the blanks together. The largest flower should be at the bottom.


Step 2:
Using a pencil, twist each petal down: place the pencil under the petal, press with your finger and stretch down to the tip, twisting slightly. These actions will make the flower lush and voluminous.

Step 3:
For the middle of the flower, you will need corrugated paper or a red napkin. You need to cut a strip about 3 cm thick, then cut many narrow strips to the middle. Roll the workpiece into a roll and cut again. Another way is to simply cut the paper into small pieces. Apply glue liberally in the middle of the flower and glue the red pieces of paper.


Step 4:
You can make the leaves like this: fold the green cardboard in half, draw half of the future leaf in the place of the fold and cut it out. There should be two such leaves.

 Step 5:
You will need green cardboard to make the stem. From it you need to cut a strip 2-3 cm wide, twist it into a narrow roll and fix it with glue. Cut the upper part of the stem into four parts.

Step 6:
All the details are ready, it remains only to connect them together with the help of plasticine. It needs to be applied to the top of the stem and the flower is secured. The leaves are attached according to the same principle. Glue the flower on plasticine to the bottle cap. This will be a craft stand.

The paper flower is ready.

"Postcard for March 8!" Safonova Svetlana Alexandrovna.
Application from colored paper. Gift card for March 8.
We need colored paper of red, purple, light green, yellow, green. It is advisable to take glossy colored paper. Cut out three flowers of different shapes. Large, medium and smallest, and so on three times. Then on the overthrown cardboard we glue first a large flower, then a smaller one, and so on three times. Cut out a vase from purple paper, glue it on a postcard. We make three yellow circles, make the middle in our flowers and glue them. Then we cut out three stalks and glue them from the flowers to the vase. Cut out the green leaves and glue them. Here's a postcard!

This video shows how to make daisies out of paper, they look very naturalistic, almost like living ones:
The flowers are so realistic that it is difficult to distinguish them from real plants.
Daffodils. Master Class
This workshop describes how to fold daffodils from colored double-sided paper.

To work you will need:
· A simple pencil;
· School line;
· scissors;
· Double-sided colored paper of orange, yellow and green shades;
· PVA glue;
· Wooden thin sticks;
· A small vase.
Work description
Take half a standard sheet of yellow double-sided paper. Prepare a ruler and pencil.

Draw 5 cm squares on a piece of paper. Use scissors to cut them out according to the graphic pattern. For 5 colors, you need to prepare 10 squares.

Take 1 square and make 4 cuts on it, as shown in the photo. Then take 1 wooden stick or rod from the handle and slightly twist the corners of the paper blank.

This will form the petals. For one flower, you need to prepare 2 identical blanks.

Glue them so that the petals of the upper blank are between the petals of the lower one.
To make the center of the daffodil, you need to cut a circle out of orange double-sided paper. After that, bend the circle with a rod, as shown in the photo.

Glue the middle to the center of the yellow blanks. One flower is ready.

Make 4 more flowers using the same principle. These are the daffodils.

To make the stems, prepare thin wooden sticks and strips of green double-sided paper.

Just cover the sticks with green stripes and the stems are ready.

Cut thin, long pieces of green paper. Using scissors, twist one end of each leaf slightly.

Glue 2 leaves on the stems.

Now all that remains is to fix the buds at the top of the stems.

Beautiful artificial flowers look as good as live ones.

Collect them in a bouquet and place them in a low, narrow vase. They look amazing!
The advantage of such a bouquet is that you can admire its beauty for more than one day, because the paper will never fade.
Daffodils aren't the only flowers you can make. Experiment, and your home will be decorated with a variety of flowering plants. For example, tulips are a faithful companion of spring daffodils, how to make them out of paper is easy and simple, watch the video:
Blue forget-me-not flower made from watercolor paper
You can make wonderful volumetric flowers for decorating postcards and gift boxes with your own hands. There is such a wonderful direction in needlework - paper plastic, which allows you to create incredibly beautiful flowers and bouquets. Thanks to the plasticity of watercolor paper, making flowers for scrapbooking is not difficult.
Necessary tools and materials for forget-me-nots:
- Blue watercolor paper;
- Scissors;
- Stencil in the form of a flower with 5 petals;
- Capacity with water;
- Ball tool;
- Sponge;
- Soft cloth;
- PVA glue;
- Pearl half beads.
Work description
First you need to make a stencil of a flower with five petals: you can draw it by hand or print it on a printer. Cut out an even number of flowers from the watercolor paper with a stencil.

Place the flowers in water for 5-10 minutes. Do not be afraid to overexpose; watercolor paper is thick enough and will soak in water for a long time. After the allotted time, blot the blanks with a napkin to remove excess liquid. If you haven't found colored watercolor paper, you can paint plain white with food dyes, gel pens, felt-tip pens, or gouache. This should be done while the paper is damp.

Place the flower on a damp, soft cloth. Using a tool with a ball at the end or any other object with a rounded end (for example, the tip of a pen, brush), press on the edge of the petal and drag it with force towards the center. Do the same with all the petals. So the flower will take on a relief.


Now place the flower on a thick sponge and push through the center of the flower. The indentation should be larger here than in the petals.

After squeezing out the petals, turn the second flower on the wrong side and push it in the center in the same way.


You should get these two types of flowers: with petals bent up and down.

Place the flowers on a flat surface and leave to dry completely. Dried flowers turn out to be very tough, reminiscent of cardboard.
Now it's up to the assembly. In a flower with petals bent outward, glue a flower with petals inward. PVA glue is great for watercolor paper.


Glue a half-bead in the middle of the flower.

Embossed flower from watercolor paper is ready! These flowers were used for decoration. Flowers made of watercolor paper are quite tough, so they can be used to decorate wicker boxes and baskets, as well as use them as interior decoration.

Easter bouquet of snowdrops. Zabrodina Anna.

"Snowdrops". Klementyeva Polina and Aleksandrova Oksana.
A very cute picture, but despite this, it is not at all difficult for children from 5 years old. To make it, you will need half a sheet of blue cardboard, a white sheet, a green pencil or felt-tip pen, green plasticine, a napkin, and glue.

DIY simple paper flower
From ordinary white paper, using a very simple technique, you can make beautiful, elegant flowers, which will surely find application in creativity. First of all, this is the creation of volumetric postcards using the technique, which is often practiced by needlewomen, and these flowers can also be collected in a bouquet or simply supplemented with a floral arrangement. A small lush accent is sure to draw attention to a wall newspaper or ad, a beautiful box or bag.

What needs to be prepared to create such a flower:
White office paper;
water and a brush;
gouache or watercolors;
scissors;
glue;
decorative stamens;
a piece of thin wire.
How to make a lush flower with your own hands in stages
1. The list of materials used intentionally does not indicate the colors of paint and decorative stamens that can be used to create a flower, because they can be chosen at your will. The base of the flower is ordinary white office paper, and then you can paint the product with any paints you like or need. First you need to take scissors and a sheet of white paper.
2. Cut out the first flower with oblong petals in the amount of 6 pieces from paper. But the shape of the flower may be slightly different, it is only desirable that the petals are oblong.

3. Using the first flower as a template, cut 6 identical layers of white paper. The more layers you use to create your list, the more curvaceous your product will be. You don't need to worry about evenness and accuracy.

4. Using a brush and plain water, wet the petals. Dip the tip of the brush into water and run over the petals as if painting over them.

5. While the paper is still wet, squeeze each petal, while it is convenient to use the same brush or pen, applying to the rounded surface. Thus, you will not only bend each petal into a kind of accordion, but also make them turned outward.

6. Repeat the same procedure for all other petals, leave all layers to dry.

7. While the layers of the flower are drying, prepare a bunch of stamens. Since a white-yellow flower is shown here, the appropriate stamens were also chosen. Take 6 or 7 double-sided white and yellow stamens, use a wire to find the middle and bend in half to get a bundle. Twist the end of the wire so that it becomes sharp. In the future, the wire will help secure the stamens in the center.

8. Dry layers of white flower begin to hold together. Stick the second layer on the first layer, moving it.

9. Then glue all other layers in the same way. Here is a blank for a lush flower.

10. In the center of the flower, make a small hole with scissors and extend the end of the wire to fix the stamens. Cut the bottom of the bush and coat with glue.
11. Pick a paint color and casually paint over the top of the flower, leaving white gaps to make it look even more elegant.

12. A beautiful handmade paper flower is a great addition to.

Simple autumn bouquet - aster
An autumn bouquet made of paper will become an interesting DIY handicraft for children. It is autumn that is the time of the year that gives us colorful colors and incredible materials for creativity. The craft is a bright bouquet, decorated with flowers that look like asters, autumn leaves and a bow.

- a set of cardboard and paper;
- scissors;
- glue;
- black capillary pen;
- half-beads-crystals;
- brocade bow;
- maple leaf template (or a special hole punch in the form of any leaf).
How to make an autumn bouquet in stages
Prepare cardboard and paper for the job. Thick paper (green in this case) is needed to create the base. You can also prepare waste cardboard from packaging or colored plastic for this purpose. Bright sheets from the set are needed to create flowers and leaves. If you use single-sided paper for flowers, the back of which is white, you will get interesting two-color buds.

From a dense sheet prepared for the base, cut out a detail that resembles a bouquet. The upper part will expand, and the lower part will have a ponytail, like a bouquet.

Cut out some maple leaves (or you can prepare blanks of a different shape, such as oak, chestnut, or birch leaves). It is best to use yellow, orange, brown, or red paper for this work. Apply streaks with a capillary pen. The leaves should be small - this is an addition to the bouquet that echoes the autumn theme. Make 5 or more blanks.

Stick the prepared leaves onto the base. You can glue four on top, one on the bottom, or distribute them as you like.

Additionally, cut out the oblong leaves. These are the aster leaves themselves, which will become the central decoration of the postcard. Curl each leaf with the same scissors. Long details are the decoration of the bouquet.

Prepare a thin brush of pink paper to create the buds. Cut the leaf into thin strips and divide each of them into segments approximately 10 cm or so long.

Fold each section into a loop, overlapping the edges. The back of the paper may be white.

Cut flower circles from paper of any color. Lubricate the circles with glue and start applying loops around the circumference, forming flowers.

Glue two or more rows of eyelets to create lush buds. Decorate the middle with half beads. You can choose half-beads to match the flowers or use yellow details.

Model three or more aster flowers to decorate the bouquet.

Glue autumn flowers in the center of the bouquet.

Decorate the lower part of the composition with a brocade bow to mask imperfections, and the bouquet looks complete.
An interesting autumn paper craft is ready.
chamomile
For example, to do paper chamomile, cut two blanks from white paper and several from yellow, glue the core to the main shape:

the Rose
For roses You will need more blanks and efforts, but the result will be impressive: fold the square of scarlet paper twice in half and once diagonally. Cut off the tip and wide edge in a semicircle, make 4 such blanks of layers with 8 petals. To create volume, cut one side of the workpiece and glue it together to get different widths of the workpiece: 6, 5, 4 and 3 petals. Twist the petals, insert layers into each other and glue. Fold green paper sheets like an accordion.
"My scarlet rose." Sivolapova Polina.
It took red double-sided paper (colored printer paper) to make this rose.

Another interesting option is two-color: here you will need not only scissors and glue, but also a stationery knife for cutting.

A simple way to do it quickly. Fold 2-3 sheets of paper with one accordion, tie in the middle, cut the edges in a semicircle. It remains only to gently fluff the petals:

Simple flowers
Simple flowers can be done in a spiral way: a classic spiral is drawn on a sheet of colored paper or wavy, with petals, cut out and curled into flowers.


Dahlia
And even if you make circles of different diameters out of paper and cut petals in them, you get a very lush flower - a dahlia.
A flower made from curled strips of paper.
Another option how to do rose from ribbon, paper or fabric, simply bending the petals at the desired angle and rolling into a roll:
YouTube video:
Hyacinths by Elizar Polyakov:


Large flowers for the photo zone
Flowers for office Photoshoot locations can be made from double-sided colored paper.
For example, in this video, 160g paper was used, 15 - 24 pieces were needed. Templates can be taken, for example, here: //pl.pinterest.com/pin/789818853371506785/. How to make a photo zone from paper flowers:
For the photo zone, you need a frame on which the canvas is stretched, and then flowers are attached to it on wire and hot glue:
Another option is to make beautiful hanging compositions, for example, the following:
Paper flowers opening in water
You can spend interesting time with a small child at home. This simple but exciting wonder-craft will interest the kid. Making flowers together will bring pleasure to everyone.

You will need:
- colored (on both sides) xerox paper;
- office white paper;
- colour pencils;
- glass of water;
- shallow white plate;
- stapler,
- circle patterns with a diameter of 6, 10 and 12 cm (for more complex color options).


Simple option
Draw several color options on a white sheet of paper, about 4-5 cm in diameter with not very large petals. It can be in different colors and shapes of petals. Now you need to cut them out. Bend the petals of each flower in the center in a circle, one on top of the other.


 When the flowers are ready, place a plate and pour some water into it. Now you can lay out paper flowers with bent petals up. And then an amazing transformation will take place. All the petals will open and flowers will bloom on the water.
This action occurs because the paper absorbs water and tries to return to its original form. This means that it straightens at the fold. It turns out that the flower is blooming.

 Flowers can be immediately cut out of colored xerox paper. You can glue or draw something funny inside the flower. Optional.
More complex option
Option number 1. The original flower can be made large in 3 layers. Take xerox paper, connect it with a stapler in the middle. Using the template, draw two circles with a 2cm difference between them. In the resulting donut, depict the petals. The finger will serve as a template. Cut the flower by grabbing three layers at a time.
Now fold the petals correctly in the center. One by one, overlapping. And so all three circles. It remains to launch it into the water and see. The flower will open layer by layer. The kid will like it.


 Option number 2. This flower can also be made in 2-3 layers. Only now the difference between the circles will be 4-5 cm. Long petals will turn out. Now each petal must be twisted with a pencil inward. A thinner diameter can be used.

Origami flowers
Flowers in the origami technique, of course, are not so similar to real ones, but they have their own charm. In addition, this technique helps to develop fine motor skills, which is very important for children and adults too. How do you get such original things from an ordinary square of paper?
Callas
For the manufacture of children's applications, paper is most often used. We suggest adding some chenille wire to it and making beautiful flowers that look like elegant calla lilies. And when creating the flower themselves, the child can be introduced to the basics of the origami technique. The whole process of making such an applique is given in this master class.

To create such a craft, we have prepared:
- white cardboard;
- red, orange, pink and green paper;
- glue;
- chenille wire;
- pencil;
- scissors;
- ruler.

Flowers for this applique will be made of colored paper using origami technique. Therefore, we initially prepare a square blank. In our case, there will be a square with a side of 8 cm.
 Fold it in half diagonally.
 Now we will expand the blank of the future flower and begin to bend the sides to the middle line.
 It is necessary to bend symmetrically on both sides.
 Next, bend the upper parts of the bent elements back. We try to do it symmetrically. We get such a blank for a flower.
 The middle of the flower will be a piece of chenille wire. It is enough to take about 4 cm. We use orange chenille wire, but if desired, such a center can be made of chenille wire of any color. We fix this piece with PVA glue.
 We fold the bottom corner of this flower to the back side and glue it.
 In a similar way, we make flowers from pink and orange paper.
 Now we distribute the flowers on white cardboard, after which we fix them with glue.
 Cut out narrow strips from green paper, which will become stalks on our applique.
 We also make leaflets for flowers from green paper. To do this, fold it in half, and then cut out the outline of the half of the leaf. We cut 3 different sized leaves. We glue them to our craft. The applique with flowers made of paper and chenille wire is ready.
Step-by-step photos of the process and diagram:

Video on how to make paper snowdrops using the origami technique:
Video how to make spring lilies of the valley. Valeria uses a large sheet of paper to make it clearer, but for miniature flowers you need to take 5 x 5 cm squares and repeat after the author:

Carnation flower from modules -:

Send your photos
Do you also make beautiful paper flowers? Send photos of your crafts. We will publish the best works and send you a Diploma of the Participant of the Competition.
All good and bright day! So very soon, in a month, the first flowers will appear, I suggest you not wait for this and make your own flowers out of paper yourself. After all, you can give such lovely gifts of nature without a reason, but if you need an excuse, then do not forget to congratulate your mothers and grandmothers on March 8 or Happy Mother's Day, because it is these days that such crafts are always presented.
Let them be paper, but they can be presented so cool and superbly that they will look even better than living ones, and even more so they can stand on a table or on a shelf for a single year. And it certainly pleases. Take a look at this picture, like it? If yes, then in I showed in stages how you can make such.
In my opinion, today's topic will always be popular, because it is the most beautiful and delicate souvenir that you can give for any occasion. So, I suggest you hang out with me for a short time))).
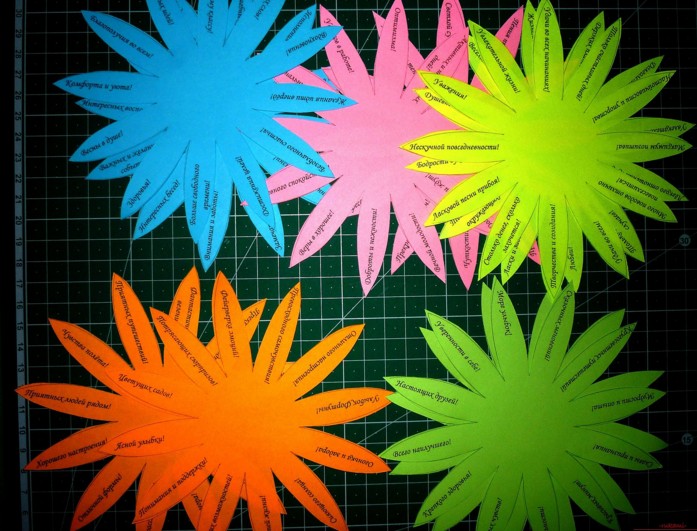
Souvenirs that carry something unusual look unrealistically beautiful and original. I propose to start with the most seemingly simple option, but just look at whom. This is a chamomile, but not simple and not fabulous, but with wishes, how nice it will be to present, don’t you think?
Moreover, you can download ready-made templates directly from this site and print on a printer. This is a very cool souvenir that will hook anyone. You can give it for any holiday, for example, for a birthday or for Teacher's Day.
We need:
- office sheets of different colors - 5 pcs.
- glue stick
- double sided tape
- rhinestones
- templates
- satin ribbon
- scissors
Stages of work:
1. Start with the fact that you will need to decide on the shape of the flower. I propose to take such a seven-flowered flower. Print the blanks on the printer. The first template will be the same as in this picture, all the rest I am sending you to your mail, just write your comment below (there are 10 of them), or you can come up with your own words or messages.

2. Here they are handsome, now take scissors, or you can use a stationery knife and cut along the contour.

3. These are such cute and funny blanks.
4. Cut out a circle of cardboard with a diameter of 5 cm and place the first flower and a satin ribbon and drip glue in the center or lubricate if using a pencil. So gradually glue everything.

5. Now it remains to arrange the middle beautifully. To do this, take a square, about 3.5x3.5 cm. Bend it like this.

6. Then make a triangle as if you were making a frog.

7. Fold the ends forward.
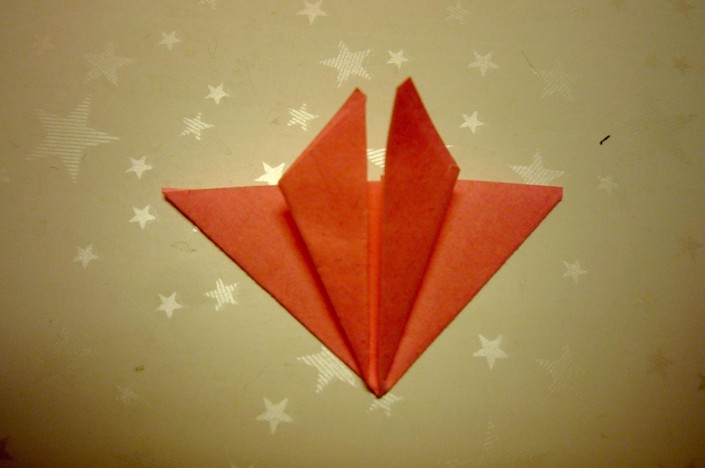
8. These are the butterflies.

9. Which remains only to connect, glue to each other, and glue the middle with something interesting, for example, a bead or rhinestones. It turned out to be a very original and unique craft, it will definitely please the one for whom you made it.

The most common and uncomplicated, especially for children, is a flower of eights using a hole punch and buttons.

Undoubtedly, roses are the king of all flowers, how to make them, to be honest, there are a great variety of options. I will write more about this in more detail sometime. Now take this masterpiece as a basis.

Or here's a sample, you need to draw 5 colors from largest to smallest, and then arrange this business in a vase.

Many of you, I know, will look for roses, because it is these flowers that are customary to give in most cases. Well, here's your first briefing. Take corrugated paper and make petals out of it. First cut out the strip, then accordion fold and round the edges. After that, you should wind it on the stem, which can be a stick or something like that.

Also decorate the stick with green corrugated paper.
You can make such a wonderful creation out of plain paper, but it is better to use crepe paper or corrugated paper. Draw the spiral yourself in a circle, cut it with a knife, and then wind it on a pencil or crochet hook.

Or use this usual scheme, you can do this in 5 minutes.


Their stages of work are absolutely uncomplicated. Remember how you made bookmarks in childhood, the system is about the same))).

The flowers themselves can also be twisted to make them look more interesting, as if they were in full bloom.

In general, quite a lot of models can be composed and made of paper, the main thing is depending on what the shape of the petal will be.

Notice these features for yourself, and you can make daisies, chrysanthemums, dahlias, and even carnations, take a look at the following pictures. You can see the cutout petal patterns.


Or do you prefer lilies with peonies more?

And what is this flower? Have you guessed?

You can make such a charm in the form of a brooch).

The very first, as you know, please us with snowdrops. Moreover, you can make the flowers themselves from pumpkin seeds.

And of course I could not pass by foamiran, use this material too.

Dandelions follow. Make them from regular tissues using a stapler.

Such a bright option will also be an excellent solution to surprise everyone.

They remind me of asters.
This view generally conquered me, I fell in love with him at first sight. It really looks like a live or real dahlia.

You can make a primrose. You will need squares, from which you need to make figures that look like triangles.

On the other hand, also roll up to form a triangle and a petal for the future bud. Then glue them together. Make the stem and leaves.

The next option looks great, as if it were real.

We make crafts from A4 sheet
Not so often, but still you have to make such products from ordinary large sheets. Of course, you can use such luxurious crafts anywhere, they look especially good if you decorate walls or a hall with them, that is, use them in the interior of the premises.
Each leaf is a large petal that you will have to paint in the desired color.

Large color options can also be made in the form of a rose. Initially, you will need to use a template.

And then step by step follow all the steps presented.
Video on how to make paper flowers quickly and easily
Believe it or not, you can quite simply and in a matter of minutes twist a gorgeous bouquet, watch this video and you will also learn this interesting lesson:
Workshop on folding paper tulips
All of us at some point in childhood folded different figures and used origami. I remember in labor lessons I really liked this occupation. The tulip is usually done using this technique. It turns out to be voluminous and similar to the original.

You can also make an open type bud.

Or take another corrugated paper idea as a basis, hide a candy in the bud. No one will refuse such a gift, that's for sure!

And here's another great idea with disposable spoons. Such a gift can be presented for a birthday and even for a wedding.

Stages of work:
1. Prepare everything you need for work, all the components are shown in this picture.

2. Cut scarlet rectangles out of corrugated paper and then wrap the spoon with this material, as if slightly twisting on a stick.

3. What does it look like? Petals, of course.

4. Disguise the stick with green paper, at the same time fold the spoons to each other (4 pcs.) To get the stem and bud. Then cut the leaves into a specific shape.

5. Place the craft in a pot or cup. You can tie a bow or some other pattern.

Step-by-step instructions for beginners on how to make a flower for mom
Now let's learn how to make the simplest option, because for someone the previous ones will seem very difficult, then this present will come to your aid.

We need:
- square paper - 2 sheets

Stages of work:
1. Take a sheet and fold it in half to form a triangle. Then one more time.
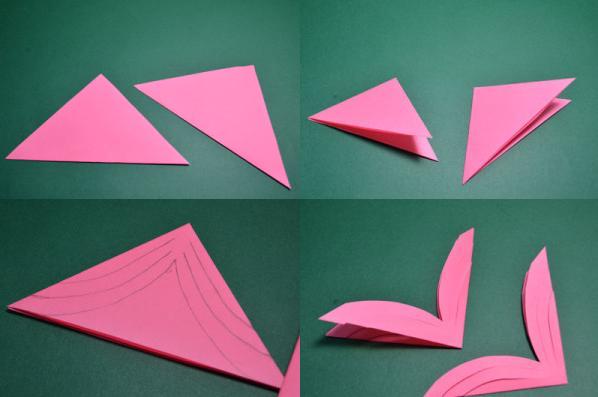
Then draw such semicircular lines as you see in this illustration. Cut from the template and follow the instructions below.
2. Unfold, unfold the workpiece and glue a couple of strips to the middle.

This varaint is suitable for the smallest, for example for preschoolers.
But with schoolchildren, you can do it even harder. The meaning is the same, only bend the petals and glue them differently.

You can also make a red poppy or take a different color, but for this work you will need more wire.

I am very much in love with asters, and you love them?

Do you want to know how these can be done?
We need:
- old magazine
- scissors
- barbecue sticks

1. Disassemble the magazine into pages, fold each page in half, then again and again.

2. Take scissors and cut with weed. To make a fringe.

3. After that, wind this charm on a stick.

4. Then fluff the product. Place the stick with green paper.

Something similar can be done to a teacher or, for example, an aunt or grandmother.
1. You will also need napkins and corrugated paper, plus you will also need a disposable cup or a jar of sour cream.

2. Since the flowers will be large, you can make smaller ones, take a napkin and fold it in half, then in half, and again. Fasten the middle with a thread or a stapler.

Cut out the petals with scissors, shape them.
3. Now prepare the glass, glue it with corrugated paper, push inside the crumpled newspaper or unnecessary paper, also cover it with a corrugation and release it as if the grass.

4. The blank should be 10-12 pieces, it all depends on your abilities.

5. Using glue, attach the resulting flowers to the base. Quite modest, but at the same time bright and stylish, such a present will delight anyone, especially women or girls.

Learning to make voluminous flowers
From what they just do not make such crafts in our time. They even adapted egg molds for this work. It is a shock for me, how and when it could have occurred to anyone, but it came and conquered everyone. At first it looks inconspicuous, and then you get awesome masterpieces.

The sample is painted with paint, put on a wire or stick.

A wonderful souvenir, as they say from improvised means and how beautiful and amusing it looks.

Agree with such voluminous colors, you can quite easily and quickly decorate any interior of a room or hall, make it irresistible and unforgettable.
You can also use just such a gorgeous flower garland.

After that, put each workpiece on a fishing line or thread.

You can also make unforgettable creations from paper bags.

Using the origami technique, you can fold and then glue the parts.
And the coolest volumetric view, which I really liked and I advise everyone to make it, is this:
Do you like calla lilies? Then take this master class for yourself.
You can even make a masterpiece out of ordinary newspapers.

By the way, you can even do Pansies with your kids.

Interesting gift idea Roses with sweets
Once I showed you how you can make roses and hide sweets in them, remember? Look what a gorgeous bouquet turned out, and we presented it on Valentine's Day, if you forgot, then I remind you.

I also give you the following diagram to help you.

You can easily go and follow the step-by-step instructions.
Or use this video, you can't do without roses:
That's all for me, I wish you inspiration and great work. Come to visit me more often, join me in a contact group, write your reviews and comments. Good luck and see you soon! Till!
Best regards, Ekaterina Mantsurova
Bouquet for mom with their own hands.
Master class with step by step photos
Description: this master class is intended for children from 8 years old, primary school teachers, parents.
Purpose: gift, work for an exhibition, interior decoration.
Target: creation of crafts.
Tasks:
to acquaint with the manufacture of basic elements in the origami and paper-plastic technique using technological maps;
develop practical skills in working with paper;
to consolidate the skills of handling tools of labor - scissors, paper:
develop artistic taste, creativity, fantasy, imagination;
develop fine motor skills of hands, eyes, spatial imagination;
to form a culture of work: to teach accuracy, the ability to use material carefully and economically, to keep the workplace in order;
to educate independence, patience, perseverance, a sense of satisfaction from the habit of bringing things to the end;
instill an interest in art, arts and crafts.
Dear colleagues, today I want to present you a master class on making a Bouquet for mom from paper with your own hands using origami techniques, paper plastic using technological maps.
Materials: colored paper, colored cardboard, glue, scissors, ruler, pencil.

Step by step description of work:
1. Making the base. The basis of our craft is an envelope.
According to technological map No. 1 make an envelope.

1. The base of the envelope is A4 colored cardboard. Fold the cardboard along the color to the inside.
2. Mark the envelope along the fold line (according to the photo).
3. Cut the workpiece.
4. Expand the workpiece.
5. Make the inner marking of the envelope (according to the photo).
6. Using a ruler and scissors, pierce (push through) the fold lines.
7. Bend inward along the inner line.
8. Bend back along the outside line. The envelope is ready!
2. Making flowers.
For flowers, draw and cut out squares 8 * 8 cm.

According to technological map No. 2 start folding the lily flower.

1. The base is a square.
2. Fold the square diagonally.
3. Expand.
4. Fold on the second diagonal.
5. Expand. Number the corners.
6. Connect two adjacent corners on the right (1 + 2).
7. Press in the middle.
8. Do the same with the left side. The base of the flower is ready.
Continue folding the lily flower according to technological map No. 3.

1. Turn the flower base according to the photo. Fold in half, mark the middle (fold line).
2. Bend the front left corner to the fold line.
3. Fold the front right corner to the fold line.
4. Fold back the right rear corner.
5. Fold back the left rear corner. It turned out to be a bud.
6. Having folded the right side of the sheet along the photo, ...
7.… and then the left side of the leaf, it turned out to be a LILY flower!
Make the required number of flowers and buds (we have 4 + 1)

For the middle, cut the yellow paper into "noodles", twist.

Glue to the center of the flower. Ready!

Checkout all flowers.

Leaves. Cut stems and leaves of any shape out of colored paper.

3. Assembling the bouquet. Open the envelope, glue the flower stalks.

Arrange, glue flowers and buds.

Twist the leaves with scissors.

Partially glue the leaves, creating volume. Close the envelope.

Draw a bow on colored paper. Cut outside the outline.

Decorate an envelope with a bow. The gift is ready!

Can be glued on a contrasting base.

Children's works.


I wish you creative success, good mood!
Elena Gadaborsheva
Master Class« Craft from colored paper« Bouquet for mom»
Educator: Gadaborsheva Elena Sergeevna.
Appointment: master-class is intended for children 6-7 years old, educators, parents.
Target: making a gift with your own hands.
Tasks: - to consolidate the ability to work with scissors, glue;
Create a sense of pleasure in making a gift with your own hands;
Develop motor skills, creative thinking, imagination;
To bring up accuracy, patience, perseverance.
The first spring holiday, March 8, is approaching. Every year my children and I prepare gifts for beloved mothers. This year we decided to make these bouquets.
Materials and tools: for the manufacture of we need crafts: colored paper for printer miscellaneous colors, curly and ordinary scissors, glue, a simple pencil, templates for children. Children pick up on their own color for packaging and flowers.

1. We make packaging for bouquet... We take the sheet A4 paper. From it we make a square.
We place the square with an upward angle and bend both corners to the center.


Cut off the edge with curly scissors. We turn away the corners.

2. We make blanks for bouquet: two leaves, five squares 4.5x4.5, a bow, three thin stripes for curls.

3. From green paper cut out 2 leaves and bend in the form of an accordion.


4. Tulips. We make tulips from the squares using the origami method.
bend the square diagonally, we get a triangle.

bend the triangle in half

expand the triangle and bend the corners up and to the side


5. We collect bouquet... Decorate with a bow and curls.


Like these ones bouquets for mummies we did it

Thank you for your attention! Happy holidays!
Related publications:
 Everyone knows that soon we will be congratulating our beloved mothers on Mother's Day. And I suggest you do such an interesting piece of work together.
 We gave our mothers cute bouquets for Mother's Day. We bring to your attention a master class on their manufacture. For their manufacture.
 Let's make a bouquet for mothers, and for grandmothers too. Soon a holiday - Mother's Day. It is on this day that our mothers receive congratulations.
 Dear colleagues! Soon the holiday “Mother's Day!” With which I sincerely congratulate you! In every garden this is a solemn day! Working in the second.
 From 12 to 18 February we celebrate Maslenitsa. Shrovetide is a fun and bright holiday that has survived to this day. Shrovetide is the farewell to winter.
 For a child of younger preschool age, there are many developmental activities. This is modeling, and drawing, and various games for development.