The laundry basket has evolved from being an item of intended use to an interesting and beautiful element of the bathroom interior. The basket fits perfectly into the overall pattern of the interior. It is homemade laundry baskets that best emphasize the features of bathroom design ideas.
Thanks to the skill and imagination of the housewives, baskets are made woven, crocheted, sewn, made of cardboard. A do-it-yourself laundry basket can be a design highlight.

The difference in baskets in shape and material of manufacture
If you wondered how to make a laundry basket with your own hands, you need to wonder about its shape. This is especially important in a small room.

The most common basket option is:

Container. The difference between containers, primarily in their location:
- corner - ideal for a small bathroom. In addition, these places in the bathroom are little used;
- direct - placed close to the washing machine;


Wall basket. The advantage of this option:
- can be hidden from prying eyes in a closet;
- takes up little space in the room.

The basket is foldable. It takes up little space, and can also be folded and put away in a closet.

Weaving material
The most common laundry basket is the wicker laundry basket. Weaving is carried out with different materials:
- rattan - for the most part, this material is found in baskets purchased ready-made.
- grape vine;
- willow vine;
- bamboo;
- newspaper;
- textile material.

The folding basket consists of two elements:
- linen cover - sewn on a typewriter from textiles.
- wooden footboard - you will need a jigsaw and a screwdriver.

To weave a basket from a newspaper, you need to complete the work with final processing to give the material strength and moisture resistance:
- stain;
- PVA glue - necessary to strengthen the paper structure.

When weaving with plastic, plastic glue is used to secure the walls of the container structure.


Tip: decide on the size of the future basket so that it does not become bulky or so small that its use will not be practical. The laundry basket should look harmonious in the bathroom.


The nuances of making a basket
In order not to have to adjust your work, it is better to think about the following tips:
- clothes have weight. Therefore, the structure must withstand the load;
- work must be done carefully. Especially the inside of the basket. There should be no protruding objects that will cling to the laundry and subsequently tear it.
- the walls of the basket must "breathe" because the laundry needs ventilation;
- the basket must be covered with a lid to prevent dust and dirt from getting on the linen;
- if the bathroom area allows you to make a double basket, then this will allow you to immediately sort the laundry.

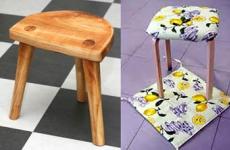
Folding basket
You can sew a laundry basket and mount it on a wooden stand. An important advantage of such an interior element can be a combination of material for sewing bathroom curtains and a basket bag.

The basket takes up little space. If there is not enough laundry in it, it can be folded slightly or removed altogether when it is empty.

Step by step work plan:
- For the base, you need to prepare 4 wooden slats, 2 metal tubes of 40 cm each and 2 tubes of 36 cm each, 10 bolts, 2 nuts. The structure is being assembled. The tubes are painted over at the beginning of the assembly.
- 5 identical pieces are cut out of textiles. The bag is sewn in the form of a square. Removable loops are sewn onto 2 opposite walls.
- The finished sewn basket is attached to the structure.


Knitted basket
For knitting, soft cords are used (more beautiful baskets are obtained) and dense ones (keep their shape better). How to tie a laundry basket is up to you.

The bottom of the basket is knitted first;
- the bottom smoothly passes into the walls;
- a lining is sewn for a basket in the form of a bag;
- basket is decorated.

Basket decoration as a design element
How to decorate a laundry basket can be discussed endlessly. The flight of fancy can only be limited by a harmonious combination with the design of the bathroom.

A funny inscription on the laundry basket will make it a living element of the interior.


You can sew various interchangeable covers with funny animals from pieces of wool and felt onto the wicker base of the basket.

Connect the weave of a plastic basket with the weave of a traditional vine.


A sewn wool basket in the shape of a shark looks stylish and will support the nautical theme of the bathroom. A wicker basket in the shape of an animal looks unusual.

A knitted basket will look funny if the lid is in the shape of an animal's head. For example, a white basket with a monkey's head.

Sewn textile baskets with geometric shapes are always in trend. Bright textiles will only enliven the room.

Both a knitted basket and a sewn one can be decorated with applique or beads along the edge or embroidery.

In the photo of handmade laundry baskets, you can see the variety of baskets and their designs.

DIY laundry basket photo


A basket made of thick cotton: a master class

In order for such a basket to keep its shape well, take really dense cotton or linen fabric for it. Then the basket will turn out to be multifunctional: it can be either put on the floor or hung, for example, on a doorknob.
You will need:
Fabric for the front and back of the basket;
Wide strong braid for basket handles;
Tailor's scissors;
Something round to use as a template (a large dish or tray, for example);
Centimeter;
Pencil or fabric marker;
Sewing machine and thread.
Steps 1-2

Measure the circumference of your template in centimeters and write down the value. Lay the fabric for the front of the basket inside out and, stepping back a little so that you can make allowances for the seams, circle the circle according to the template. Do the same with the fabric for the inside of the basket, add seam allowances and cut out two round parts of the bottom of the basket.
Step 3

To cut out the detail of the wall of the basket, use the measurement taken from the round template. This value will be equal to the width of the wall part. The height of the wall and, accordingly, the basket, choose yourself. Draw the details on two types of fabric, add allowances and cut out the details.
Steps 4-5

Fold the piece of the front side of the wall in half inside out. Pin the short sides with pins and sew. Repeat with the wrong side of the wall.
Steps 6-7

Pin the wall piece to the bottom piece of the same fabric as shown in the photo. Sew the pieces around. Repeat for other fabric pieces.
Steps 8-9

Place the basket pieces right side up inside each other. Pinch off the top edges with pins and sew, leaving an opening to turn inside out.
Steps 10-11

Turn out the basket. Straighten the top seam, pin the layers together and topstitch 5mm and 20mm from the edge (at the same time sew the turning hole). Try on the braid for the basket, cut off two identical pieces for the handles. Pin them with pins, as shown in the photo.
Step 12

Wrap the ends of the braid inside and sew, as shown in the photo. Ready!
Photo and source: abeautifulmess.com
Another version of this basket:

Here, a plain fabric is dyed with paint and a stamp before work.
Fabric basket and hoop: master class

This basket holds its shape with a very large hoop, and you can make it from an unnecessary pillowcase - or sew a bag yourself.
You will need:
A fabric bag, an unnecessary pillowcase or fabric for such a bag;
Large hoops;
Strong thick loop thread and large hand needle;
If you sew the bag yourself - a sewing machine and thread.
Step 1

If there is no finished bag, sew it. To do this, fold the piece of fabric in half face inward and stitch along both sides of the rectangle, leaving the top side open. Finish the seam. Process the top edge by tucking and stitching.
Step 2

It remains to fix the upper edge of the bag in the hoop, and sew a loop on top.
Photo and source: makingniceinthemidwest.com
Another option:

Here the rope loop replaces the eyelet.
Basket braided with cord: master class

This basket is based on a large plastic basket or bucket. The appearance will depend on the cord or rope that you pick up.
You will need:
Large plastic basket;
Rope or thick cord;
Glue gun and glue;
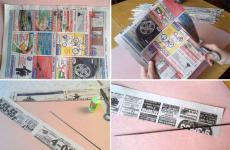
An indispensable laundry basket in the household is a symbol of order in the house. Any self-respecting hostess appreciates these items and, of course, wants to have them at her disposal. Today we will try to make it with our own hands.
For this we need:
- cardboard (any, can be corrugated);
- wallpaper or paper for pasting the bottom of the basket;
- paper tubes (in our case, from a check tape, white and stained with walnut stain);
- PVA glue;
- colorless quick-drying varnish (preferably glossy acrylic);
- fabric for textile insert.

We start by cutting out the bottom of the future basket, we have a cardboard blank measuring 23 x 35 cm. We cut out 2 blanks from cardboard and 2 from finishing paper or wallpaper. We paste the wallpaper on the photo cardboard, and on one of them we begin to glue the tubes.


We glue them with an interval of 1.5 - 2 cm, then we glue the sheets of cardboard together with a photo, be sure to place a load on them so that the tubes are well fixed between the cardboard sheets.


As soon as our future bottom is dry, we begin to form the walls of the basket. All glued tubes are racks and need to be placed perpendicular to the bottom. To do this, we start each tube under the next one from the bottom and bend it up.


Having raised all the racks, we will install a load on the bottom (best of all, a box that imitates the shape of a basket). It is convenient to control the racks on it, it is necessary that they stand straight and do not go to the side.

You can fasten them with clothespins on top of the box with the load. It is better to install this whole structure on a rotating “health disk” (it was produced back in Soviet times), it makes it possible to work freely with each side of the basket.
We start weaving with a regular gray rope. We use 2 colors: gray and white, and the type of weaving is rope. The first 4 rows are one-color. Next, weave with a pigtail rope with tubes of gray and white.

We have a two-color weave 16 cm high, then again weave with a single-color rope to a height that suits.


We make handles on the sides of the basket, raising the wicker rows on the racks to the desired height.


We finish weaving by cutting the racks to the height of the basket.

Now our workpiece must be well smeared with glue diluted in half with water, wait until it dries, but does not harden at all. In this state, you can correct minor flaws and align the walls of the basket.

When our basket dries, we begin to varnish it. It is better to use an aerosol acrylic varnish, it dries quickly and practically does not smell. The basket should be varnished in 2-3 layers.
Now let's start decorating the basket. Cut out the textile lining. The pattern consists of 2 rectangles, the first - according to the size of the bottom, the dimensions of the second - the height of the basket and its perimeter. Do not forget to make seam allowances in the second rectangle. We sew the liner, process the seams, decorate to your liking. On the sides, you can slightly reduce the height of the liner. And now, our basket is ready.

12707
0
0
Laundry basket in the bathroom: 5 materials and 5 interesting ideas for built-in models
Baskets for dirty laundry are an indispensable attribute of a modern bathroom, because it is in it that things are collected for loading into a washing machine or for hand washing. There they are hidden from prying eyes and do not take up much space.
It seems to me that the most important thing is that the baskets are ventilated, fit into the design and are durable. Therefore, in this article I will tell you about the main intricacies of choosing this accessory.
Laundry Bin Materials - Top 5 Solutions
Since the basket is most often located in the bathroom, it must be resistant to moisture and steam, and also protect the clothes that will be inside from this influence, because such an influence on the linen provokes the appearance of mold and an unpleasant odor. Therefore, the most important thing that I advise you to pay attention to when choosing a laundry container is the material from which it is made.

Solution 1: Plastic
Plastic containers, it seems to me, is a win-win option and therefore the most popular on the market. In stores and supermarkets, you can find models of various shapes and colors, you will find different sizes, and the price of goods will not hit your wallet much.
But one of the significant disadvantages of such baskets is just their appearance. Under a luxurious renovation, a high-tech bathtub, modern, minimalism and other modern styles, plastic models will not fit.


But if the basket is hidden in a closet, cabinet or drawer, and it is not visible, then a plastic container is one of the most optimal and convenient options.
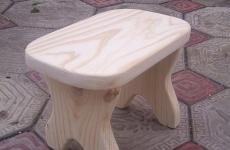
Solution 2: Tree
Given the environmental friendliness of wood, it’s hard to think of a better option for storing clothes than a wicker basket. But I focus your attention on the fact that wooden models must be of high quality, because untreated wood can quickly rot, mold, break.
Such models are suitable not only for dirty laundry, but also for towels, storage of accessories, detergents.

Wicker baskets are suitable for eco-style, Provence, classics and even minimalism, the main thing is to choose the optimal shape of the container and the color of wood that matches the interior. But modern and high-tech with such materials will not look at all.

Solution 3: Skin
But for luxurious or classic interiors, faux leather containers are suitable. They are very resistant and durable, and color and format variations will allow you to fit the model into almost any interior.

Solution 4: Metal
Metal baskets also look solid, they will last for many years without losing their presentable appearance, and will fit perfectly into certain interior styles, such as loft, hi-tech, fusion. Models made of chrome-plated metal “under bronze”, “under copper” and even “under gold” will become a highlight.


Metal containers in the bathroom will in any case be exposed to moisture, so the metal must be treated with an anti-corrosion compound. I recommend choosing stainless steel options.
Solution 5: Cloth
Fabric baskets are environmentally friendly, safe, and very beautiful. Of course, the material must be durable, not thin, so that the clothes are protected from water and steam, and the models must also be comfortable, stable, and roomy.

Fabric models are at the peak of popularity today, thanks to the creative ideas of designers who create masterpieces for your interiors. Bright prints, unusual shapes will fit into high-tech, modern, loft, in a word, almost all modern and not quite classic interior styles!

Types of containers by type of installation
The most common baskets are floor-standing. They are mobile, placed directly on the floor and can be transferred to any other place in the room.
Baskets can have additional advantages, for example, models with additional shelves not only allow you to store dirty laundry, but also place the necessary things and accessories. And this is an additional space saving.

Floor models can be folded. I really like these because they can be folded and hidden at any time, especially after washing. Most often, such a solution is made of fabric and wood or metal.

A difficult question is always the choice of the spaciousness of the goods, because you want more space for linen, especially for a large family. But in a small bathroom, this option will take up too much space.
If you dwell on floor models, then a corner basket will do, it will take up less space than a regular one, but will be more spacious.

In addition to floor models, wall-mounted ones are also distinguished, they save more space. Wall-mounted laundry containers are very convenient to install near the washing machine (but only if such a solution fits into the interior). In general, if the bathtub is compact, it seems to me that any place will suit the container for clothes, because the machine will still be nearby.

Wall models from the Polyp brand are an excellent solution for high-tech style, they not only store things, but also complement the interior

Built-in baskets - TOP 5 ideas
In compact baths, a particularly large basket for dirty laundry cannot be installed, so I recommend going for tricks, especially since modern furniture can easily help hide containers for things from prying eyes.

Ideas for placing baskets in furniture:
- Baskets built into the cabinet under the sink. I believe that the place under the sink must be used wisely, especially in a compact bathroom. In the bedside table under the washbasin, you can install not shelves for accessories and cosmetics, but pull-out laundry baskets. This is especially convenient if the washing machine is located near the sink.

- Baskets in the cabinet. Pull-out or folding baskets in the cabinet will also help save space. Moreover, the cabinet in the bathroom with a laundry basket, as a rule, has other shelves and compartments that are suitable for toys and accessories needed in the bathroom.

- Baskets in a pencil case. The idea of drawers or drawers in a compact bathroom is one of the most ergonomic ways to store things, and dirty laundry is no exception. You can buy a bathroom cabinet with a laundry basket, and the issue of storing dirty things will disappear.

- Baskets above the washing machine. Where, if not near the washing machine, it is most convenient to place containers for dirty laundry. This can be done in several ways, for example, embed several under the ceiling or attach fabric baskets to the eaves, as in the photo.

- Separate linen closets with sections. A built-in basket in a common pencil case or cabinet, where you can store other things, is not the only solution. The modern market offers special furniture for linen with sections where it is convenient to sort clothes by color. This solution is hardly suitable for compact rooms, but for medium and large rooms it will become indispensable for the owners.

You can also create sections for things with your own hands (if you have several laundry baskets of the right size). The instructions are simple - you can sew or draw words with shades (light, dark, color) on the containers, or attach wooden plates, stickers with a surface for drawing with chalk, etc.
conclusions
Floor, built-in, retractable - there are a lot of laundry baskets today, you can choose the one that will complement the interior, or vice versa, one that will be hidden from prying eyes.