Homemade laundry basket. DIY laundry basket: manufacturing methods. Braid from newspapers
An indispensable laundry basket in the household is a symbol of order in the house. Any self-respecting hostess appreciates these items and, of course, wants to have them at her disposal. Today we will try to make it with our own hands.
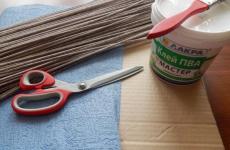
For this we need:
- cardboard (any, can be corrugated);
- wallpaper or paper for pasting the bottom of the basket;
- paper tubes (in our case, from a check tape, white and stained with walnut stain);
- PVA glue;
- colorless quick-drying varnish (preferably glossy acrylic);
- fabric for textile insert.

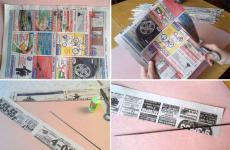
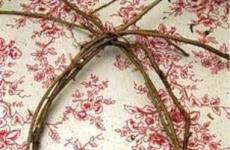
We start by cutting out the bottom of the future basket, we have a cardboard blank measuring 23 x 35 cm. We cut out 2 blanks from cardboard and 2 from finishing paper or wallpaper. We paste the wallpaper on the photo cardboard, and on one of them we begin to glue the tubes.


We glue them with an interval of 1.5 - 2 cm, then we glue the sheets of cardboard together with a photo, be sure to place a load on them so that the tubes are well fixed between the cardboard sheets.


As soon as our future bottom is dry, we begin to form the walls of the basket. All glued tubes are racks and need to be placed perpendicular to the bottom. To do this, we start each tube under the next one from the bottom and bend it up.


Having raised all the racks, we will install a load on the bottom (best of all, a box that imitates the shape of a basket). It is convenient to control the racks on it, it is necessary that they stand straight and do not go to the side.

You can fasten them with clothespins on top of the box with the load. It is better to install this whole structure on a rotating “health disk” (it was produced back in Soviet times), it makes it possible to work freely with each side of the basket.
We start weaving with a regular gray rope. We use 2 colors: gray and white, and the type of weaving is rope. The first 4 rows are one-color. Next, weave with a pigtail rope with tubes of gray and white.

We have a two-color weave 16 cm high, then again weave with a single-color rope to a height that suits.


We make handles on the sides of the basket, raising the wicker rows on the racks to the desired height.


We finish weaving by cutting the racks to the height of the basket.

Now our workpiece must be well smeared with glue diluted in half with water, wait until it dries, but does not harden at all. In this state, you can correct minor flaws and align the walls of the basket.

When our basket dries, we begin to varnish it. It is better to use an aerosol acrylic varnish, it dries quickly and practically does not smell. The basket should be varnished in 2-3 layers.
Now let's start decorating the basket. Cut out the textile lining. The pattern consists of 2 rectangles, the first - according to the size of the bottom, the dimensions of the second - the height of the basket and its perimeter. Do not forget to make seam allowances in the second rectangle. We sew the liner, process the seams, decorate to your liking. On the sides, you can slightly reduce the height of the liner. And now, our basket is ready.

In many stores you can find laundry baskets, without which it is so difficult to manage in the bathroom. Visually, they look like boxes, chests or baskets. However, the price of these stylish and beautiful products can be very high. Meanwhile, a do-it-yourself laundry basket is not such a difficult thing. Or you can just do the restoration of an old piece of furniture to update your bathroom. We will consider various interesting ideas on this topic in this article.
Newspaper basket
A do-it-yourself laundry basket is easy to make, just get:
- newspapers;
- PVA glue;
- scissors;
- ruler;
- Pencil;
- Fine knitting needle;
- Form;
- Stain or varnish.
We make blanks
After that, it remains to strictly follow the instructions:
- On a newspaper sheet, we mark stripes 7 cm wide.
- Cut out the resulting stripes.
- A thin knitting needle is laid on the strip from below. The angle should be approximately 30 degrees. Next, the newspaper strip is wound onto a knitting needle.
Important! Be sure to keep the tube tight. One end should be thinner than the other.
- Apply glue to the corner of the strip.
- It remains to pull out the needle.
Important! You need to make a lot of such tubes in order for the basket to turn out to be of sufficient size.
A do-it-yourself laundry basket for the bathroom is woven from long tubes, so the prepared blanks must be connected together. This is done as follows: a drop of glue is dripped into the wide side of the tube, then the second tube is inserted with the narrow side.

Weaving the bottom:
- Lay out five tubes and press on the right side with a ruler.
- Raise tubes No. 1, 3 and 5 up.
- Apply glue to the remaining tubes, one drop at a time.
- The sixth tube is laid on top of the glue and pressed.
- We lower the workpieces that have been raised up.
- Raise up blanks No. 2 and 4, apply glue to the rest.
- The seventh tube is glued in the same way as the sixth.
- We repeat the steps until ten tubes are glued together.
- We turn the angular end of the tube 90 degrees, weave it with five tubes.
- Weave in a circle, push the blanks so that the bottom has a round shape.
- After the bottom is completed, you should lift the tubes up and insert the mold inside.
Weave the main part:
- When braiding the form in a circle, the tubes are passed alternately above and below the base tubes.
- When the tube ends, the next one joins it.
After the required height is woven, it is necessary to draw the edge.
Edge decoration:
- Any tube is passed through the adjacent one and bent inward. A loop is formed into which a piece of the workpiece is inserted.
- We repeat the steps with all the basics.
- If very long ends remain, they need to be cut off.
- PVA glue is applied to the resulting basket.
- After the glue dries, paint or stain is applied.
Important! With the help of newspaper weaving, not only a simple do-it-yourself laundry basket can be made, but also flower pots, a vase and other interior items.
Basket in the form of a bag
And for those housewives who know how to sew, a do-it-yourself laundry basket made of fabric will be quite capable. But here, for the manufacture of a design for a bag, male help is required.
Making the base
In this case, you will need to prepare:
- Bars 60 cm long - 4 pcs.;
- Holders 30 cm long - 4 pcs.
Operating procedure:
- Using a bolt and nut, we connect two bars in the shape of the letter X.
- We carry out the second same figure.
- The holders are attached to the bases with nails.
- The design is processed with sandpaper and varnished.

We sew a bag
How to make a laundry basket with your own hands? Proceed as planned:
- We measure the frame and cut the fabric. For sewing, five parts are required: four identical ones for the sides, one for the bottom.
- All parts are connected from the inside out and stitched.
- Turn the bag inside out and iron the seams.
- To make buttonholes, the fabric is folded in three and sewn.
- Loops are attached on four sides of the bag.
The resulting basket is very convenient to use.
bottle basket
Plastic bottles are great craft material. This material is lightweight, durable and moisture resistant. After collecting the required number of bottles, we get to work:
- We get rid of the bottom and top of the containers.
- We cut the strips, while cutting in a spiral.
Important! In order to make the work easier, you must first stick an adhesive plaster on the bottle.
- We lay the box that will be the shape, bottom up. We fasten the strips with the help of clothespins.
- Alternating stripes, weave the bottom.
- We bend the sides of the strips up and continue weaving in a circle.
- After reaching the required height, insert the remaining strips into the finished canvas.
- We take out the box that was used for the base.
rope basket
A do-it-yourself rope laundry basket is a great option for those who love creativity. For its manufacture, you will need to prepare the following materials and devices:
- Ordinary plastic laundry basket;
- Cotton rope with a thickness of more than 5 mm;
- Thermal gun.
We act in the following order:
- We glue the tourniquet from the top of the container, then go down in a spiral.
Important! The rope must be pressed well, otherwise, you will have to redo everything from the beginning.
- When the sides are ready, we transfer the rope to the bottom. We continue to glue the material in a spiral.
- The upper edge of the product is decorated with a border, which can be made from a fabric 3-5 cm wide.
- The design dries overnight and is ready for use. If there is a desire, it is possible to make an inner cover made of fabric.
Important! When making a fabric cover, it should be borne in mind that its edge should protrude beyond the basket. Thus, it will be more convenient to fix it. In this case, a cover is first inserted into the container, secured with an elastic band, and then a cotton cord is glued.
According to the same instructions, a laundry basket is made from a box with your own hands.
Cardboard basket
For those who want to decorate their home, a DIY cardboard laundry basket is one of the best and easiest options. For this you will need:
- Cardboard box of suitable size;
- Dense fabric of several colors;
- Glue;
- Cord or rope.
Operating procedure:
- Cut off the top sides of the box.
- Cut out a square of fabric a little larger than the bottom. Usually use a light fabric. Glue the fabric to the bottom of the box inside.
- We cut off long strips, which should be enough to glue the inner walls.
Important! In order for the fabric not to get dirty during the gluing process, it must be rolled up. Unfold a little as you apply glue to the surface.
- Cut out squares from dark fabric for the outer walls of the box. We glue the fabric on two of them, while the edge is bent from above and glued to the inner light fabric.
- Cut out another strip of fabric, which should be enough to wrap the two remaining sides and bottom. Glue carefully.
- Using a knife, cut out holes for the handles.
- The rope is threaded through the holes and secured with knots from the inside.
footage
With your own hands you can decorate any room in the apartment. It does not require special materials or special skills. Usually you can use what seems completely useless - cardboard, bottles, newspapers, etc. Be creative, and your home will be the most comfortable and original!
Bathroom design leaves little room for creativity. Tiles are almost always made in the same pastel colors, and plumbing fixtures are white and only white. Therefore, every detail is important to create a unique and interesting bathroom design. A special contrast can be a do-it-yourself laundry basket.
It seems incredible, but there are different laundry baskets and the usual boxes are just one of the options.
- standard baskets. This is an ordinary plastic box, usually with holes over the entire surface area. They are mainly performed in light shades: white, yellow, beige, etc. A small advantage is the variety of shapes, which allows you to choose something more or less unique. As a rule, standard baskets are made in corners for ease of placement in the bathroom.
- Suspended. These are different kinds of fabric bags. As a rule, they are put on iron frames and hidden in wooden cabinets. This is quite convenient and not noticeable, but such baskets are demanding to care for. Washing should take place every 3-4 days, and the bags themselves should be thoroughly dried at least once a month.
- Designer. This is the most interesting type of baskets. A fairly large number of world-famous designers come up with laundry baskets. These can be shark-shaped cylindrical baskets, wicker baskets with various toys, or various hand-made variations, which we will talk about today.
Types of materials for self-production
Almost any junk that should have been sent to the garage or trash can can make a basket truly unique. The most popular craft items are:
- Plastic. Plastic is quite environmentally friendly and light, so such a basket will not release an unpleasant odor, it will not need to be constantly dried and mold will not start in it. Plastic is a very flexible material, so the number of shapes of plastic baskets is almost unlimited. In addition, plastic trimmings or old plastic items that have not been needed for a long time will suddenly find a new life, which is also very nice. But with all this, the plastic is very fragile, and given that the only means of attachment for home designers will be a glue gun, then such a basket is unlikely to last more than a few months.
- Metal. Metal is a much more controversial material than plastic. On the one hand, it is much more durable. But at the same time, the shape of the metal basket will depend on the initial design. The master has the opportunity to change only the external design and interior decoration. On the other hand, poorly processed metal leaves burrs on clothes, and any metal other than stainless steel is prone to corrosion. At the same time, rust spots will quickly move to clothes, which is also extremely unpleasant.
- Tree. The tree is environmentally friendly and beautiful. Wooden baskets evoke thoughts of France. This piece of decor is typical of the Provence style. Baskets can be made from boards or woven from wicker or battens. But the tree must be well processed, otherwise swelling, rotting and burrs on clothes cannot be avoided. Wooden baskets must be constantly monitored and, at the first signs of wood swelling, get rid of low-quality interior items.
- Textile. Textiles are good with a huge selection of colors and patterns. Any whim can be brought to life with the help of fabric printing. For rigidity, cardboard inserts are inserted into the fabric baskets. It is at this point that the problems begin. In the bathroom, constantly high humidity, which means soaking and rotting of the cardboard in the inserts. Rotten or wet cardboard is a breeding ground for mold and mildew.

Required Tools
What do you need to make any piece of furniture with your own hands?
- First of all, this is a glue gun. Without this item, nowhere. Decor elements are glued with a glue gun, the seams are glued and the gaps are covered. This is a fairly versatile item, so the number of operations is limited only by the owner's imagination.
- You can not do without the material for manufacturing. Basically, these are textiles, clotheslines, plastic trash cans and other remnants of economic activity.
- Depending on the material chosen, you will need a forming tool: scissors for paper and fabric, a knife for plastic, a screwdriver and a saw or a jigsaw for wood.
Options and manufacturing technology
There are several basic manufacturing options. By adding a few elements to them, you can get an interesting and unique piece of furniture.
Fabric laundry basket
To make such a basket, you need a frame. As a frame, you can use a metal fine mesh. It is sold in rolls, so after you cut the right amount, the mesh itself will take on a cylindrical shape. The width of the grid specifies the height of the basket, and the length specifies the diameter. You need to focus on the required volumes, on average, a meter of mesh is enough to make a basket with a diameter of 50 cm. You need to look at these numbers, making the basket a little larger or vice versa - smaller.
After the mesh must be fastened with wire. To do this, overlap one edge after another and rewind the mesh with wire along the entire length of the seam. For this, pliers are useful, and all manipulations are best done with construction gloves.

The fastened frame is already sheathed with fabric. A piece of fabric is taken along the same length as the length of the mesh, and twice the width of the future basket. In width, the fabric is folded in half and sewn from the sides. It turns out a cylindrical cover, which is easy to put on the grid. It is better to choose a rough fabric, such as linen or burlap. The mesh will easily break through thin fabric.
After the cover is made. For a lid, a circle is cut out of a cardboard box according to the diameter of the basket. After that, two of the same circles are cut out of the fabric, and the cardboard is simply sewn into the fabric. The basket is ready.

For a clothesline, it is also better to use a frame. The thicker and rougher the rope, the more beautiful and organic the final product will be. As a frame, the easiest way is to take a plastic basket for office waste. Then, with a glue gun, the end of the rope is glued to the bottom of the side wall of the basket and tightly wound row by row on the basket. The rope is constantly glued with a glue gun, otherwise it can easily fall apart after a while.
After the first row is glued, you need to decide whether to do the same in the inner space of the basket. It is better to leave plastic inside, it is more practical and convenient.
The lid for such a basket can also be made from a rope. To do this, on a flat surface, the glued rope should be wound tightly in a row around its own end. After the circle in diameter reaches the desired size, the rope is also cut off: the lid is ready.
It is possible, according to the same principles, to complete the entire basket without tying it to the frame, but then there will be the possibility of the rope breaking up, rotting it from moisture, and many other unpleasant consequences that plastic will protect against.
We have already talked about the disadvantages of cardboard, but if there are a large number of unnecessary boxes at home, then something interesting can be made from such material. To do this, the boxes should be divided into separate pieces of cardboard. After that, glue the identical pieces together to give greater strength to the future structure.

After that, the body of the future basket is assembled. Using a glue gun, a box without a lid is glued from the resulting panels. This box will be the basis of our basket. The corners are additionally glued for strength.
After that, we have three paths:
- Paint the box and decorate the plain surface. For this, a stencil, fabric cutouts, napkins and various beads are suitable.
- Make a fabric cover following the example of a metal mesh basket and use it.
- Paste the inner and outer surface with napkins, and then varnish.
What to choose - everyone decides for himself. The main thing is not to forget about the disadvantages of cardboard. In order to somehow level them, it is better to sew a fabric bag and insert it into the basket. And so that the bag does not ride up, glue 4 Velcro on the bag and on the box with a glue gun. Such a bag will look organic and beautiful in the basket, and if necessary, it can be easily removed along with the laundry.
That's all the simple wisdom on how to make your bathroom a little more beautiful, cozy and unique.
Recently, a laundry basket is not only a practical item, but also a full-fledged element of the interior. It fits perfectly into the bathroom decor. There are both metal and wicker products. Since more and more often the laundry basket acts as a component of the decor, various home-made analogues have appeared in which craftsmen have applied all their imagination and creativity. A laundry box with a lid can be woven, sewn, made of cardboard or crocheted - it all depends on your skills.


Basket types
Linen baskets are classified into types based on their shape. If you are seriously thinking about making your own laundry basket, it is advisable to think over its shape in advance, especially if you are the owner of a small bathroom. So, the most common model is the standard linen container. It differs in the materials involved in the manufacturing process and in the installation method. Corner and straight containers are often installed near the washing machine. The corner model is necessary in small bathrooms, since it is the corners that are most often not used.


Of the homemade products, the most practical is the wall-mounted laundry basket. It is mounted on a free wall or placed in a hanging cabinet. Such a product does not catch the eye when entering the bathroom and does not clutter up the space. Another practical option is a folding basket that looks like a standard container. Such a cover is useful for arranging a small-sized bathroom.


materials
To make a laundry basket with your own hands, the weaving method is often used, so you will need materials suitable for this method to work. In specialized stores, rattan baskets are most often found. This is the peeled and dried stalk of rattan palms. The stems have a flexible structure, which allows a person to give the product almost any shape.


Another popular and sought-after material for weaving a laundry basket is a vine. This is a kind of thin and long stem (most often a stem: herbaceous or lignified). For products, a vine tree and willow are used. From natural materials for basket weaving, bamboo can also often be found. Original products are obtained if you use an ordinary newspaper or textiles in the manufacture. In addition, such baskets are not only unique, but also no worse than those presented in stores. It is worth noting that the materials involved in the process of work require a minimum amount.

Required Tools
There are many variations on the theme of creating laundry baskets at home. After you decide on the model, it is advisable to prepare in advance all the tools required for the job. Their choice will directly depend on the type of material with which to work. But the first thing to think about before you start making a basket is its dimensions. It is necessary that the product fits harmoniously into the interior of the bathroom, and at the same time does not look bulky or impractically small.

For a wooden basket, you will need to resort to a jigsaw and a screwdriver. For a textile product, you need a sewing machine, scissors, thread and a needle. When using paper materials such as newspaper, finishing will be required on the resulting product. This is necessary to give strength and moisture resistance to the laundry basket. Which requires the purchase of varnish or stain. In addition, for gluing a paper structure, you will need an appropriate composition, for example, ordinary PVA. To work with plastic, you need a different adhesive material suitable for plastic.


Production in stages
From newspaper tubes
It is worth replacing, in order to build a laundry container from newspaper sheets, it will take a lot of patience, but the process is extremely exciting. You will need to prepare - a large amount of newspaper. Also stock up on PVA glue, varnish or stain, scissors, a pencil and a thin knitting needle.

First of all, you need to build tubes. To do this, fold newspaper sheets in half and mark seven centimeters on them. Then cut them up. Using a thin knitting needle, twist the resulting strips at an angle of 30 degrees. In the process of twisting, pay attention to one end of the tube - it should turn out to be slightly thicker than the other end. In this case, the tube itself must be sufficiently tight. Then coat the corner with adhesive and leave to dry. Remove the needle from the tube and repeat the procedure until the required number of tubes. In order for the length of the tube to be enough for weaving, it is necessary to glue them together. Put a small amount of glue into the wider edge and insert the tube with the thinner one into it.


To do it, follow the following algorithm:
- First of all, you need to count ten tubes. Lay out the other five tubes in a horizontal line and press with a ruler.
- Lift each odd-numbered tube, and smear the even-numbered tubes with a small amount of adhesive.
- Attach the sixth tube to the areas with glue and press it again. Lower the previously raised tubes.
- Repeat this procedure again, this time lifting the even-numbered tubes. Glue the seventh tube.


- Continue weaving until all ten tubes are glued together.
- Then rotate the uppermost tube, which is horizontal, ninety degrees. In the same way, weave it with the rest of the tubes.
- Continuing to weave in a circle, try to slightly push the tubes apart. This is necessary in order to get a round bottom.
- After the resulting bottom reaches the required size, you will need to bend all the tubes up. For more comfortable weaving - place any shape on the bottom, which will be the basis, helping you to make an even product.

After the bottom is finished, you can start making the side of the basket. After placing the mold, press the tubes against it until they fit snugly. Then start weaving the side parts, passing the horizontal tube over and under the other tubes in turn. If the horizontal tube is not long enough, drop some glue into the end of the tube and slide the other tube through with a thinner end. Having received the required height - finish weaving. Treat the entire resulting basket with an adhesive, then apply a layer of stain or paint with any color you like. The final step will be varnishing the product.

From fabric
To make a practical folding laundry basket, you will need to stock up on a folding frame, thread, cotton fabric and a sewing machine. So, first of all, decide on the required size of the future product, taking into account the dimensions of the folding frame. According to the indicators obtained, cut four pieces from the fabric for the side and one piece for the base of the bottom. Baste all parts or secure with safety pins. Using a sewing machine, join along the wrong side. Turn the resulting bag inside out and, if desired, iron it. Use the remaining pieces of fabric to create loops - cut four pieces and, turning the bag inside out, fasten the loops on the sewing machine.


On a plastic frame
Basket weaving can be based on any available plastic material. For example, a bottle of carbonated drink. In addition, you will need to acquire the following materials: scissors, a ruler, a pen or pencil, a box and a specialized adhesive.

- With the help of electrical tape, it is necessary to wrap the bottle at a slight angle. Next, using scissors or a clerical knife, cut the bottle. It should be a spiral.
- Repeat the procedure with the rest of the bottles.
- Take the pre-prepared box and place it upside down.
- Fix a small amount of plastic strips in the middle. Skip the rest of the strips between them - imitating a checkerboard pattern.
- After you get the base of the right size, lift the strips up and fix with an elastic band or rope.
- Braid the raw edges into the previous finished row.

from the vine
To make a laundry container, you need to acquire the following materials: rods with a diameter of five millimeters and one centimeter, rattan, an awl, a pruner and a sharp knife.
Let's consider the basket weaving step by step:
- Before working with the vine, it is necessary to soak it in cold water for 2-3 hours. Then wrap it in a damp cloth and place it in a plastic bag. The rattan is subjected to the same procedure. Next, on several rods, make an incision of five to seven centimeters at the end of the rods, on others, make a small hole in the middle.
- Having put the awl through the rods with a hole, the vine with a notch is also threaded. A cross should form.
- One side of the resulting cross is wrapped with rattan.
- Using the left side of the rattan, the cross is circled.


- Repeat the procedure using the right side of the rattan.
- At the end of the second round, the rattan is inserted between the rods of the vine.
- Next weave six rows. After that, the vine is cut into sixteen parts and sharpened along the edges.
- After you get the required size of the base of the basket, you need to divide the rattan and the vine into rods, the length of which is seventy centimeters and insert them into the bottom of the basket.
- It is definitely recommended to do another row to fix the base and bend the rods up. This will be the base for the sides of the basket.
- Wrap the upturned rods with rattan until you reach the desired height. To get neat edges, you will need to weave bent rods into the previous finished row.

Modern washing machines require a full load of laundry with a weight of 3 to 5 kg. Therefore, every housewife knows that before filling the machine, you need to accumulate a considerable amount of things. In this case, a large laundry basket is a great helper. You can make such a useful attribute with your own hands from improvised materials. And from which, we will consider in detail in this article.
High basket on wheels
Every family, regardless of the number of people living, needs such a thing as a laundry basket. You can assemble such a roomy item with your own hands using ordinary tools. Also, for work, you will need a wire mesh, a wooden base in the form of a circle, a fabric from which the bag will be sewn, screws and wheels.
From the grid, you need to cut a rectangle with a height that suits you and a width equal to the circumference of the base of the tree. For further bonding, leave small pieces along the skeleton - they will help you when fastening the seam. Then wrap the circle with the short side, leaving an allowance of 6 centimeters. Now carefully fasten the vertical seam formed on the side of the future basket by bending short segments. Next, bend the mesh allowances under the bottom of the structure and fix with screws, attaching to a wooden circle.
It remains to sew a bag corresponding to the size of the basket, and place it inside the structure. Optionally, wheels can be attached to the bottom of the structure. Such a handmade laundry basket will be a nice gift and an original decor in the interior of any room.

Bathroom bag design
For craftswomen involved in sewing, it will be easy to create a folding basket in the form of a large hanging bag with legs. True, a little help from a man will be needed. It's great if you create such a basket together.
To create the base, you need to prepare 4 beams 60 cm long and 4 holders about 30 cm, on which the bag will be attached. We connect two bars with a bolt and nut in the form of an X-shaped figure. To do this, we drill a hole in the middle of each support and fasten them with one bolt. We do the second figure in the same way. Next, the racks need to be connected with holders. To do this, you need to place them opposite each other, and nail the ends of the planks to opposite sides with studs. At the end of the work, it is desirable to sand and varnish the structure. The next step is to sew the bag.
We sew a bag
To properly cut the bag, you need to remove the dimensions of the frame. Next, cut out five parts from the fabric: the bottom and four sides. Connect all the parts and sew from the wrong side. Then turn inside out and iron. If desired, you can sew the lining in the same way. It remains to sew four strong loops to the corners of the bag. To do this, duplicate the pieces of fabric and sew three layers of material. For greater strength, it is desirable to lay several lines along and across the blanks. A do-it-yourself laundry basket for the bathroom, sewn in this way, is very convenient to use. Empty it can be folded and put against the wall or put away in the closet.

Weaving from newspaper tubes
Rattan products are very popular. But this type of needlework has a high price. Therefore, a laundry basket, woven with your own hands from available raw materials, may well take its rightful place and in no way be inferior to the things offered on the market. We will replace rattan with ordinary newspaper tubes.
To create a basket, we will need newspapers, cardboard, wood stain, a knife, PVA glue and clothespins.
Cut out a rectangular shape from cardboard. It will serve as an auxiliary base on which we will weave the bottom of our basket. With a pencil, draw vertical lines at the same distance. Their task is to indicate the location of future racks. We lay out the newspaper tubes in the designated places and fix them with clothespins. The weaving of the bottom will be horizontal. To do this, we fold the free tube in half and, grabbing the extreme rack, weave the next ones, reaching the opposite edge. We leave one part for the rack, glue the additional tube and continue weaving in the opposite direction. After the bottom has been woven, the racks must be raised, the mold inserted and weaving continued in height. At the end of weaving, we bend the last tube and glue it to the woven fabric. The basket can be stained and then varnished. So we learned how to make a laundry basket with our own hands from newspaper tubes.

Amazing thing - bottles
All kinds of products using plastic bottles have gained great popularity. This material is very light, durable and is not afraid of wet rooms. A do-it-yourself bottle-made laundry basket will be appropriate in the bathroom.
Having collected the required amount of containers, you can get to work. Before assembly, the bottom and top of the containers must be cut off. Then, in a spiral, cut the remaining parts of the bottles into strips. One container should make one tape. To facilitate work and more even cutting, you can pre-paste the bottle with adhesive tape. Weaving is convenient to start on a separate box, turned upside down. Use clothespins to secure the tapes to the base. After weaving the bottom, fold the strips along the sides of the box and continue working in a circle. Having reached the required height, bend the free ends of the vertical stripes and weave into the finished fabric. We take out the old box. You can use the bottle basket.

It is not difficult to weave laundry baskets, the main thing is desire and a little patience. Things ready for washing will always have their place.