The structure of the rhizome, tuber and bulb
Laboratory work №1.
Study of the organs of a flowering plant.
Target: study the external structure of a flowering plant.
Equipment: manual magnifier, dissecting needle, shepherd's purse plant.
Progress
1. Consider a flowering plant.
2. Find its root and shoot, determine their size and draw their shape. 3. Determine where the flowers and fruits are.
4. Consider the flower, note its color and size.
5. Consider the fruits, determine their number.
6. Sketch the plant, sign all the parts.
Laboratory work. No. 2.
Introduction to plant cells
(on the example of tomato and onion skin cells).
Purpose: and study the structure of a plant cell.
Equipment: manual magnifier, microscope, pipette, glass slide, bandage, part of the bulb, ripe tomato fruit.
Progress
Exercise 1.
Prepare an onion skin preparation. To do this, separate and remove the transparent skin from the lower surface of the onion scales with tweezers.
Examine the specimen under a microscope. Find the cell membrane, cytoplasm, nucleus and vacuole in the cells. View at low magnification.
Examine the cell at high magnification.
Sketch in a notebook the structure of an onion skin cell and label its parts.
Task 2.
Cut open a ripe tomato.
Prepare a micropreparation from the fruit pulp.
Examine the cells of the pulp of a tomato fruit under a microscope.
Draw the shape of the cells in your notebook.
After viewing, rinse the glasses and put the instruments in order
Laboratory work. No. 3.
The study of the structure of the seed of dicotyledonous plants (for example, beans).
Target: to study the external and internal structure of the seed of a dicotyledonous plant.
Equipment: manual magnifying glass, dissecting needle, dry and swollen bean seeds.
Progress
1. Consider dry and swollen bean seeds. Compare their sizes and external shape.
2. Find the hilum and the seminal inlet. Using a dissecting needle, remove the shiny dense peel from the swollen seed.
3. Find the germ of the seed. Study its structure. Consider the parts of the embryo: two cotyledons, germinal root, stem and kidney.
4. Determine which part of the bean seed contains reserve nutrients.
5. Sketch the seed and label its parts.
Laboratory work №4.
The structure of the root of a seedling (pea, pumpkin). Growth zone (stretching) at the root.
Target: study the external structure of the root.
Equipment: manual magnifying glass, sprouted pumpkin seed (or radish, pea).
Progress.
1. Examine with the naked eye the root of a sprouted pumpkin seed (or radish, pea, bean). Note its length, thickness and color. Locate the root cap at the end of the spine.
2. Pay attention to the part of the root above the root cap and growth zone. Look for outgrowths in the form of a fluff - root hairs. Read from the textbook what they have structure and meaning.
3. Consider the finished micropreparation “Root cap. root hairs. Pay attention to the growth zone (stretching).
4. Compare what you see under the microscope with the drawing in the textbook, draw and make inscriptions.
5. What is common in the structure of the root hair and onion skin cells? What explains the difference in their shape?
Lab #5
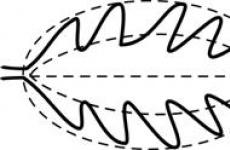
External and internal structure of the leaf.
Target: the study of the external structure of simple leaves.
Equipment: indoor plants: pelargonium, tradescantia, herbarium of birch, oak, lilac and other plants, microscopes, micropreparations "Camellia leaf".
Progress.
1. Consider the sheet. Select the characteristics corresponding to its structure, according to the following plan: leaf type; leaf venation; leaf shape; type of sheet according to the ratio of length, width and the location of the widest part; edge shape. Use a ruler and pencil when doing your work.
A. Sheet type
1) petiolate
2) sedentary
B. Leaf venation
1) parallel
2) arcuate
3) fingered
4) pinnate
IN. Leaf shape
1) cirro-lobed
2) pinnatipartite

3) pinnately dissected

4) whole

G . Sheet type by the ratio of length, width and by the location of the widest part
The length exceeds the width by 1.5 - 2 times
1) ovoid

2) oval

3) back-ovoid

The length exceeds the width by 3-4 times
4) lanceolate

5) oblong

6) back-lanceolate

D. leaf edge
1) full edge
2) wavy
3) serrated
4) double-serrated
5) paddle
Write in the table the numbers of the selected answers under the corresponding letters.
1. Stinging nettle

2.Apricot

3. Monstera

4. Uzumbar violet

5. Hanging birch

8. Plantain


2. Examine the finished micropreparation "Camellia Leaf" - a cross section under a microscope, first at low and then at high magnification.
Find the upper skin, note the features of their structure.
Under the upper skin, find the cells of the columnar and spongy tissue, compare them. Find intercellular spaces and chloroplasts.
Find vascular bundles and identify vessels, sieve tubes and fibers in them
Examine the lower skin with stomata and an air cavity opposite the stomatal opening.
Use your textbook to complete the table.
The internal structure of the leaf.
Fabric types
Features of the structure of cells
1.Integumentary tissue (skin)
2.Column fabric
3.Sponge fabric
4.Conductive fabric
A) blood vessels
B) sieve tubes -
5.Mechanical cloth
Fiber -
Lab #6
External and internal structure of the stem.
Target: to study the structure of the stem.
Equipment: tools, winter poplar branch, houseplant pelargonium.
Progress.
1. At a poplar (or pelargonium) branch, consider the stem. Find nodes and internodes.
At the poplar branch, find lentils and leaf scars.
2. Make a cross section of the poplar stem. Examine it with a magnifying glass. Using figures 55 and 57, find the main parts of the internal structure of the stem.
3. Determine the number of growth rings on the poplar branch. Locate the cambium layer.
4. Make a longitudinal section of the poplar stem. Consider it. Check the hardness of the core, wood and bark with a needle.
5. Separate the bark from the wood. Explain why it separates so easily.
6. Sketch the longitudinal and transverse sections of the branch and sign the names of each part of the stem.
7.Fill in the table:
Textile
stem layer
Features of the structure of cells
Meaning
Wood
Core
Lab #7
The structure of the rhizome, tuber and bulb.
Target: to study the structure of underground shoots.
Equipment: potato tuber, herbarium of a rhizomatous plant (wheatgrass), onion bulb.
Progress
1. Consider wheatgrass and its rhizome in the herbarium. Look for nodes, internodes, scaly leaves, and adventitious roots.
2. Consider a potato tuber. Find his eyes. On what basis did you identify them? Examine the eyes under a magnifying glass.
3. Make a thin cross section of the tuber. Examine it to the light. Compare the cross section of the tuber with the cross section of the stem.
4. Draw a cross section of the tuber.
5. Drop iodine on the cut of the tuber. Explain what happened.
6. Consider the external structure of the bulb. What is the importance of dry scales?
7. Consider the onion cut along. Find the stem and leaves of the bulb. Determine the difference between a bulb and a rhizome and a tuber. Draw a longitudinal section of the bulb and mark the scales, bottom, buds, adventitious roots.
8. Prove that the rhizome, tuber and bulb are modified shoots.
Lab #8
Propagation of indoor plants.
Target: to form elementary skills to cut houseplants.
Equipment: three bottles of water, a scalpel, indoor plants: tradescantia, saintpaulia, metal begonia, sansevier, coleus.
Progress
Stem cuttings
Carefully inspect the shoots of plants: tradescantia, coleus, metal begonia. Note that adventitious roots appear first near the nodes. Therefore, the lower cut must be done under the node. Cut the shoot into cuttings with 2-3 leaves (nodes) on each. Remove the bottom sheet. Place the cuttings in water so that 2/3 of the stems are above the water.
Leaf cuttings
Cut off the leaf blade along with the petiole from Saintpaulia (or gloxinia, bush peperomia, episcia) and put it in water (shallow). Cut a long leaf of sansevera (or streptocarpus) into leaf cuttings 5-7 cm long each. Put them in water (shallow). Do not confuse the top and bottom of the cuttings!
Observation of the development of the roots of the cuttings
Place all vessels with cuttings in a bright, cool place.
After the roots develop, plant the cuttings in flower pots with soil and water them.
Record the observations of the development of the roots in the table:
Plant
Cutting date
Date of appearance of the first root
Date of development of roots 1.5 - 2 cm long
Date of planting in the soil
Lab #9
The study of the external structure of algae.
Target: familiarity with the structural features of algae, learn to establish the relationship between structure and function.
Equipment: water from an aquarium with unicellular green algae; slide and cover glass, pipette; microscope; micropreparation "Spirogyra".
Progress.
1. Prepare a micropreparation from blooming aquarium water, examine it under a microscope, find chlamydomonas, chlorella.
2. Study of the structure of the chlamydomonas cell.
3. Studying the structure of the chlorella cell
4. Examine spirogyra under a microscope, study the structure of spirogyra.
5. Draw the algae you saw in a notebook, sign their parts.
6. Draw conclusions:
On the similarity in the structure of the cells of the algae Chlamydomonas, Chlorella and Spirogyra.
On the differences in the structure of the cells of the algae Chlamydomonas, Chlorella and Spirogyra.
Lab #10
The study of the external structure of mosses.
Target: acquaintance with the external structure of green moss.
Equipment: manual magnifier, water bottle, glass slide, cuckoo flax (herbarium and handout), sphagnum moss.
Progress
1. Study the structural features of green moss (for example, cuckoo flax) - its stem, leaves, box on a leg. Determine if the plant is male or female.
2. Study the structure of the box. Remove the cap. Sprinkle some of the spores on a piece of paper. Examine them under a magnifying glass. Blow a little on the controversy. Note how they scatter in the wind. Make a conclusion about the resettlement of the plant.
3. Compare cuckoo flax with sphagnum moss. Note the structure, shape of the leaves, bolls, branching of the stem.
4. Pour a large drop of water onto a glass slide. Put sphagnum on it. Draw conclusions about what will happen.
Lab #11
The study of the external structure of the fern.
Target: acquaintance with the structure of fern, horsetail and club moss,
learn to identify their features
Equipment: fern herbarium with sporangia, fern herbarium with rhizomes and adventitious roots; fern leaf (growing in the biology room); magnifier and microscope; micropreparation "Sorus of the fern".
Progress.
1. Consider a fern on a herbarium sheet and note the features of its leaves, stem, rhizome and roots.
2. On the lower surface of the fern leaf, find brown tubercles, they contain sporangia with spores.
3. Examine under the microscope "Fern Sorus"
4.Answer the questions: What is the root system of a fern? How do leaves grow? Justify the belonging of ferns to higher spore plants.
Lab #12
Target: the study of the appearance of shoots, cones and seeds of conifers.
Equipment: pine shoots, spruce shoots, pine cones, spruce cones.
Progress
1. Consider the appearance of small branches (shoots) of pine and spruce. State their main differences.
2. Study how the needles of these plants are located. Find shortened side shoots of a pine tree that have needles on them. How many of them are on these shoots?
3. Compare the needles of pine and spruce, their shape, color, size. Studying the structure of cones and seeds
4. Consider the cones of pine, spruce. Point out their differences.
5. Find traces left from the seeds on the scales of the cone.
6.Fill in the table.
signs
Location on the stem
Laboratory work number 13.
Study of the structure and diversity of angiosperms.
Target:
To study the structure of plants of the department Angiosperms. Learn to distinguish between representatives of the classes Dicotyledonous and Monocotyledonous.
Progress:
1. Get acquainted with the structure of the representative of the Dicotyledonous class - wild rose. Determine the main elements of its structure. To study the structure of the wild rose shoot, leaves, flower, fruit.
2. Get acquainted with the structure of the representative of the class Monocots - wheat. Determine the main elements of its structure. To study the structure of wheat shoot, leaves, inflorescence, single flower, fruit.
3. Make a conclusion regarding the structural features of plants of the classes Dicotyledonous and Monocotyledonous.
Laboratory work 14.
Determination of belonging of plants to a certain systematic group using reference books and determinants (classification).
Target:
Familiarize yourself with the principles of constructing dichotomous determinants. Use the proposed interactive guide to determine the systematic position of some representatives of the plant kingdom.
Progress:
1. Familiarize yourself with the image of one of the two plants proposed for identification.
2. By choosing one of the two alternative options, come to the definition of the systematic position of this plant.
3. Define the second plant in the same way.
4. Draw a conclusion from the work done.
Laboratory work number 15.
Recognition of the most important agricultural crops.
Target: learn to recognize the most important agricultural crops, to identify their significance for humans.
Equipment: drawings and photographs of crops.
Progress
1. From the list (1-12), select the numbers of those drawings that depict the most important crops.
№1  №2
№2  №3
№3 
№4  №5
№5  №6
№6 
№7  №8
№8  №9
№9 
№10  №11
№11  №12
№12 
2.Fill in the table.
drawing no.
Name of culture
Significance in human life
Laboratory work number 16.
Study of the structure of fungi.
Target: get acquainted with the external structure of mold fungi.
Equipment: microscope, ready-made micropreparations "Mould mukor", mold on food products.
Progress
1. Consider the culture of molds. Pay attention to the color of the mold, note its smell.
2. Use a dissecting needle to move part of the mold to the side. Note the condition of the food below it.
3.Determine what kind of nutrition the mold fungi have.
4. Examine the fungal hyphae, fruiting body and spores at low and high magnification. Note the coloration of the hyphae and spores. Draw what you see and write the names of the main parts of the mukor.
Lab #17
Recognition of edible and poisonous mushrooms.
Goal of the work: learn to recognize edible and poisonous mushrooms.
Equipment : projector, dummies of cap mushrooms.
Progress
1. Compare the representatives of cap mushrooms:
Champignons and pale grebe.
Edible chanterelles and false chanterelles.
False mushrooms and edible mushrooms.
Gall and white mushrooms.
2. Find the differences between mushrooms - twins.
3. What conclusion can we draw from the laboratory work. (We have learned to recognize edible and poisonous mushrooms, many mushrooms are similar in appearance)
Literature
Biology. Plants. bacteria. Mushrooms. Lichens. Grade 6: lesson plans according to the textbook by I.N. Ponomareva, O.A. Kornilova, V.S. Kuchmenko / ed. T.V. Zarudnaya. Volgograd: Teacher, 2007.
Illarionov E.F. Biology 6 (7) class: Lesson development. M.: Wako, 2003.
Korchagina V.A. Biology: Plants, bacteria, fungi, lichens. Textbook for 6-7 cells. educational institutions. – 24th ed. - M.: 1999.
Ponomareva I.N., Kornilova O.A., Kuchmenko V.S. Biology. 6 cells Plants. bacteria. Mushrooms. Lichens. – M.: Ventana-Graf, 2005.
FIPI. Open bank of tasks of the OGE. Biology.
In our world every second there is a huge number of physical phenomena. To be aware of their nature and meaning, a person must have a good knowledge of physics. This school subject covers many topics. In the eighth grade, students usually go through thermal, electrical, electromagnetic and light phenomena, as well as the states of aggregation of substances. These sections are discussed in detail in the textbook by the author Peryshkin A.V. The edition was reprinted many times, and many people studied from it, both in the Soviet Union and in Russia.
Like many other tutorials, this book is supplemented by a solution book. The collection is extremely necessary for those students who encounter difficulties in considering any issues and in solving problems. It is also useful for eighth graders who understand physics well and need self-examination of knowledge.
How can a solver help?
When used correctly physics manuals for grade 8 (authors: Peryshkin A.V., Shutnik E.M.) can be an excellent assistant in the knowledge of physical science. Using it, a teenager has the opportunity to:
- increase the level of knowledge and skills;
- hone the skills of solving exercises of basic and advanced complexity;
- work on academic performance;
- prepare for the upcoming independent, tests, olympiads, exams;
- increase the authority of the teacher and classmates.
GDZ in physics, edited by Peryshkin A.V. Suitable not only for students, but also for their parents. Adults can use it as a monitoring tool as well as to refresh their memory of school material. In the latter case, mom and dad will be ready to sort out an incomprehensible task with the child. Teachers will also be able to use the resource for professional purposes to develop their materials.
Collector device
In addition to the proposed algorithms for solutions and answers, there are also keys to questions after the paragraph and materials for laboratory work. Such a complex will provide a complete understanding of the 8th grade program and will contribute to the fact that in a year the student will be ready for final tests in the format of the main state exam.
Laboratory work No. 6 on TP
(For example )
Goal of the work -
1. Options for tasks:
| First letter of last name | IOS topics |
| A | Cisco |
| B | Adobe Premier |
| IN | Borland Delphi |
| G | PHP |
| D | flash studio |
| E | Adobe Photoshop |
| AND | Corel Draw |
| W | Visual Basic.Net |
| AND | Visual C# |
| TO | Neural networks |
| L | C++ |
| M | My SQL Server |
| H | 3D Max |
| ABOUT | Adobe Design |
| P | JavaScript |
| R | Windows Vista |
| WITH | Programming algorithms |
| T | Maya |
| At | Window XP |
| F | linux |
| X | MS Office 2007 |
| C | Pascal |
| H | UML |
| W | HTML |
| SCH | Artificial intelligence |
| E | Oracle |
| YU | MS Movie Maker |
| I | Adobe Acrobat Professional |
Guidelines
information and training system
Educational (closed mode)
This mode involves the consistent teaching of the student from the starting position (from the initial level of knowledge) to the end of the training of the entire material.
Corrective mode
This mode involves teaching a student with a thorough analysis of his current level of knowledge in a given discipline, with the possibility of correcting this level.
training mode
This learning mode is in constant feedback from the user, and the entire learning process is based on testing the acquired knowledge.
5.Self-education mode
In the self-education mode, the possibility of automating the formation of information content based on personal characteristics is disabled. The advantage of the self-learning mode is the ability to obtain only the most necessary information of the material, after which the self-education of the user in this area is implied.
6. Exam (checking the level of knowledge in the discipline)
Taking into account the initial, final level of knowledge, personal characteristics, an exam in this discipline is formed. The purpose of the mode is to check the level of knowledge that the user has reached at the end of the training, to set a rating and an assessment.
adaptive mode
The adaptive mode allows you to save the amount of time (about 1.5 - 2 times) for training by adapting the program to the user and his level of knowledge. For example, if the user already knows some educational elements (topics of the educational material) by 70-100%, then the system decides to skip them with a sufficiently high % of quality and an insignificant share of the error of the studied educational element.
learning mode
Working with a learning system based on a learning mode, not only the user acquires new knowledge in the process of working with the system, but the program learns along with him. Tracking the initial level of knowledge of the student, the stages of achieving results, the number of visits, the quality and purity of knowledge, the user's reaction to completing tasks, the depth of questions, as well as other characteristics, the electronic educational and methodological complex replenishes its knowledge base, which further affects its "consciousness » (relationship to the student, to the group of students, decision-making, etc.). Based on this knowledge, the content of the system for the specific user is formed.
Intelligent Mode
The system operating in intelligent mode is based on elements of artificial intelligence. During the user's work with the OS, not only the content and content are formed, but also its semantics and operation algorithm are individual for a particular user, i.e. the system decides the best algorithm for its work, taking into account the characteristics of the student.
Report design
The report must include:
· Title page;
· Introduction;
· Task to perform lab. work;
· Description of the subject area
· Screenshots
· Step-by-step description of the program development progress;
· Conclusion;
· Bibliography;
· Program listing
4. Security questions
4.1 What is an information system?
4.2 Operating modes of training systems?
4.3 Types of demo modes of the program?
4.4 How does the demo mode of the program work?
4.5 Programming technologies in the information and training system?
4.6 Ways to improve the quality of information systems?
Annex A
An example of a description of a training system
Borland Programming Languages: Pascal & Delphi
When the program starts, the Login form appears, allowing you to select a system user from the list in accordance with Figure 9. To download the training system, you must enter a password specific to a particular user.
Figure 9 - Window "Login"
The "Login" button allows you to log in, provided that the password is correct.
The "Register" button allows you to open the registration form to create a new user in accordance with Figure 9.
The "Login as a guest" button is a limited login mode that does not allow you to automatically save the student's intermediate results and adjust his level of knowledge.
The "Delete" button allows you to delete a user by the system, provided that a password is entered.
The "Administration" button opens passwords for each user, which allows you to log in if you forget your password.
The "Analytics" item opens the analytical part: the initial and acquired level of knowledge, the schedule for mastering practical skills and the control chart for mastering knowledge. The initial level of knowledge is the sum (in percentage terms) of the level of knowledge in Borland: Pascal & Delphi. If the user finds it difficult to assess his initial level of knowledge at the time of registration, you can use the entrance testing, which will automatically determine the current level of knowledge.

Figure 10 - Registration form
The Graph of Mastery of Practical Skills shows the dependence of the percentage of mastery on the number of logins and attempts to master the material. The graph traces the quantitative indicators of development and quality indicators in accordance with Figure 10.
The control chart of mastering knowledge demonstrates the dependence of the quality of mastering the material on a specific topic of the textbook. Quantitative quality indicators are formed after passing the control testing on all topics of the textbook, taking into account the development of practical skills and the initial level of knowledge. The graph clearly shows the general level of knowledge on a particular topic. The system analyzes the difference between acquired and initial knowledge.
The value of the general level of knowledge is affected not by the degree of maximum training, but by the difference between initial and acquired knowledge in the process of working with the system.
The main form of the system
The main form of the learning system expands to full screen. The design of the program is made in a classic style with elements of Hi-Tehc style. Loading the form begins with the appearance of an animated screensaver created by means of Shockwave technology in Macromedia Flash Studio 2007.
The main dynamic navigation menu is located on the left side of the screen, serving as a guide to the main sections of the system.
Below is a static navigation menu for system management and additional information.
The dynamic navigation menu consists of theoretical, practical, training and control sections of the system in two directions: Pascal and Delphi. In the theoretical part, in accordance with Figure 11, sections have been added: "Programming" and "Algorithms", which are an extension of knowledge on programming technology.

Figure 11 - Theoretical part of the section "About programming"
In the practical module, tasks are divided into difficulty levels: simple (level A), medium (level B), difficult (level C) and olympiad (level Z).
The system offers to parse 110 tasks, divided into topics and difficulty levels. The learner himself can form his own way of learning.
When opening a task, the task statement and listing are automatically generated. The task button will turn off. This indicates that this task has already been formed and opened. When the system shuts down, the program automatically "remembers" open tasks and subsequently points to it.
For each task, you can see a detailed description of the example, a listing, and a finished compiled application.
In the Pascal simulator in accordance with Figure 12, 25 tasks are offered with the program code missing in two places in the listing, which must be inserted. The system evaluates not only the complete correctness of the answer, but also, in case of incorrectness, calculates the percentage of correctness of the answer, saves it in a list and takes into account the level of knowledge on the graph.

Figure 12 - Practical part. Examples of level A tasks

Figure 13 - Examples of Olympiad tasks
The simulator provides hints for each task. In the case of a correct answer, but with the use of a hint - 1 point less than if the hint had not been used in accordance with Figures 14, 15.

Figure 14 - Practical part. Training apparatus

Figure 15 - The appearance of a hint
The control part is implemented in the form of tests in accordance with Figures 16 and 17. Question and answer options are stored in the database and appear in a random sequence and in a random order. The test is organized in such a way that if the student answers the question incorrectly, the system will automatically offer to go to the theoretical part of the corresponding topic of the question.
The management of the learning process in this system is based on a multi-criteria decision-making model developed in the third chapter.
The testing system does not allow you to load the next question until there is a correct answer to the previous question.

Figure 16 - Control testing

Figure 17 - Training testing
The listing of the diagnostics subsystem Information and training system "Programming languages Borland: Pascal & Delphi" is given in Appendix B.
The information and training system "Programming Languages Borland: Pascal & Delphi" is a human-machine complex that implements scenarios of educational activities and prepared knowledge in a certain way (structured information and a system of exercises for its comprehension and consolidation), operating in an interactive mode and designed to management of learning activities, the purpose of which is to master knowledge, skills and abilities.
An example of a description of an electronic educational and methodological complex in physics “Mechanics. Molecular physics and thermodynamics»
Together with the Department of General and Theoretical Physics of KazNTU, an electronic educational and methodological complex (EUMK) in physics for university students was created. The complex includes an information and training system.
The teaching system consists of two parts - mechanics, molecular physics and thermodynamics. Each part is divided into 5 sections, the names of which are placed on the working panel and are always in sight, forming a complete picture of the subject of study.
The content of the system is hierarchically structured. The top level reflects the main concepts and statements. Subsequent levels detail and deepen the content of the material. The hypertext presentation of information and the navigation system make it possible to optimally navigate through the sections of the textbook, through the levels of educational material and quickly obtain the necessary information.
The illustrative material is presented visually and dynamically in the form of animated cartoon projects and interactive multimedia applications.
The interactive testing complex built into the EUMC is not only controlling, but also teaching. It allows you to assess the level of assimilation of the material (in percentages and points) and, by "working on the mistakes", get the correct answers to the proposed questions.
Tasks are also presented in a "dialog" mode. If the entered answer to the problem is not correct, then a hint is offered in the form of a working formula. After the repeated introduction of the wrong answer, the complete solution of the problem is revealed.
The system is especially relevant during the period of transition to credit technology of education in our Republic.
To work with an electronic educational and methodical complex (EUMK) requires some computer literacy of students and technical equipment of the workplace - the presence of a personal computer with special software: Window 9X, 2000, XP; Microsoft Office 9X, 2000, XP. The screen resolution must be at least 800x600 pixels (recommended resolution is 1024x768). The computer must be equipped with a CD-ROM, headphones or speakers.
The main part of the EUMK working field is occupied by the information output area - text, graphics, animations. To the left of it and at the top right are dynamic and static navigation menus, in the upper left corner there is a button to exit the tutorial in accordance with Figure 18.

Figure 18 - General view of the main window
The dynamic menu allows you to first select the section of physics of interest (mechanics or molecular physics and thermodynamics), and then navigate through its levels and sublevels. It is important that the textbook program remembers every step of your movement. When you click on the "Back" button, located on the left above the text field, it sequentially returns you to the previous positions.

Figure 19 - Sections of physics
To enable animation in the text, click on the corresponding figure. Then the static image will become dynamic, accompanied by a synchronous audio commentary. The “animation” button that appears will allow you to re-view it. To return to the text, just click on the "back" button. The list of all system animations is in the corresponding button of the static navigation menu. An animation hyperlink allows you to call it without entering the text of the tutorial.

Figure 19 - View of the loading window of the first test question

Figure 20 - Window for performing work on errors
Tasks presented in the "dialog" mode are located in the corresponding button of the static navigation menu. After entering the wrong answer to the problem, a hint is revealed in the form of a formula. If again the answer is entered incorrectly, then the full solution of the problem is revealed in accordance with Figures 21 and 22.

Figure 21 - View of the task conditions window

Figure 22 - Window for solving the problem
Using the buttons of the static menu, you can open the content of the EUMC, in which all information is divided into levels and sublevels; reference book with physical constants; calculator, bibliography, author information and help.
The advantage of such systems is obvious. In the age of development of information technologies, their use in distance education is especially important.
1 Serbin V.V., Suleev D.K., Uskenbaeva R.K. Strategy for the formation of the content of the information and training system based on a multi-criteria evaluation model. // Vestnik KazATK. - 2008. - No. 1. - S.288-292.
2 Serbin V.V. Development of a multi-criteria model for evaluating a student's knowledge. // Search log. - 2008. - No. 2. - P.120-126.
3 Serbin V.V. Algorithms for managing the learning process in an electronic educational and methodological complex. // Bulletin of KazNTU. - 2008. - No. 3. - P.164-170.
4 Serbin V.V., Suleev D.K. Development of models for assessing the level of knowledge of the student // Bulletin of KazNTU. - 2008. - No. 3. - P.37-41.
5 Serbin V.V., Uskenbaeva R.K. Making decisions on the organization of the learning process in the information and training system. // Proceedings of the International Scientific and Practical Conference "Information and Innovation Technologies: Integration of Science, Education and Business". - Almaty, 2008. - S.203-208.
6 Serbin V.V. Development of models and algorithms for knowledge management in the information and training system. // International Kazak-Kyrgyz electronics and computer conference. - Almaty, 2007. - S.79-83.
7 Serbin V.V., Mukazhanov V.N., Berikuly A.B. Many-criteria model of Rating knowledge of students in an electronic educational resource. // International conference on "IT Promotion in Asia 2008". - Tashkent, 2008. - S.101-103.
8 Serbin V.V. Modeling the learning process in electronic educational resources. // Proceedings of the regional scientific and practical conference "School Informatics: Yesterday, Today, Tomorrow". - Almaty, 2008. - S.18-22.
9 Serbin V.V. Educational electronic information system in additional education. // Educational-methodical magazine "Out-of-school student of Kazakhstan". - 2007. - No. 1. - P.40-43.
10 Serbin V.V. Technology and methodology for creating an information and training system. // Proceedings of the International Scientific and Practical Conference "School Informatics: Experience, Problem and Prospects". - Almaty, 2007. - S.160-165.
11 Serbin V.V. Implementation of adaptive systems for objective assessment of knowledge with elements of artificial intelligence. // Materials of the IV International Forum "Informatization of education in Kazakhstan and CIS countries". - Almaty, 2006. - S.182-188.
12 Serbin V.V. Elements of artificial intelligence in learning systems for testing knowledge. // Journal "Open School". - 2006. - No. 4. - P.21-26.
13 Serbin V.V. Realization of adaptive systems of objective evaluation of students’ knowledge with machine intelligence elements. // Proceedings of the VI Interuniversity scientific and practical conference "Kazakhstan in the context of globalization." - Almaty, 2006. - C.76-78.
14 Serbin V.V. Implementation of elements of artificial intelligence in electronic educational and methodological complexes (on the example of learning systems for assessing knowledge. // Proceedings of the III International Scientific and Methodological Conference "Mathematical Modeling and Information Technologies in Education and Science". - Almaty, 2005. - P. 202-207 .
15 Serbin V.V., Shotan Zh.Zh., Sadgalin M.E., Afanasiev G.A., Lemeshko A.A. Exam testing program. // Proceedings of the scientific-practical conference "Problems of the development of energy and telecommunications in the light of the strategy of industrial and innovative development of Kazakhstan." - Almaty, 2005. - P.147.
16 Technology, methodology of creation and development of information and training systems: Monograph. - Almaty: AIES, 2010. - 198s.
Laboratory work No. 6 on TP
"Technology for creating an information system"
Goal of the work - develop an information-training system based on the model. Make a demo version of the program.
1. Options for tasks:
Table 1 - Topics of the information and training system (ITS)
| First letter of last name | IOS topics |
| A | Cisco |
| B | Adobe Premier |
| IN | Borland Delphi |
| G | PHP |
| D | flash studio |
| E | Adobe Photoshop |
| AND | Corel Draw |
| W | Visual Basic.Net |
| AND | Visual C# |
| TO | Neural networks |
| L | C++ |
| M | My SQL Server |
| H | 3D Max |
| ABOUT | Adobe Design |
| P | JavaScript |
| R | Windows Vista |
| WITH | Programming algorithms |
| T | Maya |
| At | Window XP |
| F | linux |
| X | MS Office 2007 |
| C | Pascal |
| H | UML |
| W | HTML |
| SCH | Artificial intelligence |
| E | Oracle |
| YU | MS Movie Maker |
| I | Adobe Acrobat Professional |
Table 2 - Operating mode of the information and training system
Guidelines
An information-learning system (ITS) is a human-machine complex that implements scenarios of educational activities and prepared knowledge in a certain way (structured information and a system of exercises for its comprehension and consolidation), operating in an interactive mode and designed to manage learning activities, the purpose of which is the acquisition of knowledge, skills and abilities.
The teaching system should teach, but only the study of theoretical material is not yet learning. Therefore, the learning system is a broader concept than an electronic textbook. It should include theoretical material with examples (i.e. an electronic textbook), as well as tools for developing practical skills for trainees and tools for monitoring acquired knowledge, skills and abilities (a control system and a training program).
The main purpose of training (and, consequently, of the training system) is the acquisition of skills, not knowledge. The mechanism for the implementation of activities is the solution of problems. Therefore, the main part of the training system is training.
Figure 2 - Generalized block diagram
information and training system
The learning scenario in ITS is formed dynamically in accordance with the current situation. Implementation is carried out on the basis of the protocol of the learning process for each learning element.
Consider briefly the purpose of all components:
The user identification subsystem is designed to personalize the student;
The information content formation subsystem is designed to determine and form "portions of information" of theoretical, practical and control modules;
The subsystem of the formation of the level of complexity determines the level of complexity of the studied material;
The diagnostic subsystem is designed to control the knowledge of the student, calculates the level of knowledge of the student according to the super-criteria of the multi-criteria knowledge model, taking into account the level of reaction, doubt, confidence, and other criteria;
The decision-making subsystem is designed to make decisions about the formation of a training sequence, the number of tasks, the choice of difficulty level, etc., thanks to a multi-criteria decision-making model.
In the 9th grade, a colossal load falls on schoolchildren, and physics plays an important role in this. During this time period, students go through topics such as the laws of interaction and movement of bodies, mechanical vibrations and waves, sound, electromagnetic field, the structure of the atom and the nucleus. Each section must be taken seriously. In addition, some students choose it as a subject for the OGE exam.
The vast majority of schools use the classic textbook on the subject by Peryshkin A.V. and Shutnik E.M. These methodologists are known for their textbooks, which millions of people have learned from. In addition to detailed theoretical material, the book also contains questions after paragraphs and exercises to consolidate knowledge. Often, students have difficulty finding answers and solving tasks. In such cases, they can come to the rescue Reshebnik in physics for grade 9 (authors: Peryshkin A.V. and Shutnik E.M.) with pre-made keys.
How is the GDZ collection arranged and how to use it correctly?
The manual contains both detailed algorithms for finding answers to problems and explanations of questions after the paragraph. To find the information you need, just find your number. Among other things, there are also auxiliary materials for laboratory practice and a section for self-examination.
Before viewing the information given, the ninth-grader is recommended to try to solve the task on his own. After that, you can turn to the keys and compare the results. All examples correspond to the Federal State Educational Standard, so there is no doubt about their correctness.
How can homework assignments help?
This edition is designed for students who may not be very good at the subject, but want to get a good grade. The guide will help them:
- qualitatively analyze their activities and level of knowledge;
- fill in the gaps in the material covered;
- improve the average score in the discipline.