How to make a bathroom in a wooden house. Bathroom design ideas in a wooden house Toilet and bathroom design in a log house
We love to go to visit my grandmother, she lives in the village, in a private house. Your garden, farming, nature, in a word, grace. Except one but. The toilet is outside and that says it all. We decided at the family council to eliminate this defect!

Preparatory work for the construction of a toilet in a village house
Except one but. The toilet is outside and that says it all. We decided at the family council to eliminate this defect!
Grandma's house, though old, but made to last! Five-wall, the main room is a chopped log house, and a utility room, warm and quite spacious. It has a gas boiler with water heating function.
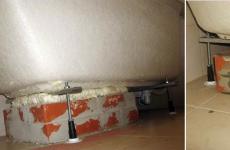
This is where we decided to place the bathroom. The wooden floor has been removed. We freed the room from all the rubbish, in a word, we prepared a front of work!

We decided to make a toilet in a village house measuring 180 by 120 centimeters. Just right, so that the door from the house could open freely and the area of \u200b\u200bthe toilet was comfortable enough for this room.
The base for pouring the base was laid out of white silicate brick, since a lot of it remained after the cladding of the house. They did everything as carefully as possible so as not to damage the ongoing communications.

They decided to level the walls with a ceiling profile for drywall. They installed it using the building level, and fastened it to ordinary “swallows”. We decided not to do all the work twice, at the same time to make the ceiling, but about it another time!

The walls of the future toilet were sheathed with 12 mm drywall. They did it quickly, because this procedure does not cause labor with a prepared crate.
Since the house is rustic, they tried to preserve the style of the rustic interior by using floral wallpaper and inserting a rustic door. By the way, I had to redo the door to the house, when it was opened, it closed part of the doorway to the toilet and created certain inconveniences.
However, if you have a good tool and a little experience, work for half an hour! By the way, have you noticed that she is like a twin brother with a bathroom door?

This is what our bathroom looks like from the outside. We noticed that the floor had changed, we raised it with a concrete screed and the ceiling was lined with PVC panels. Beauty!

Tiles 20 * 30 were glued to the walls, they are usually easier to lay than smaller ones. Grout Ceresit. The floor was not made warm. Grandma still wears slippers, and the room is warm enough in winter.
For laying tiles, they did not prepare a cement mortar, a lot of dirt and troublesome, they simply purchased tile glue and installed the entire tile on drywall. For the floor, they took a mixture for laying tiles. It took about a day to work.

So, in just two weekend visits to our beloved grandmother, we made such a comfortable toilet in a private village house with our own hands!
Now the guests are more willing to agree to stay overnight, all the same convenience without leaving home.
Always remember that our comfort is in our hands!
Well-maintained toilet in a private house in the village - a master class with a photo, Do it yourself
How to make a toilet in a village house with your own hands, see the master class with step by step photos
How to make a toilet in a private house, design and arrangement

Choosing a place for a toilet in a private house
The ideal place for arranging the future toilet is considered to be a finished room like a small pantry. It is desirable that it be located closer to the drain well.
Things are much more difficult when there is no suitable room. Then, to install the toilet, you should find a free corner. There is nothing wrong with the fact that such a place can only be in the kitchen. In this case, a home-made toilet is enclosed with a solid partition, and the entrance is made by cutting through it from an adjacent room, so unpleasant odors will not interfere with eating. In this case, you can use materials such as chipboard, lining, drywall, etc.
Arrangement of sewerage in a private house
Depending on the variant of transportation of sewage and waste, sewage can be:
- pressure (forced);
- non-pressure (gravity).
The pressure structure uses a fecal pump to move the waste. As for the gravity drain, it occurs due to the slope of the pipes. When solving the problem of how to make a toilet in a private house, you can use any option, depending on the circumstances.
Gravity sewer system
The effective operation of such a design can be ensured if the slope parameters are strictly observed - it must be constant and uniform throughout the entire length of the pipe. Most often, during installation, they allow the creation of too steep a slope. The fact is that the very fast movement of drains does not allow them to fill the pipe completely and for this reason the inner surface is poorly washed.

In the case when the slope is less than permissible, the flow speed slows down and this moment is a big drawback. It is necessary to ensure such a ratio between the filling of the pipe and the speed of sewage movement so that self-cleaning occurs during its operation. Otherwise, plaque will appear on the inner surface of the pipeline, preventing the discharge of effluents and contributing to the formation of blockages.
Pressure sewer system
In some cases, the arrangement of a toilet with a gravity sewer is problematic. Laying pipes with a diameter of about 100 millimeters through partitions and walls is quite difficult. Problems can be circumvented by installing a pressure sewer, the main element of which is a fecal pump.
The design of the sewerage system in the house
For laying sewers in a house, polypropylene pipes are a good choice, which are durable, lightweight and able to withstand temperatures up to 95 degrees without deformation. The last advantage comes in handy when a washing machine is connected to this area or someone pours boiling water into the toilet.

Plastic sewerage is assembled easily, as if it were a children's designer. Installation starts from the lowest point, for which the next element is inserted into the socket of the previous part, but before that, a sealant is applied to the end of the fitting or pipe.
Before each turn, at the bottom of the risers and at the place where the sewer exits the house, revisions should be made. If there is a need to combine a new plastic pipe with an old cast iron product, the connection is sealed with a special rubber cuff.
- there is no need to go around the corners, since the pipes will be laid in the shortest way, and this will save materials and time, which means money;
- sewer pipes will not occupy the space at the bottom of the room.
The elements that make up the pressure sewer are connected together by welding or using flanges. Depending on the characteristics of the fecal pump, the diameter of the pipes can vary between 20-40 millimeters. Laying can be done both from the outside, and under the floor or in a wall strobe.
How to make a sewer outside
The design of the toilet involves laying the outer part of the sewer in a trench, the depth of which depends on the climate in the region. Pipes at the same time use different ones - from asbestos, cement, cast iron, plastic and ceramics. The most popular are plastic products, such as in the photo.
Toilet installation

- Usually, in their own houses, the floors are made of wood, so before you make a toilet in a private house, they should be leveled, strengthened and laid with linoleum. When the neck of the pipe is located above the outlet of the plumbing fixture, it must be raised. The podium can be made from a wide board or pieces of timber. If the installation is planned on a concrete floor (for example, on the basement floor), then brick and cement will be required. The wood must be carefully coated with drying oil and painted.
- Most often, the connection to the sewer can be made directly: a cuff with an o-ring is inserted into the pipe, and the toilet bowl outlet is inserted into it. In the case when this is not possible, a plastic eccentric or a corrugated cuff is used.
- Connecting to a fecal pump will not cause difficulties, since the inlet on it is located at a standard height, and everything that is needed for docking is available.
- After the toilet is installed in the place intended for it, and after making sure that it fits securely with the sewer pipe, mark the holes. Then the plumbing is removed to the side and the floor is drilled. A set of fasteners is usually included with the toilet. It consists of self-tapping screws, plastic dowels, washers and decorative caps.
How to make a toilet in a private house: arrangement, design in photo and video
How to make a toilet in a private house: arrangement, design in photo and video
Warm toilet and sewerage system in a village house
Many private houses built in Soviet times did not provide for the installation of a warm toilet, but had only a separate object, which was extremely inconvenient to get to in cold or rainy weather. Therefore, it is necessary to resolve this situation and install a warm toilet with sewerage in a village house on its own.
Choosing a place for the toilet
In order to make a minimum effort for equipping the toilet, it is necessary to find a ready-made room that is suitable for construction standards. It should be a small room, with an area of at least 3 m2 to accommodate the toilet and all necessary accessories. The ideal option would be to place it near one of the outer walls, which will ensure a minimum distance to the cesspool or local sewerage. If such a room is located inside the house and does not border on an external wall, then the implementation of connecting the toilet to the sewer will become somewhat more complicated due to the laying of pipes in the basement.
 wooden toilet and shower with sewerage system
Another option could be to equip a toilet inside a dwelling with the installation of partitions and summing up all communications. The advantage in this case will be the creation of sufficient space and its location in any convenient place. However, in this case, living space will be lost and the implementation of the project will be very difficult.
The main requirements that should be followed when choosing a place for a toilet are as follows:
- Minimum distance to the point of discharge of sewage or to the local sewer system.
- The room should not be located near the place of eating or sleeping.
- It will be possible to freely enter pipes with cold water into the toilet, carry out sewage and equip ventilation.
If sewerage and water supply are introduced into the house, then you can immediately place a bathroom and a bathroom in the same room near the entry point. This will save on installation work and building materials.
The main nuances of connecting to the sewer
Laying the sewer to the toilet is qualitatively divided into two stages: external and internal. External consists in laying sewer pipes to local, centralized or storage systems. Internal involves the installation of piping and plumbing.
 construction of a warm separate toilet with sewerage
External piping should be carried out taking into account the following factors:
- Depth of soil freezing. It has a strong influence on the operation of the sewerage system and therefore must be strictly taken into account. For central Russia, it ranges from 0.8 m. Additionally, protection from stronger frosts should be provided and pipes should be insulated.
- The distance to local treatment facilities should, on the one hand, be minimal, and on the other hand, comply with sanitary and building standards. The minimum distance is 15 m, and the slope of the pipe per linear meter is at least 30.
- The choice of pipe type depends on the heaving and density of the soil. In places of high soil mobility, it is necessary to use cast-iron pipes, and in other cases, plastic pipes are recommended.
When creating internal communications, the main problem will be the choice of how to install the toilet. This is due to the fact that it will require a rigid and durable foundation, which is absent in most village houses, and it is impractical to install on wooden floors for the reason that warm floors cannot be laid on them. Therefore, most likely, it will be necessary to pour concrete floors with all the costs and labor that result from this.
Filling toilet floors
Before carrying out installation work, the room must be completely emptied and cleaned of dirt. This will accurately assess the condition of the walls and ceilings. If there are any defects, they will need to be corrected.
 toilet sewer system
If wooden floors are laid, then they will need to be dismantled. Then, along the perimeter of the room, it is necessary to dig a pit to a depth of 40-50 cm with leveling the bottom and careful tamping. It is important not to damage the main foundation. After that, you need to fill the bottom with a layer of sand, 30 cm thick and carefully tamp or spill it with plenty of water. A layer of crushed stone with a grain size of up to 10 mm is poured over the sand, leveled and rammed.
At the next stage, you need to bring the sewer pipe outside the building through the foundation. This will require the use of a diamond drilling machine to prevent the foundation from losing its bearing capacity due to cracking or partial failure. The hole diameter must be at least 100 mm. The depth of the exit of the outer part of the pipe from the outside must be below the freezing level. Indoors, the height of the pipe should be 15-20 cm higher than the floor level. To prevent foreign objects from entering the pipe, it must be closed on both sides with a tight plug.
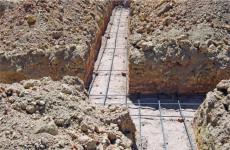
Then, overlapping waterproofing material is laid at the bottom of the trench with careful sealing of the joints. After that, a reinforcing mesh with a rod diameter of 4-6 mm and a mesh size of more than 5x5 cm is laid. A solution of M300 grade concrete is poured over it. Thorough mixing will be required to remove air bubbles. The surface must be carefully smoothed. Until the solution solidifies, they measure the places for attaching the toilet bowl and insert vertically steel pins with a thread cut from above into them.
After that, a system of electric underfloor heating is installed on the prepared surface, taking into account all the recommendations of the manufacturer. If a heating water circuit is implemented in the house, then it is possible to connect a water circuit instead of an electrical system, but at the same time, the heating of the toilet will be noticeably slower, and the height of the floors due to pipe laying will be about 5-10 cm higher, depending on the laying technology and the diameter used pipes.
On top of the warm floors, a screed is made and tiles are laid.
Wall and ceiling insulation
Prepared walls for repairs must be marked for installation of battens for drywall sheets. The distance between the nearest rails is chosen so that it is from 1 to 1.5 m and the crate is evenly spaced along the walls. It is advisable to use special metal profile rails. They are placed in a strictly vertical position close to the wall and fixed to self-tapping screws at intervals of 15-20 cm. Then the entire surface of the walls is laid with a waterproofing film overlapped at intervals of 15 cm and glued with a special adhesive tape or adhesive tape. Mineral wool is tightly laid inside the gaps between the slats of the crate. A vapor barrier layer is laid on top of the mineral wool layer, similar to a waterproofing layer. If the walls are thin, then you need to additionally lay soundproofing material. Then, drywall sheets with a thickness of at least 12 mm are installed end-to-end, the joints are smeared with putty and the surface is leveled. The ceiling is insulated in the same way, only thinner sheets of drywall with a thickness of up to 8 mm are used.
 connecting a separate toilet to the common communications system of a private house
After that, the inner surface of the walls and ceiling is plastered, and then laid out with tiles or finished with waterproof plaster.
Toilet installation
The installation of a toilet bowl in a wooden house is carried out directly on steel pins pre-installed in the floor at the time of pouring the concrete floor. To do this, it is necessary to lay a dense cork or rubber gasket at the installation site to ensure tight contact of the toilet heel with the floor surface. Then the toilet bowl is taken, placed on top of the gasket and the bolts are tightened. The main thing at the same time is to observe the same clamping of the nuts in order to prevent distortion and damage to the heel. Therefore, the nuts must be tightened alternately while tightening about half a turn. The moment when the toilet became completely stable and motionless, indicates its correct installation. Then, a drain tank is mounted on special fasteners on the surface of the bowl.
The toilet is connected to the sewer pipe using a corrugated flexible hose with rubber seals. The outer part of the connecting joints must be coated with a silicone-based sealant. After that, the toilet bowl can be connected to a pipe with cold water, which should be stretched from the nearest point.
Laying external sewer pipes
A toilet in a wooden house with sewerage involves connecting the toilet to already laid internal communications and will not require external work. Otherwise, it will be necessary to carry out earthworks and, possibly, install local treatment facilities or connect to a centralized system.
 construction of a separate wooden house for the bathroom
Digging a trench is carried out in accordance with the scheme for laying an external sewer system, which was thought out at the planning stage. Its depth should be at least 0.8 m, and the bottom should have a slope towards the wastewater discharge at an angle of 30 per linear meter.
A sand cushion with a thickness of 30 cm is laid at the bottom of the trench and carefully leveled and compacted. Then, from the pipe brought out from the house, a sewer system is laid directly to a local or centralized sewage discharge point. For laying, it is desirable to install metal-plastic pipes with a diameter of more than 100 mm and as long as possible in order to minimize the number of joints and reduce the likelihood of leaks.
When all pipe communications are connected, it is necessary to check the functionality of the toilet. To do this, open the water supply to the tank, monitor the degree of its filling and, if necessary, immediately adjust. Turn on the underfloor heating system and set the required degree of heating. Then they drain the water from the tank and inspect all the joints of the pipes and the joints with the toilet. If any deficiencies were found, they are immediately eliminated. External communications are examined in the same way. In the absence of leaks, the insulation is installed on top of the external sewer pipes, and then the trench is buried.
Warm toilet with sewerage in a village house
Many private houses built in Soviet times did not provide for the installation of a warm toilet, but had only a separate object.
How to make a house
DIY rustic toilet: types, construction options
 Recently, people often began to buy country plots to build a cozy house, a bathhouse on them. All this people do in order to come there on vacation or on vacation. As a rule, the first building after the acquisition of the site is a toilet. We can somehow manage without a house, a bathhouse and a shower, but there is no such building as a toilet.
In most cases, a rustic toilet is the first experience in construction. It is good that the village toilet is not a complicated structure and a person even without experience in construction can cope. Although the village toilet is not considered a complex building, there are some nuances that need to be considered.
 Construction of a village toilet
So, how to build a rustic toilet:
- You must select the type of toilet;
- It is necessary to determine where the latrine will be located;
- It is necessary to determine the dimensions and select materials for construction;
- Start building.
And now we will analyze each stage in more detail.
Village toilet type
Before you start building a toilet, you need to decide on its type. And this is not about the house itself, but about its internal structure.
There are several types of rural toilets.
 So, according to the type of device, they can be divided into groups:
- With a cesspool device;
- No cesspool.
In the event that the groundwater level in your area is higher than three and a half meters, then your choice is limited to a device toilet without pit. Such restrictions apply to places where there are natural cracks or soil of shale rocks.
Consider the option of a village toilet with a cesspool.
With cesspool
 If you chose pit toilet, then it must be borne in mind that the depth of the pit should be one meter less than the groundwater level.
The volume of the pit depends on the number of people and the frequency of visits. For example, if your family consists of 2 or 3 people, then a pit with a volume of one and a half cubes will be enough for you.
If you want to equip a toilet in the country, then the volume of the cesspool can be made smaller.
 The shape of the container can be any, but most often it is made square, in rare cases round.
The walls of the container can be lined with brick, concrete, rubble masonry, wood that has been treated with resin.
The container is also made of concrete rings, but in this case, the bottom and joints must be sealed with special compounds so that there are no leaks.
 The cesspool must be equipped with a ventilation system. That is, a large-diameter pipe is installed in the pit, the second end of the pipe (it should be 50-70 cm above the toilet roof).
Also, a window for ventilation is made in the toilet itself, it can be located above the door or one of the side walls.
If the pit is filled with more than two thirds of the volume, then the contents are pumped out using special equipment.
Exists two types of organization of the drain pit This:
 Ordinary. The pit is located directly under the house;
Backlash - closet. The pit is on the sidelines. With this option, you can also place the toilet in the house (make a warm village toilet), and all the sewage will drain through the pipes (which are laid at a slope), then falling into the tank.
 The backlash-closet device is suitable for a house in which people live permanently, but for a summer residence this option will be too expensive.
When installing a backlash - a closet, it will be necessary to equip full ventilation, provide a supply of water for flushing, and drain pipes must also be laid lower than the soil freezes through. And the cesspool is lowered lower, because the drain pipes must have a certain slope (2-3 meters).
Without cesspool
A toilet without a cesspool is built faster, since all waste accumulates in them in an airtight container (it is placed right under the toilet seat) The difference is in how waste is processed and odors are neutralized.
Exist the following types:
In this case, a container with peat, sawdust, ash, earth or a mixture of the above components is placed in the booth.
This name arose because the waste is, as it were, powdered with the above powders.

A kind of powder is a closet; crushed peat is used to sprinkle waste.
These types of toilets are also produced on an industrial scale.
Industrial peat toilets are similar to cistern toilets, but the cistern is not filled with water, but with peat crumbs.

In such a toilet, waste is poured into a container in which a solution containing microorganisms is poured. These organisms are engaged in the processing of waste.
Such booths are often installed in public places.
Dry closets are sold together with plastic cubicles, as well as separately (toilet with a container)

This type of toilet is very similar to a dry closet, but chemicals are used to process waste. Such substances are produced in the form of tablets or powders. Waste treated with chemicals cannot be used as fertilizer. Waste from such a toilet can only be drained into the sewer and this should be done periodically.
The positive qualities of pit latrines are obvious:

Such toilets also have negative qualities:
- Industrial toilets are not cheap;
- There is a need to change the tank;
- It is necessary to monitor the availability of means of neutralizing waste.
Installation norms
These regulations are necessary in order to limit possible contamination. And so the rules are:

And so on the site plan it is necessary to choose a place that will satisfy all the requirements.
Norms required for all types of toilets:

How to make a rustic toilet with your own hands?
You have already taken the initial steps, these were the choice of the type of toilet and its location. The next step is to choose the size of the toilet. It will not be difficult to determine these parameters. We have already described to you how to determine the volume of the cesspool you need (for 2-3 people, the volume of the pit should be 1.5 cubic meters).

 Most often, toilet houses are made of wood. But a rustic toilet house can also be made from other suitable materials, such as GVL, fiberboard, etc.
Usually the roof of a village toilet is covered with slate. Such material is relatively inexpensive and lasts quite a long time.
But for the roof of the toilet, you can take another suitable material, since the roof is fixed to a solid crate.
The final stage is the construction of a village toilet.
If you are making a pit latrine, make a pit first.
Consider how to make a cesspool.
 First of all, a pit is dug in a suitable place, with dimensions 30-40 centimeters larger than the future drain pit.
Then clay is laid on the bottom and rammed. The layers must be laid without voids, this is necessary so that sewage does not fall into the soil.
Then the bottom and walls are laid out of brick, buta or wood impregnated with resin. The most important factor is that the walls and the bottom should not let moisture through, so the walls of the pit are plastered and coated with special waterproofing agents.
 Soaked clay is laid between the walls of the drain pit and the soil.
Then a ceiling is laid on top of the pit, it is made of boards.
Two holes are left in the ceiling, for the toilet seat and for the hatch.
The hatch for pumping out waste is made double so that unpleasant odors do not penetrate outside.
 Next, they are engaged in the installation of a ventilation pipe and only then they build a toilet house.
You can buy houses for the toilet ready-made or build it from wood, making it rectangular in shape with a pitched roof, with your own hands.
 If you do not want to strain yourself with a waterproofing device, masonry walls and bottom, then you can easily install a plastic tank (septic tank) in the pit. Such tanks are produced in different sizes and designs.
Well, in this article we told you about how to build a rustic toilet on your site with your own hands. Good luck!
How to build a rustic toilet with your own hands: types, norms
Construction of a village toilet. In this article, we will consider the types of rustic toilets, as well as the nuances that must be considered during construction and installation.


The location and layout of a bathroom in a country house or in a wooden house has no fundamental differences in comparison with houses made of other materials. The features are in the ways of laying engineering communications, in the nuances of finishing the floor and walls, in a more thorough study of ventilation issues to maintain a normal level of humidity. Read more about how to make a bathroom in a wooden house in this article.

Ventilation for a bathroom in a wooden house is especially important Source topdom.ru
Communications
There are two options for the layout of water pipes in a wooden house - upper and lower.
In the first case, a storage tank is used at the top "point" of the house - in the attic. This option has such a feature as mandatory insulation of the attic and storage tank. But there are also advantages - the possibility of gravity water supply, the presence of an emergency supply of water, hidden horizontal laying of pipes along the ceiling.
With the lower wiring, pipes can be laid in an open way or covertly - under the floor. The open method is simpler and provides control over the condition of the pipes and the tightness of the joints, which is important for pressurized water supply in the event of leaks. Hidden laying is more aesthetic, but there is no visual control, and during installation it is necessary to take into account seasonal changes in humidity and the reaction of the wooden structure to this. And here a certain degree of freedom in the location and fastening of pipes is necessary:
if the pipes pass in the walls and logs through through holes, then they must be of large diameter with elastic seals that would not interfere with their displacement;
if the pipes are mounted in the basement on suspensions, then they should not be rigid.

Installation of sewerage and water supply is one of the first types of work. Source mendig.ru
On our website you can find contacts of construction companies that offer the service of design and installation of sewerage and water supply. You can directly communicate with representatives by visiting the exhibition of houses "Low-Rise Country".
When laying hidden water pipes, it must be taken into account that the water from the well (or from the collective village water supply system) is rather cold, and this creates the prerequisites for the occurrence of condensate and moistening of the logs, beams, and other wooden elements of the building envelope. Therefore, it is imperative to provide for the insulation of the water supply along the entire length of the horizontal wiring under the floor in the bathroom of a wooden house, and the vertical part if the pipe passes through the wall cladding.
Sewer pipes do not experience such large "internal" loads as pressure water supply, but the strength of the connection between themselves and with fittings is not as high. Therefore, they can only be rigidly attached to a solid base that is not subject to shrinkage. And in a wooden house, it can only be a strip foundation or a concrete floor slab on the first floor. In all other cases, fastening to wooden structures should ensure the "mobility" of the pipe without violating the tightness of the joints.
 Source nl.decorexpro.com
Floor and waterproofing
Regardless of the type of finish, the floor in the bathroom of a wooden house must be waterproofed. This applies to both the first and second floors.
Attention! Bathrooms on the second floor and attic should be located only above the bathroom on the lower level, but not above the living quarters.
Rolled waterproofing is considered the most reliable for the floor. If the house stands on a monolithic reinforced concrete foundation, and a reinforced concrete slab is used to cover the first floor, then the bathroom floor is waterproofed over a leveling screed using standard technology. For wooden floors, other rules apply:
moisture-resistant plywood or gypsum board is chosen as the basis for laying waterproofing strips;
standard sheets are cut into four parts;
screw plywood (GKL) with self-tapping screws to the subfloor, observing gaps between parts of 3-4 mm and shifting the rows relative to each other;
the seams are sealed with an elastic sealant;
polish the surface;
treated with a moisture-resistant primer;

Such a "pie" is obtained by laying tiles in the bathroom of a wooden house Source stroim24.info
rolled waterproofing is laid (the strips overlap each other by 15-20 cm and go onto the walls by 10-20 cm);
along the perimeter, a damper tape is attached to the walls, which will ensure the mobility of the floor (“floating” technology, without rigid fixation to the walls);
a leveling thin-layer screed (up to 30 mm) is poured with fiberglass mesh reinforcement.
Attention! Only a "floating" subfloor meets the requirements of laying tiles on a wooden base.
Instead of tiles, when arranging the floor in the bathroom of a wooden house, a massive board is often chosen (so as not to violate the "integrity" of the overall design). To do this, logs are laid on top of the waterproofing in a “floating” way (without rigid attachment to the base and walls), and so that they do not move during installation, they are fixed between themselves with transverse bars. The distance between the ends of the log and the walls must be at least 10 mm, and the laying step depends on the thickness of the floorboard. As a coating, if you do not consider such exotic moisture-resistant woods as teak, it is better to use larch, which is not afraid of high humidity and open contact with water. You can also choose a heat-treated board - the same larch or any other domestic wood species.

Heat-treated boards are distinguished by their characteristic colors. Source bs42.ru
Of course, heat treatment reduces wear resistance, but a bathroom in a wooden house needs more flooring resistance to high humidity.
Attention! Logs and floorboards without heat treatment must be impregnated with an antiseptic solution.
Instead of an array, you can use an engineering board with a protective paint layer already applied. And instead of tiles on a leveling screed, you can lay a parquet board and even a moisture-resistant laminate. But in any case, the connection of the floorboards to each other should take place according to the “thorn-groove” principle with the obligatory treatment of the seams with water-repellent mastic.
Tiled walls and waterproofing
With the complete finishing of the bathroom in a wooden house with tiles, you will have to additionally build false walls around the entire perimeter. The design is not new and is used when leveling walls with drywall in brick houses and city apartments. There is only one difference - the use of a sliding fastening of the frame (battens) to the main walls and partitions. This method is necessary so that the shrinkage of the wooden walls of the house does not have a destructive effect on the interior tiling.

The principle of operation of a sliding mount Source iobogrev.ru
The technology is well-established for both wooden beam battens and a metal profile frame for drywall installation - there is even appropriate fasteners produced specifically for such purposes.
If you do not tile all the walls of the bathroom, then the most difficult part is the bath, shower and washbasin area. In this case, a combined wall decoration is used, which can be on the same level when tiles and wood paneling are attached to a common frame. But it can also be on two levels, when the inner surface of walls and partitions does not need decorative finishing - for example, in houses made of logs or glued beams.
This part of the waterproofing of a bathroom in a wooden house can have different schemes.
With full wall cladding with moisture-resistant drywall, coating waterproofing can be performed over the entire surface, or only in the bath, shower and washbasin areas.
With a combined finish, such work is needed only in the indicated areas.
Important! For waterproofing, special polymer-cement mixtures are used. The use of bituminous mastics is not recommended due to their high fluidity.

The choice of mixtures for creating a waterproofing layer is quite wide Source lyuksstroy.ru
But even in the case of complete waterproofing of the floor and walls, the ceiling in a wooden house remains unprotected from high humidity. And the use of suspended structures or a stretch ceiling only worsens the operating conditions of a wooden floor - without good forced ventilation, warm air saturated with water vapor will moisten it.
Wooden walls of the bathroom
If the bath and sauna are sheathed with wood, then the bathroom in a wooden house can also be finished in this way. And if conifers are not recommended for a steam room, then for the bathroom, and even more so for the toilet, there are no such restrictions - not the same temperature conditions.
To finish the toilet in a wooden house, you can use any natural wood cladding board - lining, imitation timber, block house.
As in the case of the floor, here it is necessary to carefully treat all wooden structural elements with antiseptics and the presence of a ventilated gap on the “wrong side” of the sheathing. It is even better to use heat-treated wood, which, thanks to its “closed” pore structure, is highly resistant to high humidity, even in direct contact with water.
Video description
For examples of original solutions for finishing a bathroom in a wooden house, see the video:
Conclusion
A bathroom in any house, and especially in a wooden one, is the most difficult room in terms of laying communications and finishing technology. Even the kitchen does not have such harsh operating conditions, characterized by significant changes in humidity and air temperature.
Forced exhaust ventilation plays a particularly important part in the arrangement of a bathroom in a wooden house - comfortable conditions, the service life of finishing materials, the safe operation of lighting and electrical appliances depend on its effective operation. Therefore, the design of the bathroom and its arrangement should be handled by experienced professionals.
August 2, 2016Specialization: a professional in the field of construction and repair (a full cycle of finishing work, both internal and external, from sewerage to electrics and finishing work), installation of window structures. Hobbies: see column "SPECIALIZATION AND SKILLS"
A warm toilet and sewerage in a village house is the dream of every summer resident. And this is quite understandable: if a person at least once in the rain ran out into a wooden structure standing near the fence, then he will definitely appreciate the benefits from the bathroom located in the house itself.
In principle, the arrangement of the toilet is not one of the most difficult tasks. Having studied the specialized literature and developed a suitable project, it is quite possible to implement it with your own hands. Of course, you will have to work hard, but in one season you will definitely cope.
Circuit diagrams: 2 options
At one time, thinking about how to build a warm toilet in a private house, I analyzed several projects of such structures. By and large, they all came down to the implementation of one of two options:

In terms of comfort - not the best solution
- We make a classic bathroom with a water supply, a toilet bowl and the removal of wastewater through a pipeline into a storage tank - a cesspool or. A variation of this option is to connect the sewer circuit to a centralized sewerage system, but in the private sector, where my house was located, there was no such blessing of civilization.

- We equip a separate room in which we install a dry closet. In principle, for the operation of such a system, there is no need to lay a water pipe: it is enough to install a small washstand for hygiene procedures, and collect drains (there will be very few of them) in a container and pour them into a cesspool on the street.
By and large, the choice between these two options depends on the availability of water supply: if there is a water supply system, or we plan to do it, then we lay in the project a scheme with a toilet bowl and a drain through the sewer pipe. But for a small country house in which we do not spend much time, a dry closet would be a perfectly acceptable solution.

Since in my case the water supply was available, I chose the scheme with a septic tank. However, I also analyzed the options with a cesspool and dry closet in sufficient detail, so in the descriptions I will pay attention to the features of their implementation.
Place for drains
Cesspool
Before you make a comfortable bathroom in a wooden house, you need to make sure that we have where to remove the drains. There are two solutions here - one is simpler, the second is more convenient to use.
A simple solution is to equip a cesspool - a reservoir in which effluents accumulate until they are pumped out by a sewage plant. It is worth making a cesspool if you use the country house relatively infrequently: the smaller the volume of drains, the less often you will have to pump out, therefore, the financial costs will be less.

A cesspool is made very simply:
- We choose a place in the lowland, at a distance of at least 5 m from the wall of the house and at least 12 - 15 m from the water intake points (well or well).
- We remove the fertile soil layer to a depth of about 0.5 m and an area of about 3-5 m2. The excavated earth can be used in the beds, or it can be returned to its place by covering the cover of the pit with turf.
- We dig a pit up to a depth of 2.5 m and an area of 2-3 m2.
- To avoid contamination of soil and groundwater with fecal masses, we seal the bottom of the pit. I would use a 20cm layer of clay laid over three layers of plastic sheeting.

If finances allow, or you want to achieve maximum reliability, then about 10 cm of concrete can be poured over the clay.
- The option with earthen walls is quite viable, but short-lived. To fix the structure, it is better to use a crate of tightly fitted boards (serves up to 10 years). Well, if possible, fold a box of old ceramic bricks: if you believe the experts, then such a pit will definitely serve for 20-25 years.
- From above, the structure is covered either with thick boards or concrete slabs. A hole must be made in the ceiling for a hatch through which pumping will be carried out.

septic tank
The obvious minus of the cesspool is its inevitable overflow. To avoid the need for frequent pumping, I equipped a two-chamber septic tank in my suburban area.

The instructions for making a septic tank may differ depending on its configuration, but since I had the task of implementing the most economical option, I did this:
- First, at a distance from the house and from the well with the installed pump, a pit was dug 2.5 m deep, 3 m long and 1.5 m wide. Since the volume of excavated soil was impressive, I had to involve two assistants in the work, otherwise the work would have been delayed.
- Then, two adjacent chambers of ceramic bricks were built inside the pit. At the same time, the first chamber was folded "solid", and holes were made in the lower part of the second chamber.
In no case should you use silicate brick, which does not withstand prolonged contact with a liquid, especially one as aggressive as sewage. Monolithic concrete chambers, concrete rings for sewer wells and even tires from heavy vehicles can become an alternative to ceramic bricks.
The ideal option is generally to buy a plastic container for a septic tank, but here a rather high price stopped me.

- The bottom of the first chamber - a sump - was covered with clay with a layer of 15 cm, after which I concreted it for maximum tightness.
- In the bottom of the second chamber - the filtration well - I made about a dozen holes with a depth of 0.5 m using an old auger ice drill to improve drainage. Coarse gravel was poured into the holes, and the same gravel was laid on the bottom with a layer of about half a meter.

- An overflow pipe was installed between the chambers at a height of approximately 1.7 m from the bottom.
- In the sump at a distance of 50 cm from the ground level, I made a hole for a drain pipe.
- From above, the entire structure was covered with a concrete slab with holes for two hatches. Separately, I had to drill a groove in concrete to install a pipe 1.5 m high.

The advantage of this solution, despite its complexity, was a long battery life: the effluent entering the sump is divided into fractions, while the clarified liquid is poured into the second chamber, where it is gradually filtered into the ground.
Since I add special bacterial cultures to the septic tank and do not use the country sewerage so often, I have to pump out every three years. And then, to be honest, for prevention - according to my estimates, the system can work for a couple more years without compromising the quality of cleaning.
Pipe laying for the house
Installation in a private house of sewage in general and a toilet in particular involves the transportation of wastewater to a cesspool / septic tank / collector. To do this, we need to lay an underground pipe:
![]()
- From the house to the tank, we dig a trench at least 70 cm deep. The deeper the pipe is located, the less risk that its contents will freeze in winter.
- We make the bottom of the trench with a slope of about 2.5 - 3 cm per 1 m.
- Under the pipes we lay a bed of sand. The optimal bedding thickness is 10-15 cm.
- We lay pipes (we use only products for outdoor work) and carefully seal all joints.
In my case, the pipe went in a straight line, but if you need to make a turn or lay a pipeline with a length of 15 m or more, then it is mandatory to equip at least one revision well. I became convinced of the usefulness of such a structure when I had to help in cleaning the sewers in a neighboring area: it is much easier to remove the blockage if there is access to the problematic point of the pipe.
- We insulate the pipes with mineral wool or fiberglass, then fill them with soil and carefully ram it.

- We pass the pipe outlet into the hole that we left in the wall of the cesspool or septic tank.
- At the entrance to the house, we lead the pipe into the hole in the basement and attach it to the internal riser.
Toilet in a country house
Arrangement of the premises
Making a toilet in a wooden house with our own hands, we often encounter constant humidity in the selected room. You can solve the problem if you approach it as responsibly as possible:

- We choose the room itself in such a way that it is located at the outer wall of the house, as close as possible to the cesspool. So we will save on pipes, and we won’t have to pull communications through the rooms.
- If the bathroom was not originally laid out in the project of the country house, at the first stage we make a partition, separating it from other rooms with a frame wall with plywood or OSB sheathing. To make the toilet really warm, we lay heat-insulating material inside the frame.
- We install a door separating the bathroom with all its sounds and smells from other rooms. To ensure airflow between the lower edge of the door and the threshold, there must be a gap of at least 5 mm.
- We make holes in the walls and in the floor, through which we bring water pipes and a sewer pipe into the room. We fix adapters / taps on the walls to connect the toilet bowl and washstand.

- The floor is either left wooden, covering it with several layers of a waterproofing composition with an antiseptic, or we revet with ceramic tiles.

- We also protect the walls from moisture by treating them with waterproofing or sheathing with plastic panels. In the second case, additional insulation can be carried out by laying foam plastic, mineral wool or a foil-coated polymer sheet under the sheathing frame.
- Under the ceiling, be sure to make a ventilation hole. You can get by with a simple air vent, but I preferred to install a simple electric fan, and brought its power to a separate switch - this made forced ventilation of the bathroom much more convenient.

Option with toilet
As I noted above, it is best to make an ordinary toilet in a private house with a classic toilet and sink. Installation of equipment in a room with communications connected is a fairly simple task:

- First fix the toilet. To do this, we fix a thick board impregnated with a moisture-proof compound with anchors to the floor (wooden or tiled). We put the base of the toilet bowl on the board and fasten it with the fasteners included in the kit.
- We attach the toilet drain to the outlet of the sewer pipe coming out of the floor or wall using a rubber cuff. To seal this node, we use sanitary silicone.
- We install a tank on the base of the toilet bowl, to which we attach a hose for supplying water from the water supply. Connect the other end of the hose to the faucet at the end of the water pipe.

- We hang the sink on the wall in the chosen place. We attach the drain elbow of the sink to the pipe, which is then brought into the general sewer circuit.
- Either on the sink or on the wall above it, we install a mixer. We fasten hoses with hot (from the boiler) and cold water to the mixer outlets.

The whole system we have created will only work effectively if both the toilet and the sink are above the level of the drain. Otherwise, and also if you plan to use the sewer very actively, I would recommend installing an additional sewer pump in the system, which will ensure the forced removal of drains.
Option with dry closet
It is also possible to make a comfortable toilet in the country without a cesspool and internal plumbing. Naturally, this will also have to equip the premises, but the direct disposal of waste will be carried out using biological treatment systems.

To date, there are several types of dry closets suitable for use in private homes:
| Device type | Description |
| compost | Partial waste disposal systems operate either on peat or on a mixture of peat and sawdust. When interacting with fecal masses, the material is effectively composted, and the following portions are poured into the container using an autosampler. Total recycling systems work on a similar principle, but composting is more efficient, and we additionally get a fairly effective fertilizer as a result. |
| Separation | In the waste disposal process, wastewater is separated into a liquid and solid fraction: solid feces are then removed for composting, and the liquid is filtered in a special unit. |
| Thermal | The system requires about 5 kW of power to operate, so you can install a toilet only in houses with a good power supply. During disposal, the waste is burned to ash, and the moisture evaporates through a special condenser. |
| cryogenic | The fecal masses that enter the dry closet are frozen, which allows you to destroy almost all microorganisms and get rid of the unpleasant odor. The downside is the dependence of the system on the presence of voltage in the network, therefore, for a private house, I would not recommend such a device. |

Even if we limit ourselves to the simplest models that run on peat, you can provide yourself with a fairly high level of comfort. However, this system is unlikely to be compared with a full-fledged toilet bowl, therefore I would still advise considering the possibility of creating a full-fledged waste disposal system - albeit based on the simplest cesspool.
Reference materials for budgeting
Getting started, you need to draw up an estimate that takes into account all costs. Doing the basic operations with your own hands allows you to significantly optimize the budget, but you still have to buy materials. At this stage, a table containing indicative prices will help you.
Using the information given in it, you will be able to predict at least the order of the amount that you will need.
| Material | Unit/capacity | Estimated cost, rubles |
| Sewer pipe for outdoor work 110 mm | 1 m. | 125 — 200 |
| Sewer pipe for interior work 50 mm | 1 m. | 75 — 150 |
| Metal-plastic water pipe 16 mm | 1 m. | 70 — 120 |
| storage tank for septic tank | 1 m3 | 18000 |
| Septic tank TANK-1 | 1.2 m3 | 19500 — 22000 |
| Impregnation waterproofing for wood | 10 l | 800 — 1500 |
| Penetrating primer with antiseptic | 5 l | 250 — 500 |
| Waterproofing mastic | 5 kg | 1200 — 1700 |
| Tile adhesive CM 9 | 25 kg | 220 — 400 |
| Grout for tiles | 5 kg | 600 – 1200 |
| Tile budget | m2 | 45 — 90 |
| Medium level tile | m2 | 250 -500 |
| PVC lining for wall cladding | m2 | 150 -250 |
| Wooden beam for the frame | Panel 6 m | 80 — 200 |
| Galvanized steel profile | Panel 3 m | 150 — 350 |
| Sink Rosa Standard | PC. | 850 — 950 |
| Toilet-compact Santek | PC. | 3100 — 3500 |
| Dry closet Thetford Porta Potti Qube 145 | PC. | 4000 — 4500 |
| Dry toilet Biolan (separation) | PC. | 26500 and above. |
Naturally, only some items of expenditure are taken into account here. To implement the project, you will need a lot more materials, including various mortars, sealants, fasteners, fittings, plumbing fittings, etc.
Conclusion
As practice shows, it is possible to make a warm toilet in a village house with your own hands. Of course, this is not a quick business, and it will require financial investments, but if you follow the advice I have given, and also carefully study the video in this article, then everything should work out.
In addition, questions that arise during the design process can be asked in the comments - I will answer you in the most detailed way.
August 2, 2016If you want to express gratitude, add a clarification or objection, ask the author something - add a comment or say thanks!
A cozy wooden house is the dream of many. But everyone knows how difficult it is to properly equip it, especially when you need to think about arranging a bathroom in a wooden house. If until recently a booth stood somewhere on the edge of a suburban area, today modern technologies have done their job, so you can create all the amenities in your home. How to do it right? What should not be forgotten?
The main thing is timely attention
As a rule, the location of the toilet and bathroom in the house is determined at the design stage. When building a bathroom in a wooden house, you need to do it in several stages.
- Arrangement of the sewer system.
- Ventilation installation.
- Implementation of a waterproofing layer.
- Selection and installation of sanitary equipment, accessories.
- Wall, ceiling, floor decoration.
The stages are the same for any cottages - from rounded logs, profiled timber or manual felling.
We follow the rules

A bathroom in a wooden house should be built wisely, since the quality of the work performed depends on how efficiently and for how long it will be used. First, you need to remember that any house made of wood shrinks, since no one has yet canceled the seasonal changes in wood.
Accordingly, in order to drain water, it is best to use pipes made of plastic or metal-plastic, which will not deform under the influence of changed walls or partitions. Secondly, the pipeline must be attached to special clips or clamps with rubber gaskets.
The arrangement of a bathroom in a wooden house is best done on the basis of independent wall technology or a sliding frame, since in this case neither shrinkage nor deformation of the walls will lead to problems in creating a bathroom.
What is a sliding frame?
This system is a self-supporting structure that is independent of the walls and their movement during shrinkage. A frame is pre-created from a metal profile, which is attached with the flat side to the wall. Calculations play an important role.
- We pull the cord along the height of the wall to the bottom: 10 cm should remain from the floor, we retreat 70 cm from the ceiling.
- We make marks along the entire width of the wall. It is on these marks that you will have to be guided in the future in order to install drywall sheets.
- The sheet is stacked so that it goes halfway onto the next sheet.
- Between the ceiling of the bathroom and you need to leave about 40 cm. In this space, you can lay, for example, ventilation pipes or electrical wiring.
- If the walls are made of logs, then the profile is attached to metal elements that are mounted in grooves cut in the logs.
In order for the bathroom in a wooden house to be equipped with high quality, pay great attention to attaching the profile to the wall. It must be mobile - this is the most important requirement. To do this, it is necessary to drill not round holes, but somewhat elongated ones, so that the screws enter them without catching the wall material. The profile is attached to the walls with screws with washers, but you should not tighten them too tightly. This method will make the profile movable and protect it from deformation when the wall shrinks.

How to fix drywall?
After the profile is installed, we prepare the base for drywall sheets. We turn the U-shaped profiles we created into box-shaped ones by attaching the same profiles to them. The box is leveled, the elements are fastened with aluminum rivets. Before sheathing a bathroom in a wooden house with drywall, you should consider the location of the electrical wiring. Pre-drill holes of a certain diameter into which the braid or casing with wires will be inserted. The second ends of the wires must be brought to the junction box located outside. Drywall is fastened with self-tapping screws, then the coating can be finished with tiles.
Floors and ceilings
The floors in the bathroom of a wooden house and the ceiling space must be properly equipped. Ideally, a suspended ceiling should be made, since it can be removed there and lamps can be built into the ceiling itself. As for the floor, it is equipped in several ways. If the base is in the form of a concrete slab, then the floor is laid by analogy with the construction of a stone house. If the floor is located on wooden logs, a different approach will be required.
- On the logs of the floors, a flooring is made of two layers up to 20 mm thick.
- We cover the layers with hydroglass.
- A reinforced screed is laid, inside which a cable or pipes are placed.
- Ceramic tiles are laid.
After the floors in the bathroom of a wooden house are ready, you can proceed with the installation of equipment. Holes for pipes are best made with an oval section to avoid possible deformation of the tree.
Ventilation features

Let's start with ventilation. As you know, wood is a material that is not resistant to moisture. As a result, fungi and mold appear on it, and subsequently the wood is destroyed. To avoid this, you need thoughtful ventilation in the bathroom of a wooden house. Let's make a reservation right away that if you do forced ventilation, then along with the compensation gaps between the air ducts and the walls, you will also need special fans with a high fire protection class.
The best place for ventilation is the attic. Several rules must be followed.
- During installation, contact with wooden structures should be avoided, and only special brackets should be used as supports.
- Ventilation ducts and fan must be made of non-combustible materials.
- Ventilation ducts should only exit through special openings that will protect the system from displacement when the cottage shrinks.
- The ventilation system must have fire dampers.
The arrangement of a bathroom in a wooden house requires attention to the competent supply of electrical equipment. The fan must be reliably protected from moisture.
Features of waterproofing

The material and method of waterproofing should be chosen depending on the quality of the surface to be treated, and on the technical capabilities of the room as a whole. in a wooden house it can be made on the basis of polymer floors, laying roofing material, backfilling a mixture of soil, which is additionally enriched with liquid glass and betonite. But it is not always cheap and environmentally friendly, so most often the floors are waterproofed in the following ways:
- A water-repellent mixture is applied to form an impermeable membrane.
- A roll material is glued to protect the surface from moisture.
In the first case, waterproofing is performed by coating, in the second - by gluing. Any of these methods is suitable when a bathroom is equipped in a wooden one, it assumes that preparatory work is carried out first - the surface is cleaned, cracks are leveled, and so on.
Before laying the waterproofing, the weak points of the bathroom are determined, that is, those areas that are most exposed to moisture. The most problematic areas are the floor and ceiling. In a private house, it is rational and logical to finish them with ceramic tiles that protect against moisture. In this case, waterproofing is carried out in several stages:
- the base is equipped for tiles made of moisture-resistant chipboard or cement-bonded chipboard;
- tiles are laid.
The result is a well-equipped and moisture-proof bathroom in a wooden house. Finishing it will depend on the wishes of the owner of the home, because in most cases they simply save on this room.
When finishing the walls, you should first treat them with antiseptics that will protect the wood from mold and decay. Transparent solutions and impregnations that preserve the natural structure of the tree are best suited for these purposes.

Features of water supply
Finishing a bathroom in a wooden house is the final stage of work, and before it, all systems in this room should be thought out, from ventilation and sewerage to drainage. When building drainage networks, you need to remember that they can not only leak, but also freeze in severe frosts. To prevent such situations from occurring, you need to do the following:
- insulate the base of the floor with a vapor barrier film and expanded clay;
- insulate pipes with appropriate materials;
- install a drain valve.
Finishing Features
A bathroom in a wooden house can have a very different design. Moreover, it can be located not only on the first floor, but also on the second, and all thanks to the development of building technologies and materials. Finishing can be done with various materials: ceramic tiles, mosaics, porcelain stoneware or glue plugs, which are treated with various compositions.
The most traditional and simple is the decoration of a bathroom in a wooden house using a slatted or imitation timber. False ceilings look beautiful, but this is not a cheap pleasure, and it is rational and logical to mount it in a room with a certain design and style. For wall decoration, ceramic tiles are most often used, presented in a wide variety of colors and textures and characterized by moisture resistance and ease of use. If the bathroom has good ventilation, then you can do without finishing at all. The main thing is to treat wooden surfaces with special compounds for wet rooms.
How to attach?

If you buy a standard project or build housing yourself, then a bathroom and a bathroom will be planned at the development stage. However, if you bought an old house and want to add a toilet room to it, this is also possible.
Not everywhere there is sewerage connected to the site. In such cases, the addition of a bathroom to a wooden house will help out. It should be located near a source of water and access to the sewer system. You can not do without good ventilation, so that the level of humidity and unpleasant odors do not go off scale.

The bathroom will be built in several stages.
- The foundation is raised.
- Mounted walls with openings for doors and windows, if any.
- Floor coverings are in progress.
- The roof is being put up.
But the most important question is to plan the location of the toilet in relation to the house. When pouring the foundation, it is necessary to link it with the foundation of the house as efficiently as possible so that the extension does not subsequently crack. This can be done with metal ties. Much attention should be paid to the joining of the walls. You can link them with specially created recesses in the old walls. After these works are completed, the equipment is installed.
conclusions
In the most convenient and efficient operation of the house, each room and its connection with other rooms plays an important role. Close attention should be paid to the bathroom equipment and care should be taken not only about its aesthetics, but also about protection from moisture. In addition, any bathroom located inside the house or outside should be equipped with a good ventilation system.
From the point of view of finishing, the bathroom is the most difficult room in a wooden house. Changes in temperature and humidity harm floor and wall materials; building structures need reliable protection. And it is quite difficult to provide it, especially when the house made of timber is new and still “sits down”.
By tradition, most homeowners finish the bathrooms in their frame and timber houses with clapboard and tiles (tiles are laid in "wet" areas). This article talks about the intricacies of finishing bathrooms in wooden houses.
- Finishing a bathroom in a wooden house: tiles on a floating frame.
- Tiled bathroom in a frame.
- Finishing a bathroom in a wooden house with plastic panels.
- Finishing the floor in the bathroom of a wooden house.
Bathroom tiles in a wooden house on floating rails
The decoration of the walls of a bathroom in a wooden house is perfectly illustrated by the example of FORUMHOUSE. In the house of a FORUMHOUSE participant with the nickname Vikta bathrooms are finished with tiles and larch clapboard.


All bathrooms with windows, all have forced ventilation. When there is forced exhaust ventilation in the bathroom of a wooden house (ideally, if there is also a window), it removes excess moisture from the room and prolongs the life of the finish. A number of errors in finishing with good ventilation will not be fatal, but without it it will.

The tile is laid on two layers of waterproof drywall, fixed on a frame made of metal profiles. Larch was attached to a wooden frame. The log is still shrinking, so all four walls were finished on floating rails. How this is done is clearly shown in the diagram.

In a row of logs with a step of 60 cm, a 50x50 bar was attached to the slot with capercaillie. The slot was made with a margin of 10-15 cm from the capercaillie attachment.
The mount is precisely capercaillie, it is necessary to turn it all the way, but without fanaticism. Along the entire length of the slot, both for the width of the washer and for the depth of the head, the tree was removed with a cutter so that it does not stick out .
The meaning of the floating frame is that the drywall will be able to "slide" through the slots during the possible shrinkage of the house. Therefore, it is recommended to screw capercaillie without fanaticism.
If the house was built a long time ago and does not shrink, then you can not be smart with the slots: it is enough to lay a material like sealing tape between the elements of the house and the frame, similar to that used in frame housing construction and when installing drywall partitions.
Tiles in such finishes are best mounted vertically, it visually raises the ceiling.
A good example of decoration is the bathroom of a FORUMHOUSE user with the nickname Kirsan in the photo below: the upper part is larch covered with sauna tiles, the lower part is a tile with a wood texture. (The bathroom is not yet finished, the gaps are not buried, and the layout is not done).

Bathroom tiling in a frame house
If the house is framed and “shrinkage” does not threaten it, then drywall for tiles can also be mounted on wooden blocks. The wall pie looks like this:
- insulation;
- film (should not touch the insulation);
- frame for fixing drywall;
- two layers of moisture-resistant drywall;
- glue;
- tile.
Such a finishing scheme can only be used in a heated house - the temperature difference for drywall is unacceptable.
Finishing the bathroom of a wooden house with varnish

One of the bathrooms in the log house is a FORUMHOUSE user with the nickname mixail50100 laid out with tiles, and the second, with a shower, finished with varnish.
Finish scheme:
- coat all seams with acrylic sealant;
- treat the entire room with an antiseptic;
- paint with covering acrylic paint;
- apply two coats of varnish.
The floor is tiled, the ceiling is suspended.
Finishing a bathroom in a wooden house with PVC panels
Plastic wall panels, fiber cement aqua panels, etc. in the bathroom of a wooden house they are mounted on a wooden crate.
The pitch of the crate cannot be less than 50 cm and more than 60 cm.
The crate can be either only vertical or only horizontal.

The first panel is nailed to the bar according to the level, the second is inserted into the groove of the first, etc. At the end of the work, a plastic profile is put on the structure, which will protect against the penetration of water into the grooves.
Finishing the floor in a wooden bathroom
Waterproofing the floor in the bathroom of a wooden house is carried out at the stage of laying communications. The scheme is selected for each specific building. There are several working strategies, each using its own materials.
Let's take a look at a few examples of floor waterproofing that works well.
Using coating waterproofing
FORUMHOUSE member with nickname Semsey in the bathroom of his wooden floor he did waterproofing like this:
- Logs made of larch 200mm, between them to their height - a heater.
- Draft floor - board 40 mm.
- Sheet material: two layers of plywood (MDF or CSP can be used) on glue with broach screws. Seams apart.
- Two layers of coating waterproofing.
- Finished floor - tiles. Can cork, etc.
Such waterproofing is presented in the diagram (here the numbering is in reverse order and instead of tiles - OSB).