Photogun grip how to make. Interesting ideas for homemade photo equipment. Rules for using a photo gun on a photo hunt
Homemade photo guns (P. Yarovitsky)
The interest of amateur and professional photographers in working with long-focus lenses "Tair-3", "MT0500" and imported ones is growing every year. But photography is powerless without special equipment, without devices for mounting photo optics, without photo guns.
When photographing birds and animals with a photogun with long-focus optics installed, the stability and maneuverability of the camera, fast focusing, high speeds when shooting, convenience during work and transportation, easy shutter release and a single-lens reflex camera are necessary.
Over the years I have examined and tested a number of photo guns. I give a brief description of them. Are they finally worked out and fully meet their purpose? I think not yet. The essential, difficult task of quickly and conveniently focusing moving lenses so that the subject is constantly in focus and the shutter can be easily released at the right moment is not solved. Not all photo guns have a quick and convenient transition from horizontal to vertical shooting. Some models do not allow you to change the camera and lens. But existing photo guns can be photographed well, if necessary, improving their design in the future.
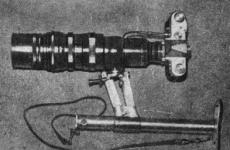
Let's analyze the device of the first photogun (photo 1). It is easy to make. Easy rotation of the camera for shooting from horizontal to vertical makes it possible to use any single-lens reflex camera and any long-focus lens, both domestic and imported, not only for narrow, but also for wide (6 X 6) film (for example, the Pentacon camera) ). The fastening of the shutter release cable is soft, light - under the index finger of the right hand. The main rod is made of a thin-walled duralumin tube. A small pressure spring is inserted into it, creating storage for spare cassettes and film rollers. The handle for attaching the photo-optical part moves along the rod (for adjustment). The carrying strap is attached to two swivels - from the end of the rod and from the side of the butt plate of the photogun.

Photogun-2 (photo 2) is designed similarly to photogun-1, but changes have been made to the main shaft. The fact is that earlier it was curved, which did not justify itself in operation, especially when shooting in winter. In the new model, the handle for mounting the photo-optical part is made of a thin-walled oval-shaped duralumin tube, which improved stability and convenience when shooting. A non-standard long-focus lens, a tube made of duralumin with an I-51 lens built into it with a focal length of 210 mm and aperture ratio of 1: 4.5, is mounted on the photo gun, it is quite suitable for a photo gun-2. The I-51 lens can replace a complete set of lenses for a SLR camera, such as the Yu-9, Yu-11, etc. If the Yu-11 at a focal length of 13.5 cm has the ability to shoot no closer than 1.5 m, then the lens The I-51, mounted in a tube and attached to a photogun, makes it possible to take a full frame (24 X 36) photograph of a butterfly sitting on a flower or make a good portrait of an animal.

Photo gun 3 (photo 3) is of the same type as photo gun 1, but it is collapsible and more convenient for transportation. The main rod consists of two halves. In the case of transportation, the photo gun is disassembled into parts and fits into a small cloth bag, where the handle, butt plate and two parts of the rod are placed, taking up very little space. The conditions for using the photo gun are the same as for model 1.

Photo gun-4 (photo 4). It is similar in general design to the photo gun shown in photo 1. Only the shoulder rest has been changed. It is fork-shaped, which gives more stability when shooting, but less portability. This model can be used with any single-lens reflex camera and any telephoto lens and shoot horizontally and vertically. The handle, on which the optical part is mounted, is articulated, which allows you to change the position of the optical axis in relation to the main rod, creating convenience when adjusting the photogun according to the photographer's design.

Photo gun-5 (photo 5) of an original, beautiful design. It allows you to use any single-lens reflex camera and any telephoto lens, shoot horizontally and vertically. The butt length is adjustable. Thanks to the wide buttstock, this photo gun has a more stable position, but is not very convenient to transport. In operation, it is similar to the photo guns described above.

The photo gun-6 (photo 6) has a stock and a handle made of wood. A fork-shaped stock with a wide end is justified and gives a stable position, but its length is not adjustable, remaining constant, transportation is inconvenient. The model makes it possible to use any narrow-film single-lens reflex cameras and telephoto lenses, shoot horizontally and vertically.

Photogun-7 (photo 7) is less convenient than the designs already shown here, since the angle of attachment of the optical part with respect to the stop in the shoulder is not very convenient when shooting. The model is made of wood. The camera and lens cannot be replaced. On the handle for mounting the optical part, a turntable is arranged like a turret, which makes it possible to shoot horizontally and vertically.

Any photogun shown in photos 1, 2, 3, 4, 5, 6, 7 can be made on your own if you wish.
The photo gun should be made of light metal, portable and convenient. The best will be one that can be used with any single lens reflex camera (narrow and wide) and any telephoto lens. It should not have shiny surfaces, it should be easy to disassemble and quickly assemble as needed. The handle with the installation of the optical part must be knurled and adjustable (move) depending on the constitution of the photographer. The main rod can consist of two parts, which makes the photo gun convenient for transportation. The shutter should be released by lightly pressing the index finger of the right hand and have a free stroke. It is not advisable to use and design various lever trigger systems that complicate manufacturing, since with any design of a photo gun, a flexible cable is sufficient, which can always be placed in a convenient place on the handle.

The back part can be made of textolite and be sure to make cuts on it to prevent slipping at the shoulder. You can buy a ready-made recoil pad from a hunting rifle in the store. The back of the head can be replaced with a small fork, but this makes the gun less portable.
Swivels for attaching a narrow belt are required, since it is more convenient to keep the photo gun on the chest when moving.

Only single-lens reflex cameras are suitable for shooting with a photo gun with a telephoto lens, preferably with a cocked shutter.
To prepare the camera for shooting with a telephoto lens, you need to unscrew the standard lens from the camera and screw in the telephoto lens in its place. (The "Start" camera has a special adapter ring.) Then the optical part and the camera are attached to the handle of the photo gun, where the trigger cable is also placed. No additional adjustments are required when using SLR cameras and telephoto lenses.

When shooting, the back of the head should be pressed to the shoulder, the elbow pressed to the chest, and the focus should be made with the left hand. Press the trigger smoothly, while holding your breath. When shooting with a telephoto lens, fast shutter speeds are required.
A distinctive feature of long-focus optics is a shallow depth of field, which is why focusing should be done more carefully, and the aperture setting, if the lighting allows, should be set so that it increases the depth of field of the object being shot.

A lens hood is required when shooting with a telephoto lens. When photographing moving objects (birds, animals) during motion shooting, the lens is set on a scale of approximately 30-40 mm and accordingly apertured, which makes it possible to correct focusing and press the shutter release button when an object appears quickly.
Shooting can be done by panning behind a moving subject as long as the shutter speed is appropriate.
Ask any hunter what is the most interesting thing for him in hunting? The process itself? Hunting trophy? Skin dressing (you can read more about how to dress the skins of dead animals using the “tube” method)? Most hunters will answer that the end result is important to them, but the process of hunting attracts them no less. And now imagine that you will hunt with ... a photo gun? It is about the latter that we want to tell you in our new publication ...
Photogun hunting
 Hunting with a photogun equipped with long-focus optics is a difficult, but quite exciting activity. Such a hunt knows no restrictions or prohibitions. Thus, the hunter throughout the year has the opportunity to follow the life of animals and birds, and record moments from their lives on information media. Such photo hunting trophies can be stored for years and are of great value.
In Soviet times, photo hunting was carried out using long-focus lenses Tair-3, MTO-500 and MTO-1000, however, the use of such lenses also involved the use of a special device - lens mounts.
At one time, specialists had the opportunity to examine and test a number of models of photo guns of various designs, and today we would like to invite you to familiarize yourself with their drawings. Who knows, you may be able to find such a photo gun in the attic and use it to save money on the purchase of modern photographic equipment.
The following device options have an advantage when shooting with a Zenith camera, and some have advantages when shooting with a Start camera. In one case, the lens structures are attached to the butt, and the camera is in a free-suspended state, while in the other case, you can observe the simultaneous mounting of both the lens and the camera. Unfortunately, not all of these photo guns have the ability to make a quick and convenient transition from shooting horizontal shots to shooting in vertical mode - this is not modern technology for you. Some also have the disadvantage of not being able to quickly focus moving subjects so that they can be constantly in focus and the shutter is released at the right moment for you.
The presence of such shortcomings at one time prompted a number of amateur photographers and professionals to begin work on improving the design of photo guns and prompted them to create their own versions of such a gun. True, such achievements remained little known, and factories for the production of long-focus optics were not interested in them. But, we suggest that you still consider their discoveries, as well as the device and rules for using a photo gun while hunting ...
Rules for using a photo gun on a photo hunt
 So,
So,
if you want to take photographs with telephoto lenses, it will be useful for you to know that of the old models, only SLR cameras are suitable for this purpose, such as Zenit, Kristall and Start, as well as others equipped with a trigger cocking. At the same time, they do not require any additional adjustment steps.
The longer the focal length of the lens that is used for shooting, the more difficult it is to shoot without a stop. Also, it is worth remembering that using a tripod while shooting animals and birds is not convenient and impossible.
The presence of a lens hood for long-focus optics is a prerequisite. At the same time, in order to achieve a stable position of the camera during shooting of moving objects and running shooting, cameras with a butt, which are called photo guns, are used.
How to use the camera and lens while hunting
 In order for you to prepare the camera for shooting, you need to unscrew the standard lens and return one of the long-focus lenses in its place - Tair-3, MTO-500, MTO-1000.
In order to turn the long-focus lens on the Start camera, you should use a special adapter ring.
For photoguns shown in Figures 1,2,3,5,6, the camera with a lens is attached to the buttstock using a special threaded hole located on the lens, and a special “lamb” that is permanently attached to the stock of the photogun. This mounting of the camera to the butt allows you to achieve a good balance of the installation and provides free access to the camera. In this case, the camera is in a free-suspended state. For some designs (in particular, for Zenith cameras), the release cable should be lengthened by making 2 standard cables that you fasten together using an adapter sleeve - see photo 2. The best cable that attaches to the front of the photo gun handle will be of course, the standard cable from the Start camera. The photo gun, which is shown in photo 4, mounts the camera with the lens at 2 points, that is, both the camera and the lens are attached. But, with this mount, there is no possibility of replacing the camera.
To shoot with a photo gun, the back of the butt of the butt should be firmly rested against the shoulder, and with your left hand grab the lens and focus. The shutter speed is set according to the shooting circumstances and the lens, and the aperture according to the required depth of field and lighting conditions. However, it is worth remembering that working with a telephoto lens when shooting will require setting additional high shutter speeds.
A distinctive feature of telephoto optics is that the depth of field of these lenses is insignificant and therefore focusing should be carried out more carefully, and the aperture setting (if the lighting allows it) should be done in such a way as to maximize the depth of field. For shooting moving objects and running shooting, the lens must be set on a scale based on the removal of the subject by approximately 30-40 meters and, accordingly, apertured in advance. This will enable the hunter to quickly take a picture in case of an unexpected appearance of the subject. Shooting can be done while panning behind a moving subject at the desired shutter speed.
One of the rather interesting devices - it is shown in Figure 2, is a special lightweight tube made on its own from aluminum or duralumin with an I-51 lens mounted in it with a large aperture and focal length and aperture of 1 to 4.5 or an I-13 lens with an even greater focal length and the same aperture. These lenses are used for pavilion cameras with a frame size of 18 by 24 centimeters and larger. They are well suited for small format SLR cameras like Zenith, Start, Kristall and can even replace a set of Yu-8, Yu-9, Yu-135 and Tair-3 lenses. Their resolution is in no way inferior to these interchangeable lenses and makes it possible to shoot from a distance of 0.5 meters and further. In other words,
you can take a full frame 24 x 36mm picture of a butterfly sitting on a flower and also capture a bird or beast well and make a good shot, regardless of the distance at which the picture is taken.
But, it should be noted that the camera type Start, in addition to focusing on frosted glass, there is also a wedge aiming, which interferes a little when photographing birds and animals in motion. We would recommend that you get rid of it.
I have an AI Nikkor 400mm F/3.5. An excellent lens in terms of optics, strong as a tank, but shooting with it hand-held is something! It weighs under three kilograms and almost all of this weight falls on the front lens block. Holding it, in principle, is not a problem, but also focusing by rotating the focus ring is not an easy task.
It was necessary to somehow unload the left hand brush a little. Of course, there are options, but there are not many of them - a good tripod and monopod. They provide excellent support for capturing everything that happens at the level of the photographer's eyes and within a small range above and below. If the object moves in a wide range of heights in the vertical plane, then the monopod is only a hindrance (one time I just had to unfasten it and throw it into the dirt nearby so as not to miss a good shot) and a tripod can save if it is high enough and equipped with a gimbal head Wimberley suspension. A good solution, but it has two significant drawbacks - unbearable weight and dimensions and the same price. Theoretically, there is another option - like Sharik from Prostokvashino, that is, a photo gun, or more precisely, a shoulder rest for a lens with a camera, but ... as it turned out, such things are practically not produced now. From the factory - only all-plastic Bushhawk 
with a rather futuristic appearance and dubious ergonomics and SharpShooter, the basis of which is very reminiscent of the Tapco T-6 adjustable rifle butt (however, this is it). 
There are also all sorts of handmade "limited editions" and some ancient stock, for example, for leik's calves and light shoulder rests, for example from Manfrotto. 


But these options were not seriously considered due to their dubious availability or unsuitability for heavy optics. I looked at the "Photosniper" for a long time, which now you can buy at no cost at all and, having thrown out the regular dull Tair with Zenith, try to attach your system there, but having estimated the difference in dimensions, I considered that the balance in the end would be unsatisfactory, plus the labor costs for revision that could be unreasonably high.
In the end, I decided to try to make the machine myself, specifically for my kit. That is, having formulated the following terms of reference for oneself: the convenience and familiarity of the grip, the same as for small arms, the lowest possible center of gravity, the usual shutter control, i.e. a button for the index finger of the right hand, fixing the lens with the camera at least in two points in order to eliminate the possibility of unintentional rotation of the lens on the screw of the tripod platform (judging by the photographs of Bushawk "and from imported forums, with lenses attached to it with a rubber band, such an option is not normally there provided), the possibility of manual focusing with the left hand, and, if possible, the minimum dimensions and weight with good strength.
A raid on the surrounding shops bore fruit in the form of a set of plastic (butt and fore-end) on the "Tiger" and a duralumin bracket for flashing from an unknown Chinese manufacturer, however, made very high quality. 
Everything was done in a couple of days (nights), and the lion's share of this time was spent thinking "how to cross a grass snake and a hedgehog as efficiently as possible", since I still had no clear idea of \u200b\u200bthe final form of the product by the time production began. but eventually something began to emerge. The bracket was disassembled and sawn, some interfering or unnecessary protrusions were cut off from the butt, and then everything was dry tried on, fitted and assembled on screws with self-locking nuts. The Chinese remote control "Pixel" served as the release button, which, by the way, is also of very high quality. It is fixed in such a way that the first phalanx of the index finger rests on the button - this is familiar and comfortable, there are no new sensations compared to the standard camera button. Certain difficulties arose with the attachment of the tripod leg of the lens. Ideally, I would like something like a Manfrotto 357 sliding adapter, but for now I had to limit myself to the standard Manfrotto 323 platform. I certainly wanted to put it on a regular 3/8 inch thread so as not to make extra "holes", but it turned out to be an inch fastener in Khabarovsk absolutely fantastic idea. The "pedlars" from the Central Market helped out, from whom I fished out a rusted, but quite working, 3/8 die for ridiculous money. With its help, the M10 bolt was "cut", which was perfectly screwed into the regular socket of the platform. For additional fixation of the camera, a bolt from the anti-aircraft cover is provided. Its mount is made sliding and to some extent movable in the vertical plane in order to eliminate bending stresses in the "camera-lens" ligament. From what has not yet been done - I want to hide the remote control wire in the hollow construction of the butt and buy a rubber butt pad on it, since the standard metal one is rather slippery.
The result is a non-flimsy machine weighing 900 grams, which almost completely fits in the back pocket of the Mini-Trekker. Easily held with one right hand. When taking photographs, the left palm rests on the front stop for extra support, while the thumb and forefinger remain free to allow easy rotation of the focus ring. In general, I coped with the task and am satisfied with the result. According to the results of trial shooting, it would be nice to get an elongated magnifying eyecup on the eyepiece, otherwise everything is very good. 


Any amateur photographer is not only a photographer, but often a craftsman who easily equips his photo lab with his own hands.
For example, it is easy to make a photo gun with your own hands from available simple materials and ready-made parts in a short time.
Such a photo gun is called "Crossbow" - for some external resemblance.
"Crossbow" is a very simple mechanism and it is very easy to make such a photogun with your own hands.
But the main thing is that all the original parts are very cheap, and the photogun itself is very easy to manufacture.
The most expensive part in it is the telescope "Tourist-4". This tube gives a 10x magnification with very good image sharpness. But this is identical to a telephoto lens with a focal length of 500 mm, as, for example, with the MTO-500 telephoto lens.
But after all, a telephoto lens costs not commensurably more, especially in modern times.
The base of the photo gun is a steel tube with a diameter of 20 mm and a length of 350 mm. Two ears are welded to it for attaching clamps - a spotting scope bed. They are also steel, made of a strip 2 mm thick.
From below, to the base, two washers for the butt hinge are welded.
A plate (steel, 2 mm thick) is welded on the right side of the base - a camera bracket. The butt itself is curved from steel wire with a diameter of 6 mm. An elastic retainer plate is welded between the butt branches. When the butt is tilted into the working position, it firmly connects it to the base.

And finally, two clamps, curved from a strip of stainless steel 1 mm thick: thanks to this configuration, they have good springiness and securely hold the telescope.
And in order not to scratch it, the collars are pasted over with suede from the inside.
Getting ready to shoot
We fold the butt into the working position We install the camera in the bracket and fix it with a tripod nut. Set the camera lens to infinity. Then close to the lens we bring the eyepiece of the telescope and "press" it into the clamps.
Focusing, through the viewfinder of a SLR camera, is carried out by rotating the thickened part of the telescope. The eyepiece of the camera is stationary at this time.
If your camera is not a reflex camera, then focusing is done "by eye".
First, before installation in a photo gun, we aim a spotting scope at the object and achieve sharpness. Having determined the distance to the object, set the distance on the lens 10 times less.
After that, we connect the "spotting scope - camera" system and shoot.
Of course, this design is not without drawbacks. But the Crossbow suits me just fine.
Here are the photos: one was just taken with a camera, and the other was taken with a Photo Gun.

Simon comments:
Photo fig. I did the same but with a digital camera, my photos turned out much better
The troll comments:
And why such tricks? Now for 60-90 tr. you can buy an awesome DSLR with a telephoto lens and shoot normally with high quality.
On such a handicraft, there will still be no electronic image stabilization.
Mosquito comments:
And what prevents the conic minolta from being put on a photo gun? There will be both quality and electronic stabilization.
Michael comments:
Doubtful not only cheapness, but also the project itself: in the 50s, Tair-3 was made, and after that the same photogun. And the FR 300 was not just considered so: it is very difficult to shoot with a longer focal length. So, already 400 mm in most cases gives a blur, and if we talk about 500 mm, then you can’t do without a tripod in 80% of cases even with good lighting ...
I solved the problem for myself like this: I bought a FS, and instead of Zenith I got Pentax. And the stabilizer works, and the lens, although simple, allows you to work at the level of expensive branded ones.
For reference: FS cost 4 tr in a complete set, and I overpaid this))
Photo hunting is a fascinating and interesting direction of photography, which involves shooting animals and birds in their natural habitat. Today, photography is becoming increasingly popular due to the development of digital photographic technology and its accessibility to the layman. Photo hunting can be an interesting hobby or even an environmentally friendly form of tourism. In any case, photography requires certain skills and special equipment.
Photo hunting features
Photohunting is similar to real hunting for animals, since here a person must also be able to find animals in the forest by following their tracks, sneak up to them as close and imperceptibly as possible in order to make a beautiful shot. Photo hunting also requires knowledge of the area, patience and the ability to behave quietly so as not to randomly frighten off the “victim”. Thus, to take truly beautiful and interesting pictures of wild animals, you need to be not only a photographer, but also have useful knowledge in the field of ornithology, biology and hunting. That is why photography is one of the most difficult areas of photography, but at the same time one of the most interesting.
FR 300mm, F6.3, ISO 800, 1/60c
Photohunting is very exciting, it is not devoid of sports passion. There are many ways to photograph wild animals in their natural habitat. You can arrange a special shelter (hut) and take pictures from there, unnoticed by animals or birds. To do this, you will have to guard your models, being in shelter for several hours or even days. Another option is approach photography, where the photographer has to quietly sneak up on his "victim" using disguise to capture some valuable shots. Shooting in menageries or zoos is also sometimes referred to as photography.
In photography, it is customary to distinguish the following types of shooting. The first is defining photography, which involves photographing the animal close-up, from the side, at the same level with it. The second type is dynamic images, which are designed to reveal the nature and behavior of a particular animal. Finally, there is also artistic photography, when the photographer pays the most attention to the background, the color parameters of the picture, so that the frame turns out to be truly beautiful. The last two types of photography, of course, are the most difficult to perform.

In the forest, the photographer is hunting, so he must remain inconspicuous. In this regard, you have to carefully approach the choice of clothing. A photohunter's wardrobe should have at least four sets of clothes of various colors - light winter clothes, clothes for the forest, meadow, sand. Especially for photo hunting, some craftsmen make camouflage suits by sewing elements of the environment into ordinary clothes - branches, leaves or grass. Such a costume helps to completely merge with the world of wildlife.
Some other photo hunting tricks are the use of various powders or special shampoos that "kill" the human smell. After all, it is important that the animal does not smell the person during the shooting. Such tools are relevant when you need to get as close to the subject as possible. The rest of the equipment is not much different from the equipment of a real hunter (knife, backpack, etc.).
As for the choice of a “victim” for shooting, there are no problems with this in our country. The fauna of Russia is very diverse in terms of photography. For example, in deciduous forests you can easily meet wild boars, badgers, squirrels, martens. In coniferous forests, you can "hunt" for bears or wolves, of course, observing certain precautions. Closer to the mountainous area, you can take pictures of bison, aurochs, roe deer and other animals. Also, our forests are very rich in species composition of birds. In a word, having left for nature, far from the achievements of human civilization, you can get a lot of interesting “trophies”.

Naturally, for high-quality shooting of animals and birds, you will need appropriate photographic equipment. Today, most hunters prefer SLR cameras equipped with a telephoto lens. The SLR should be of a sufficiently high class, otherwise it will be extremely difficult to get high-quality “trophies”.
The camera should have a protected, sealed housing (this is very important in the field), it should allow you to manually set the exposure settings and provide the ability to adjust other shooting parameters. In addition, a hunting camera should allow the use of manual focus, including the ability to focus on a specific point or area. In addition, it is desirable that the DSLR be fast enough.

Equipment for photography
A separate issue is optics. Here you need a good telephoto lens, with which you can “reach out” to cautious animals or birds, removing them from a distance or from cover. It is important that the front of the lens does not rotate when focusing - this can frighten the subject. Usually use optics with a focal length of 300 mm. Small birds are photographed with such optics close-up from a distance of three to four meters, large birds - from ten to fifteen meters. Wild animals are photographed with long-focus optics from a distance of twenty to fifty meters.

Instead of a reflex camera plus telephoto lens kit, some hunters today use advanced superzooms that have a fixed lens with high optical magnification, for example, as recently appeared on sale.

In any case, a large increase requires the use of a tripod, otherwise the image will be blurry. Modern tripods can be big or small, light or heavy. The choice of a tripod ultimately depends on the tasks facing the photographer, the characteristics of the photographic equipment and personal preferences.
photoguns
In addition to DSLRs with long-focus optics, photo hunters often use special photographic equipment - photo guns - to shoot in the wild. This is a special device that is used for handheld photography with long-focus optics. In fact, a photogun is a SLR with a telephoto lens, which is equipped with a special stock similar to the design of a conventional gun. There is a shoulder rest and a comfortable grip that stabilizes the camera for clearer and sharper shots. When shooting from a distance, the photo gun is held like a normal gun while shooting.
 "Magazine gun camera" manufactured by Sands & Hunter, UK. 1885 Source: zenitcamera.com
 For the first time, a photo gun appeared back in 1882 thanks to the French physiologist Etienne-Jules Marais, who designed the world's first portable movie camera. In film times, the feasibility of using a photogun came down to a few basic points. Thanks to a special "under-barrel" drum, quick focusing was carried out. And most importantly, the photo gun increases stability at relatively short shutter speeds. Reduced fluctuations of the telephoto lens, which is important for shooting from a distance.
Nowadays, these advantages of a photo gun are gradually leveled due to the rapid development of digital photographic equipment. In particular, modern DSLRs have already acquired a fast and accurate autofocus system. They provide the possibility of comfortable work at short shutter speeds. In addition, SLR cameras with telephoto optics have an effective stabilizer. For these reasons, the leading manufacturers of photographic equipment today do not produce photoguns, focusing on the production of superzooms, DSLRs and telephoto optics, which can be successfully used in photo hunting.
However, when shooting from an approach, when the photographer quietly sneaks up to his “victim” and shoots from a certain distance without a tripod, a photo gun can really come in handy. In addition, outwardly resembling a real gun, it allows you to feel additional hunting excitement. It should be noted that, oddly enough, domestic photo hunting enthusiasts were somewhat more fortunate than their Western counterparts. After all, only in our country for a sufficiently long period were produced excellent guns "Zenith. Photo sniper. This is a camera with a telephoto lens and a built-in ergonomic stock. "Photo snipers" have a strap, so you can comfortably carry them through the forest, throwing them over your shoulder.
 wikipedia
 It is interesting that the "Photosniper" guns were produced by the Krasnogorsk plant initially for military use - for the purpose of photographic reconnaissance. But in some incomprehensible way, they eventually became available for mass use. Photoguns "Photosniper" - one of those products that have been successfully sold abroad. The most popular model FS-12 was placed in a suitcase weighing about five kilograms. This model included a Zenit film camera with a special design and a powerful Tair-3S lens with a focal length of 300 mm.
It is very easy to use such a device: you tune with your left hand, and press the trigger with your right hand. Thanks to the butt and the trigger, you can feel like a real hunter. Moreover, if you disconnect the body of the Zenit camera from the butt and screw the Helios-44M-4 optics, which is also included in the equipment kit, to it, you can get a regular camera for everyday shooting.
Currently, you can only buy a "Photosniper" with your hands, and for quite a lot of money. In fact, there are not so many people who want to sell such a heavy, but at the same time very convenient and versatile equipment for photography. Today, many craftsmen, both in our country and abroad, make such photo guns on their own, but still it is impossible to get the same convenient and thoughtful design.
In Western countries, photo guns were not so widespread, they were produced by various companies, mainly in limited editions. For example, the German Leica was engaged in the release of photo guns. In particular, the Leica Telephoto Assembly RIFLE shotgun was released in a limited series on the eve of the 1936 Olympic Games. It was this gun that the notorious writer Ernest Hemingway acquired. The Leica gun was equipped with a 50mm lens with f/2 aperture.
Modern digital cameras, unfortunately, are not produced in the design of a photo gun for the mass user. There are only independent developments from avid photo hunters that can be bought online. Such a technique is on par with a good double-barreled shotgun, but for true connoisseurs of photo hunting, such costs are not significant. After all, having got your hands on a photo gun, you can feel like a real hunter.