How to make and install wooden fence posts? How to install (place) a wooden fence post
Wooden fence posts are not as strong and reliable as metal ones. Therefore, you will have to spend some time and some money on acquiring durable wood and creating a well-draining base for each post so that your beautiful fence does not rot in a few years. Packed earth over a crushed stone pad is usually sufficient to secure most posts, but for soft ground, concreting may also be considered.
Steps
Installing a post in soil or gravel
- Due to the increased load experienced by gate posts, it is better to concrete them.
-
Choose durable wood for the posts. Follow local guidelines for wood selection whenever possible, as selection will be influenced by climate and the availability of specific materials. Unless you live in a desert area, it would be wise to pay attention to durable wood, which can be of two types (they are discussed below).
Protect the wood from moisture (optional). Sawn ends of wood are most affected by moisture. If you live in a humid climate, consider the suggestions below.
Drill holes for the posts. As a general rule, a 2.4 m long fence post must be sunk 0.6 m into the ground. If you plan to install the post directly into the soil, then the hole for it should match its thickness as closely as possible. If you plan to sprinkle rubble on the post, the hole should be somewhat wider (for example, 20 cm in diameter for a beam with a section of 10 cm x 10 cm).
- Use a drill bit to create a straight vertical hole in the soil. If the soil is very hard, first remove the sod layer with a shovel and / or soak the earth with water.
- Leave some dug-out soil (or soil mixed with rubble) nearby to fill in the free space around the post.
-
Pour gravel into the bottom of the holes. A layer of fine gravel a few centimeters thick will improve soil drainage. Qualitatively tamp the rubble. This step is especially important if the soil itself is poorly drained.
- As a tamping tool, you can use a wooden stick, a cutting from broken garden tools, or an unnecessary piece of wood.
-
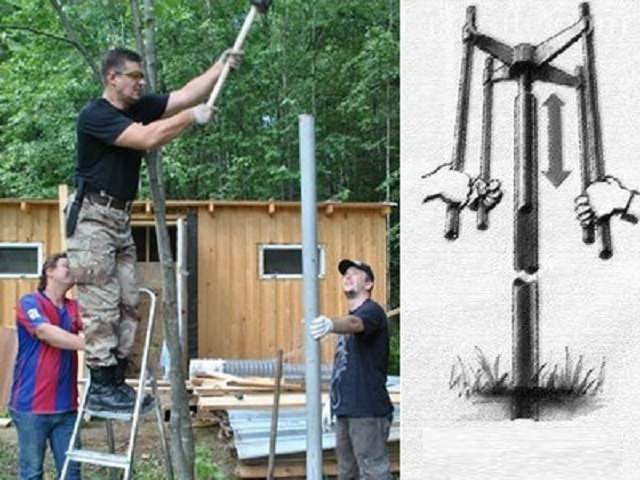
Install the post in the hole. Center the post in the hole, align it vertically, and make sure it lines up with the other posts. It will be helpful to have someone help you to hold the post in place for you while you install it. However, if you plan to do the work alone, prepare a pair of boards that are 2.5 cm x 10 cm and about 1.2 m long or more. When inserting the posts into the holes, to fix them vertically, use the above boards to support the posts on both sides, temporarily securing them with self-tapping screws.
- Don't forget to accurately align the distance between all the posts, so that the upper and lower crossbars fit well into it later.
-
Fill in the space around the post with compacted soil or crushed stone. Crushed stone will provide better moisture drainage than soil, as well as greater post stability (provided it is well compacted in dense soil). Regardless of whether you are using soil or crushed stone, consistently pour the material in layers of 7-12 cm and compact each layer well. Continue working until you have completely filled in the empty space around the post.
- Before compacting the next layer, apply a level to the post and adjust its position to vertical.
- If you plan to seed the area around the post with grass, cover the last few centimeters of the hole with soil, not rubble.
-
Finish off by creating a small slide around the post. pour a small “mound” of soil at the base of the post with a gentle slope in all directions. It is in the place where the wooden pole sticks out of the ground that rot most often forms. Good moisture drainage is essential here.
Concreting a wooden pole
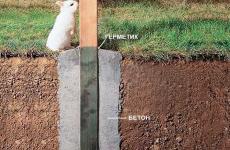
If the stability of the pillars is especially important to you, concrete them. Concreting may become necessary when placing posts in sand or very soft or often sagging soil. It is also wise to always concrete the gate posts to give them more stability. The main disadvantage of concreting wooden poles is that water can stagnate between the concrete and the wood. Because of this, the life of the poles can be impressively reduced. The concreting method shown here avoids this problem by using a crushed stone pad at the base of the post and encircling concreting without forming a concrete bottom.
Prepare the poles. All poles must be made of durable wood suitable for service in contact with the ground. For more information on choosing and preparing posts, see the previous section of the article.
Dig a wide post hole. Concreting a 10cm x 10cm pole would require a hole about 30cm in diameter. Prepare to bury the poles about ⅓ of the length plus allow for a few extra inches to create a cushion of rubble at the base. A large hand drill or power drill will make this job much easier.
- Be aware that using a power auger on stony ground can be dangerous. In this case, it may be necessary to use a special auger drill for rocky soil and long crowbars to split large stones.
- The hole should have the same width throughout its height, and not be tapered.
-
Pour a few centimeters of rubble into the base to create a pillow. A crushed stone pillow will improve drainage. Pour 10–15 cm of crushed stone into the bottom of the pit and tamp evenly.
Fix the post in the hole. Place the post in the center of the hole and level it vertically with a level. Hold the post and lower two stakes into the hole from two adjacent sides of the post. To secure the post, nail or self-tapping screws between the post and the stakes to secure the unneeded scraps of wood. Do not dig nails and screws too deep, so that it will be easier for you to remove them later.
Repeat the above steps for all pillars. Prepare pits for all the posts and fix the posts themselves in them so that you can start concreting them. Stretch the twine between the outermost posts to check that all the posts are even.
Add some more gravel to the holes. An additional layer of compacted rubble will further improve drainage.
Mix concrete. Wear safety goggles and waterproof gloves. Pour a full bag of cement (or as much as you can handle) into the mixer with the amount of sand and gravel indicated on the package and add about 90% of the recommended amount of water. Stir the mortar for a few minutes, and then check its consistency, then start slowly adding water until the concrete becomes pasty.
Fill the posts with concrete. Use a shovel to pour concrete into the hole around the post to the level of the soil. Work quickly to use the concrete to the last drop before it has set. Be careful not to soil the top of the posts with concrete during work.
Form concrete mounds at the base of the pillars. With a trowel, form mounds of concrete at the base of the pillars. Level the concrete so that it forms a gentle slope in all directions from the post. Try to make sure that the slope goes from about 1.5 cm above the ground to 1.5 cm below ground level. This will ensure that the water drains away from the post, preventing puddles from forming under it that promote decay.
Use this method for dense soil types. The post can be driven directly into the ground if it is sufficiently dense and there is good drainage. This installation of posts is a little more labor intensive and not as reliable as the option with concreting, but at the same time it will cost you less and, most likely, will be more resistant to decay.
There is no more traditional material for building a fence than a wooden beam. And even today, in the time of new building materials and construction methods, every third fence is built on wooden poles and slats. There are many reasons for such popularity, first of all, a very attractive appearance and relatively easy to process and install material. Wooden fence posts allow you to reduce the time of erecting a fence and at the same time make it much cheaper, which is important for owners of summer cottages and suburban areas.
Advantages and disadvantages of a fence on wooden poles
In a series of building materials, wood stands apart, is in a privileged position:
- The use of special mastics and protective impregnations allows you to show a beautiful texture of wood;
- Wooden posts, with the right choice of the cross section of the supports and the installation performed, are able to provide high strength of the fence at a relatively low cost;
- Wooden poles are easily assembled with metal, corrugated board, wooden lath and any other material for facing the fence.
Wooden poles, unlike concrete or steel poles, are quite capable of being installed by hand, while the light weight and good machinability of the tree make it possible to manufacture and process the poles almost at home.
Important! Racks made of wood are extremely sensitive to excess moisture and putrefactive microflora, therefore, how long the pillars will stand in the ground depends on the quality of the processing of the material.
There are a lot of ways to process the material, but not all recipes give a stable and lasting effect, so the method of applying a protective coating must be selected in accordance with the composition of the soil and the type of wood.
How to protect wooden fence posts from rotting
The durability of a wooden support depends primarily on the type of wood. The wood of larch, oak, walnut is considered the most resistant to rotting. Pine, spruce, and fir withstand the putrefactive environment worse. Poplar, birch, aspen are considered unsuitable for use as poles. Experts recommend, before installing the pillars, to provide protection against the development of putrefactive microflora by the following means:
- Impregnation in two or three doses with antiseptics based on organic solvents;
- Treatment with salts of iron, copper, chromium, nickel, lead, creosote;
- Coating with protective waterproof compounds, for example, epoxy or pentaphthalic varnishes.
Advice! Processing is carried out, as a rule, in several steps, with drying of each layer. To install wooden poles in the most aggressive peaty soils, the bottom of the pole can be wrapped in sealed plastic bags.
All kinds of drying oils, organic oils, impregnation with used engine oil, kerosene, diesel fuel are considered ineffective for protection.
Installation of wooden fence posts
Any construction of wooden fences begins with the installation of supporting elements. For fencing up to 2 meters high, a square or round beam with a maximum transverse dimension of 90-100 mm is used. Higher fences of 2.5-3.0 m must be installed with concreting of the base, the cross section of supporting elements for blind fences should be proportionally increased by 25-30%.
To fence a summer house or a country house, the following pole installation schemes are most often used:
- Concreting in a well drilled with an auger drill to the installation depth;
- Fixing wooden poles by backfilling the well with crushed stone, rubble, broken bricks, gravel screenings;
- Hammering a wooden support into the ground. Such schemes are often used as temporary, with subsequent replacement with metal or concrete supports;
- By installing a wooden beam inside a steel cup or a piece of pipe hammered into the ground.
For your information! The small specific gravity of wood makes it relatively easy to install wooden poles even alone, it is much more difficult to solve the question of how to align the supports in one plane without resorting to the help of neighbors.
We install wooden poles for the fence in concrete with our own hands
If you have to install wooden supports with your own hands, without assistants, then the easiest way would be concreting or backfilling with rubble stone. This method makes it easy to align the posts with a marking cord and a pair of building levels.
According to the marked contour of the fence, it will be necessary to drill the required number of wells, with a diameter of 10-15 cm more than the maximum size in the cross section of the support. The easiest way is to use a garden auger drill with a diameter of 15-20 cm. Before drilling, a steel or paper non-stretching rope or twine is pulled, pegs 20-25 cm high are hammered. After drilling, the bottom of the well is covered with fine gravel screenings, the layer thickness is 5-7 cm. The screenings must be well tamped and leveled to get a flat bottom. Next, install the corner or extreme fence posts.

Before concreting the well, the extreme supports must be carefully aligned, since all the other pillars of the wooden fence will have to be placed along them. To align the position of the support, three main parameters are used:
- The distance from the marking cord to the head of the pole, so that there are no errors in height, the stretched thread must be leveled horizontally using the building level;
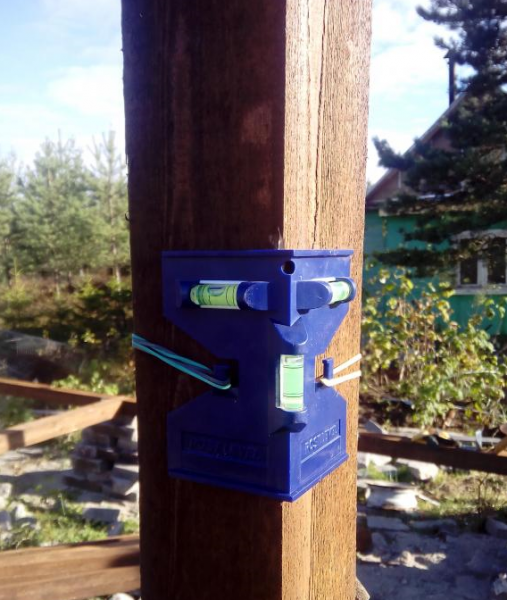
- Indications of two building levels in mutually perpendicular planes.
If possible, it is better to use the device shown in the photo. In its absence, you can take two building levels and fix them on the planes of a square bar with an elastic band. After leveling the pillars, the position is fixed with wooden spacers or pieces of building material. Concrete is poured into the well in small portions so that the mass does not hit the wooden beam of the support.
In the same way, leveling is performed when using a layer of gravel or rubble material instead of concrete. The fixing mass is poured and rammed in small portions, 5-6 kg each.
How to hammer and level a wooden post
For low wooden fences, it is easier to hammer the supports into the ground than to fool around with drilling and concreting. When using oak beams, you only need to sharpen the lower end with a symmetrical bevel, and you can hammer. In order not to break or split the top of the support, it is necessary to strengthen a board made of soft wood, linden or poplar on the head.
As the timber is hammered and settled, the position of the support must be periodically monitored using the building level. As long as the fence post is not buried in the ground by more than a third, the slope can be corrected by simply knocking out the side surface, at the end the soil around the post is rammed with sledgehammer blows.
Larch wooden poles cannot be hammered directly like oak poles due to the wood's high tendency to chip. In this case, a steel pipe or scrap is pre-hammered into the ground, and thus a thin guide hole is obtained, after which it is possible to install and hammer a larch fence post.
Conclusion
For heavy and dense loamy soils, before drilling or driving wooden supports, the soil has to be artificially “soaked”. In this case, a hole is punched to a depth of 30-40 cm and periodically filled with water. After about a day, you can drill a well with your hands or hammer wooden bars in the order described above.
Question. Hello! A neighbor at the dacha put up a wooden fence and poured concrete round wooden poles. Tell me, is it possible to pour wooden poles with concrete?
Answer. Good afternoon Fence posts are poured with concrete so that they do not squint from the time and load of the fence canvas. Therefore, wooden poles are not just “possible”, but “needed” to be poured with concrete mixture. The only question is the preparation of such pillars for contact with concrete. We give below the technology for installing wooden poles for a fence "on concrete".
The best types of wood for posts are oak or larch. Oak and larch, even in their raw form, are highly resistant to decay. However, for reliability, the part of the column located in concrete should be treated with two layers of BT 577 bituminous varnish or two layers of MBI bituminous mastic.
The length of the part of the column buried in the pit is taken to be approximately 30% of its total length. At the same time, the surface should be covered with mastic or varnish in the format of 30% of the total length plus 5-8 centimeters to ensure reliable protection against splashes of rain and snow.
With a high standing of groundwater, the column is buried below the depth of freezing of the soil in a given area, and drainage is poured into the bottom of the hole - fine gravel with a layer of 20 cm.
It is best to drill with a hand-held garden drill with a nozzle with a diameter of 200-250 mm. A garden drill can be purchased at a store or an online garden supply store. The need for this tool in a private house constantly arises, so it should be in the arsenal of every private household.
So, wooden poles and holes in the ground are prepared, you can either buy ready-made concrete or proceed to self-preparation of concrete mortar. You will need the following materials and tools:
- Portland cement CEM I 32.5N PC (old marking M400);
- sand;
- small gravel or construction debris (broken brick, broken tile, etc.);
- halves of red brick (battle);
- water;
- building level;
- putty knife;
- bucket;
- shovel;
- steel trough or sheet of iron;
- a piece of reinforcement with a diameter of 12-20 mm, a length of 1.5 meters (rammer).
In a trough or on a sheet of iron, concrete components are mixed in the following proportions: 3 buckets of crushed stone, 3 buckets of sand, 1 bucket of Portland cement and about 0.5 buckets of water. Everything is thoroughly mixed until a homogeneous creamy mass. More water can be added if necessary.
The post is placed in the hole, set vertically in level and fixed with brick halves driven between the post and the ground. Further, the volume of the hole between the post and the ground is filled with concrete and "bayoneted" with a piece of reinforcement.
Important point! The column is poured 3-5 centimeters above the ground level. The part of the fill protruding above the ground is smoothed with a spatula “from the post to the surface of the soil”, ironed and covered with polyethylene for 2-3 days.
A reliable and durable fence needs high-quality supporting elements. For this reason, summer residents should familiarize themselves with how to dig fence posts from various materials. Proper installation of load-bearing structures will increase the strength of the fencing element, emphasize its style and shape. Considering how to properly perform the work, keep in mind: the support frame installed according to the technological sequence will increase the life of the fence.
When is concreting contraindicated?
Pouring concrete pillars is a simple and reliable way to install them. But there are a number of factors under which there are indications in the driving or butting of the support. Experts highlight the following points:
- possessions are located on heaving soils that sag in the spring;
- high rainfall in winter. Melting snow leads to the destruction of the concrete base;
- hard soils justify clogging - a quick way, convenient for arranging temporary hedges;
- lightweight fence products. Concreting is successful for strengthening massive structures made of brick, concrete or solid sheet metal.
Carrying out work on the construction of a fence on problematic soil involves digging in, driving or butting a support. By selecting elements from various materials, you can reduce the load on the ground.
Types of materials for poles, their advantages and disadvantages
When choosing building materials for supporting elements, consider the strength, load-bearing capacity of the main web, and wind resistance. Manufacturers offer several types of elements for the construction of the fence:
wooden supports
Eco-friendly wooden poles are ideal for building lightweight structures - delimiting garden areas or temporary fences. Before installation, the wood is treated with special impregnations that prevent rotting and destruction. The maximum service life of lumber poles is 20 years. 
Asbestos-cement pipes
Putting a fence structure on such supports is a reasonable decision. The material is distinguished by an affordable price, high performance. Asbestos cement products:
- do not rot;
- do not deform over time;
- are easy to maintain.
The supporting elements have only one drawback - fragility. Asbestos sheet requires extra care during transportation and installation. The second nuance that needs to be considered is hollowness. To prevent splits, do not install posts in sub-zero or wet weather. 
metal pipes
The optimal combination of quality and cost. A country fence made of metal picket fence, profiler, chain-link mesh, plastic or euro picket fence is securely placed on metal structures. Iron supports have a number of advantages:
- strength, resistance to wind and mechanical stress;
- high bearing capacity, thanks to which it is possible to install a fence made of solid metal sheets or asbestos-cement slate;
- long period of operation - up to several decades;
- the possibility of repeated use of the pipe;
- fast installation and processing by special means;
- increased weather resistance.
A dug-in or concreted element is connected to the fence sections using bolts, clamps, and welding. 
Concrete supports
The large weight of the supporting elements implies reliable installation - the presence of a foundation. The frame of concrete pillars has advantageous advantages:
- strength. M300-M500 brand cement is more reliable than wood;
- long operational resource;
- the possibility of decorating with stone, textured plaster;
- ease of self-assembly.
The pillars have a significant mass, so it is better to strengthen them with a foundation. Owners who are counting on the installation of supporting pillars for a country fence without the need for concreting need to pay attention to other options. 
Elements built from bricks
Pillars of brick form not only a stable base for the fence, but also serve as a decorative element. The construction of brick pillars with your own hands is a very laborious and costly process.
Each support has advantages and disadvantages. The main thing is that the material for the frame ensures the stability of the structure. The choice of specific material depends on the budget of the builder. 
Where to start work?
The formation of supporting elements for the fence is carried out in several stages. A rational step would be to draw up a schematic work plan.
Preparatory activities
Construction tasks include the solution of the following issues:
- design;
- determining the location, marking and cleaning the area;
- preparation of tools;
- choice of raw materials for support;
- development of design and binding of the fence to the landscape of the site.
Compliance with a step-by-step list will save you from unnecessary spending on building materials, and minimize time costs. 
List of materials
Before installing fence posts, you should prepare construction tools, the list of which consists of:
- borax;
- scrap;
- level;
- hydraulic level;
- roulettes;
- shovels;
- twine;
- crushed stone;
- water;
- sand;
- raw materials for supporting elements.
The use of the above tools does not require special skills and knowledge in carrying out construction work.
Fence layout
The fencing installation technology begins with the sequence of the following works:
- Clear the soil of vegetation, debris, roots.
- Make a marking of the territory.
- Calculate the number of supports for the frame.
The correct ratio of supporting structures to the mass of the fence increases the service life and reliability of the building.
The algorithm for marking the fence:
- We mount the supporting elements along the perimeter of the future frame within a radius of 2 - 3 meters from each other.
- To evenly distribute the load, we put pillars of a larger cross-sectional diameter at the corners of the fence.
- We give the structure the correct shape with the help of twine, which passes through all corners.
How deep the post needs to be buried depends on the condition of the soil: if it is a dry and loose trench goes underground at a distance of 1-1.2 meters, if it is wet, it requires additional meters. 
Pole mounting options
Backfilling pillars - how to do it right
With the help of a drill, we make recesses in the places where the pegs are fixed. To drain groundwater, you need a substrate of crushed stone and sand.
Installing pillars by backfilling requires the following steps:
- We mount a support in each hole, strengthening with wedges of wood.
- The level measures the deviation from the vertical line.
- We make a wrap. We fall asleep in layers of crushed stone, each time moistening and carefully tamping the building material. Make sure that the dug-in post is in a perpendicular position.
- The last layer is made of sand.
- Gradually fill the trenches with concrete mortar, making small holes to avoid relief and swelling of the surface.
- To protect the frame from seasonal phenomena, we use metal plugs in the upper part of the supports.
It is necessary to install structures without pouring concrete if light building material is used for future fencing, which does not exert a large load on the supporting parts. 
Driving method - step by step implementation
It is required to hammer pillars of metal piles. Iron, of course, is easier to bury, but clogging is a more reliable option. We do the event like this:
- We drill several trenches in the ground, smaller than the diameter of the support.
- We control the immersion depth of the drill, diverting about 60% of the pipe to it.
- We measure the perpendicularity of the rod.
- Climbing up the ladder, we hammer the post with a sledgehammer.
To simplify the work, you can rent a mobile device for driving iron piles, which operates on the principle of a compressor. 
The subtleties of installing poles for different materials
For a support made of a specific material, a specific butting algorithm is provided. Mistakes in dismantling the base can lead to deformation of the entire fence.
Installation of wooden fence posts
Natural building material is easy to process. Minus wood - low resistance to insects and atmospheric phenomena. Lumber structures are not durable, therefore they are justified for a frame made of light load-bearing elements.
Installation of wooden beams does not require much effort:
- For a pole 2 meters high, we make a trench. We deepen it into the soil by 0.5 m, taking into account that the part to be buried should be 1/3 of the entire length of the log.
- The diameter of the recess is the section of the column multiplied by two.
- We cover the bottom of the pit with gravel. In case of leakage of groundwater, it is advisable to use expanded clay.
- Level adjust the vertical position of the support, and fall asleep with rubble.
Metal sleeves, which serve as the basis for mounting the lumber support, will help to give stability to the pillars. 
Installation of metal poles
The metal support does not deform under the weight of a heavy structure. Its arrangement has several nuances:
- it is necessary to bury the pillars to a depth of at least 1.5 meters, and during installation, use concreting and driving into the soil.
- before installation, the metal bases are coated with a primer to prevent corrosion.
- concreting is carried out on level ground with high water permeability.
- for tight fixation to the ground, the post must be placed in a trench of a smaller section than the base of the support.
- the rod is hammered with a sledgehammer.

To prevent the accumulation of groundwater in the body of the pipe, metal caps or covers are used.
You can design a reliable fence with your own hands. To achieve the strength of the fence canvas, take care to install reliable posts for the country fence without the use of concreting.
Despite the constant emergence of new modern materials on the construction market, natural wood has not lost its privileged position. Due to its presentability, ease of finishing and installation, it is most often used for the construction of fences. Wooden fence posts reduce the cost of the barrier structure, reduce the time for its construction.
The use of wood racks provides the fence with:
- beautiful appearance. This natural material has a unique texture that can be further developed with the help of special impregnations;
- high strength at low cost. Having selected wooden supports of a suitable section, correctly installing them, you can strengthen the fence structure, make it resistant to strong gusts of wind, mechanical damage. At the same time, the cost of the material will be lower than that of metal, stone or brick;
- ease of installation. Pillars made of wood are light, easy to process, they can easily be installed with your own hands, without having carpentry skills;
- the possibility of combining with other raw materials, building materials. For the construction of a fence on such racks, it is possible to use not only sections from boards, but also from metal, profiled sheet;
- environmental friendliness.
Please note: a wooden post is sensitive to moisture, which provokes its decay. You can avoid this and extend the life of the support by treating it with a protective compound before installation.
Choice of wood
The strength and service life of wooden supports depends on the type of material. The wood of oak, pine, larch, walnut has the best characteristics. Bars from them are not only durable, but also resistant to moisture.
Tip: do not use aspen, poplar, birch racks for fencing - they are prone to rapid decay.
When choosing posts for a wooden fence, you should give preference to dried planed beams. The moisture content of raw materials should not exceed 15%. If the material is dried incorrectly, it will turn out twisted.
If there is wood with bark, it must be thoroughly cleaned and treated with an insect repellent. This will get rid of bark beetles and other pests that can ruin the product.
Lumber should be inspected for knots. If there are a lot of them, the strength of the timber is significantly reduced, it becomes unable to withstand the load. Also, there should be no delaminations and moldy areas on the wood. Such material is not suitable for supports.
Installation
Due to the lightness, ease of processing of raw materials, the installation can be carried out by 1-2 people without special training in a short time. For supports of low fences (up to 2 m), square / round bars with a cross section of 90-100 mm are used. Fences over 2 m are fixed with racks concreted in the ground. When erecting a blind fence, racks are used, the cross section of which is 20-30% larger than the standard one.
There are several ways to install a wooden pole:
- manually driven into the ground. This is a temporary measure when it is planned to replace the racks with brick or metal ones;
- installation in a pipe segment hammered into the ground;
- backfilling with stone (gravel, crushed stone, rubble);
- borehole concreting method.
Tip: with self-assembly, the easiest and most reliable way would be to fill them with stone or concreting. So the racks are easier to align, using only a cord stretched over the top and a building level.
Injection
If there is no experience, you can buy ready-made supports and install them yourself. After processing the ends, they are buried in the ground, well rammed. As you deepen, the verticality of the beam is checked with a level. With a slight inclination, the position of the rack is corrected by hammer blows on its side.
Attention: larch poles do not hammer directly like oak, as this type of wood is prone to splitting. They are installed in the ground, deepening the pipe there in advance. The resulting pilot hole will simplify the driving of racks from this type of wood.
After 5 years, a check should be made to detect fungus or rot. If you use high-quality impregnation, then the racks will remain intact.
Pipe installation
For installation, you will need a metal cylinder, mostly steel. An analogue can be a segment of an asbestos-cement pipe.
Attention: the workpiece must be of such a diameter that the beam fits snugly into it. If the pipe is wide, the post will wobble.
How to install the rack in this way? The lower part of the support (30 cm) is cut down so that its end fits into the pipe. Then it is covered with drying oil, leaving for several days to absorb it. After that, the end of the column is treated with hot tar, pressing it into the pipe section. All gaps are filled with the same material. After that, the support should be dug into the ground so that the top of the pipe rises slightly above the ground (by 5 cm).
Backfilling with stone
A recess is made in the ground with a drill with a depth of more than 1 m. The width of the pit should exceed the diameter of the column by 2 times. Its bottom is covered with gravel. Then a support is inserted, after which all side gaps are filled with stone, tightly ramming it.
Note: before installing wood poles in heavy loamy soil, the soil should be pre-soaked. To do this, a hole is made in it with a depth of 30-40 cm, which is periodically filled with water throughout the day. The next day, you can begin to install the bars.
concreting
The installation of wooden poles in this way is similar to the procedure for filling them with stone. The difference is that after the support is installed, it is fixed with wooden struts, and then the gaps are covered with small portions of gravel, pouring them with a concrete mixture.
The construction of a fence with wooden poles is a simple and affordable option for a fence for a site. If you choose the right raw materials, follow the installation technology, such supports will last a long time.